At Constructech Consulting, we help businesses set up and maximize their career path strategies. Here’s how a well-defined career path benefits your team:
1. Boost Employee Engagement
Employees are more motivated and invested when they can visualize their future within the company. Career paths help create a sense of purpose and direction, which increases retention and job satisfaction.
2. Enhance Skills Alignment
With career paths in place, employees know exactly what skills and training are required for their next steps. This ensures a steady, focused development plan tailored to both individual and organizational needs.
3. Streamline Growth Opportunities
Career paths make it easy to identify promotion opportunities and prepare employees to step into leadership roles, fostering a culture of growth and internal mobility.
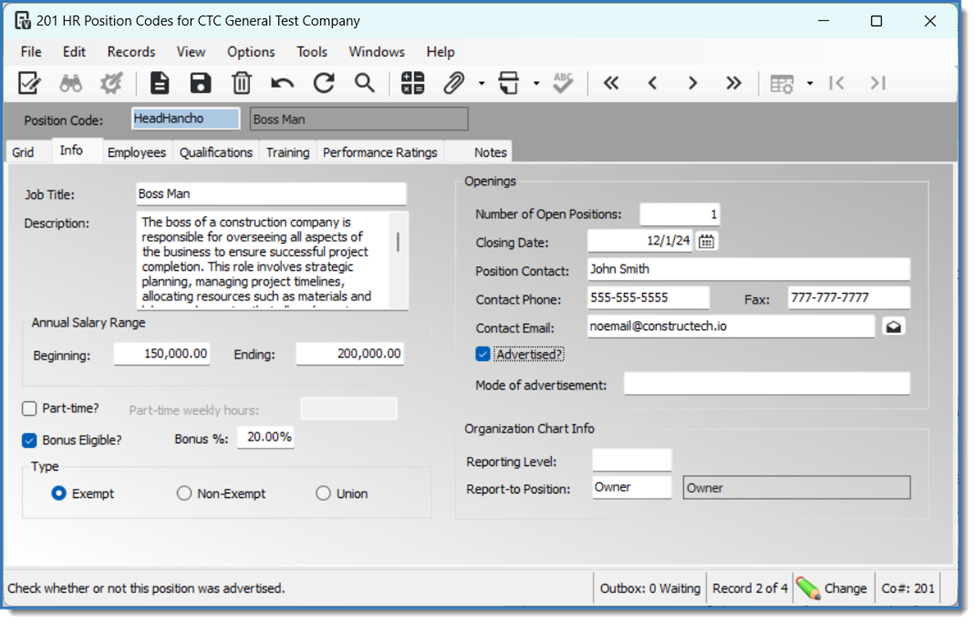
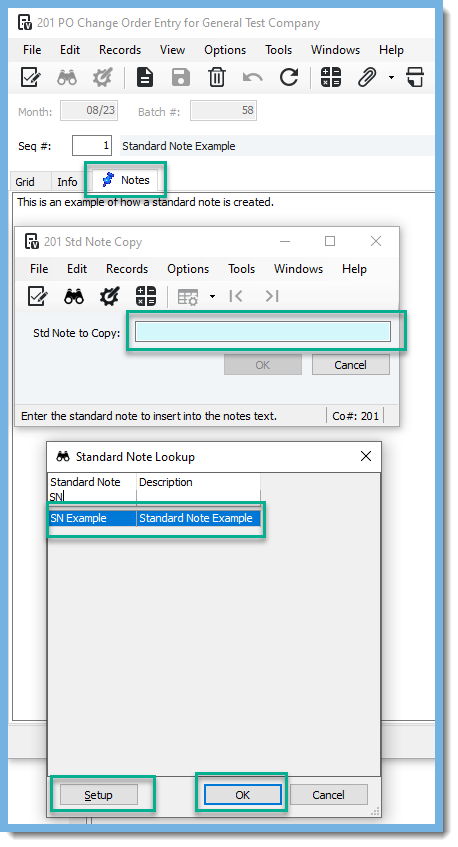
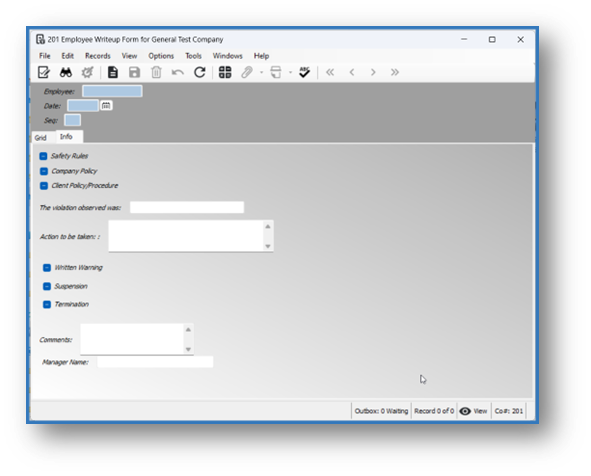
How It Works
With our integrated tools, setting up career paths is simple and effective. Using your HR Position Codes in Vista, you can define roles and their required training, as shown below:
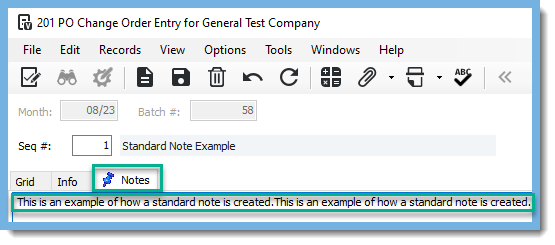
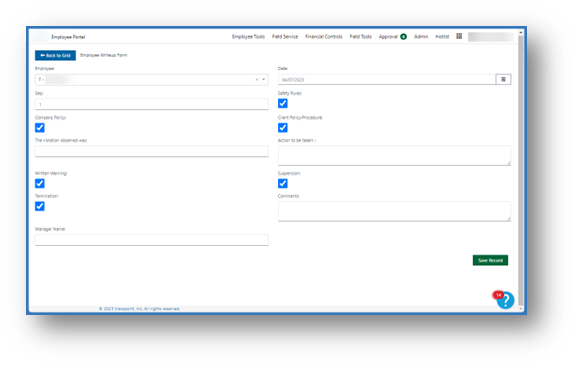
 Once position codes are set, employees can access the Career Path feature in their Employee Portal. This intuitive tool allows them to explore their potential growth opportunities and see the exact skills and training required to reach their next position:
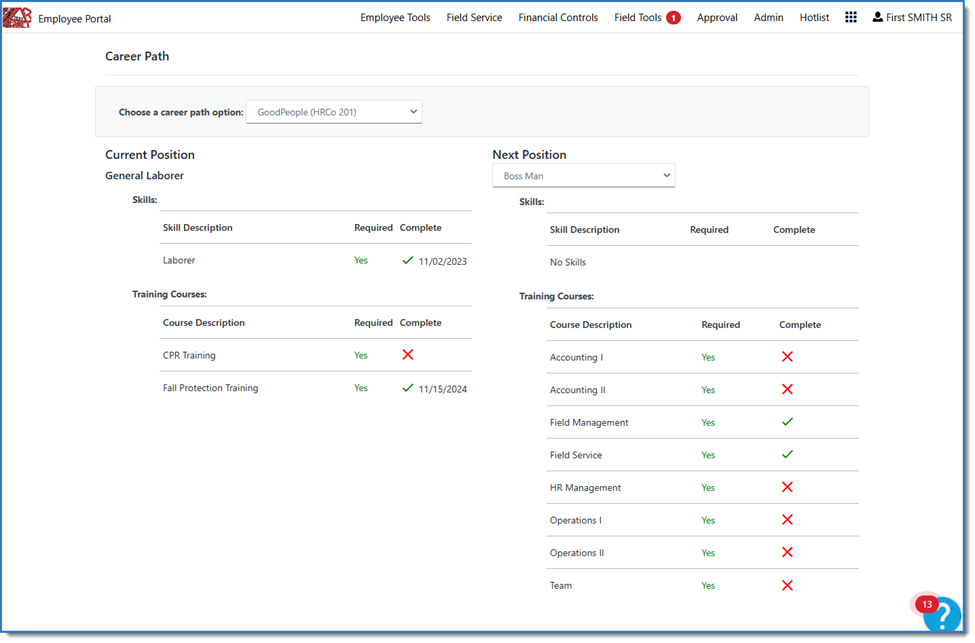 Through this seamless process, employees feel empowered to take charge of their development while managers gain valuable insights into workforce planning.
Ready to chart a clearer path for your team? Let us help! Contact us at Constructech Consulting to learn how we can bring this powerful solution to your organization. Your team’s growth starts here!
]]>
 Make sure to tune in every Tuesday for various tips on how to use the software you use everyday. We are always here to help as well if you are looking for impactful ways to study or visualize your data to aid in making smart business decisions. Visit our website and book a call.
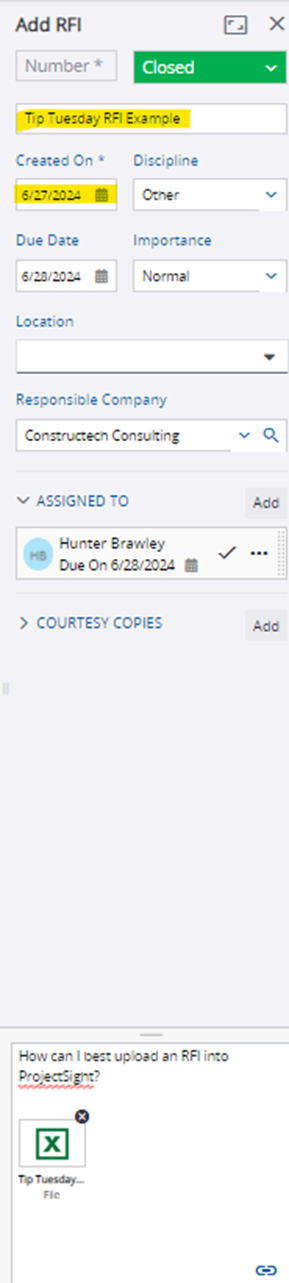
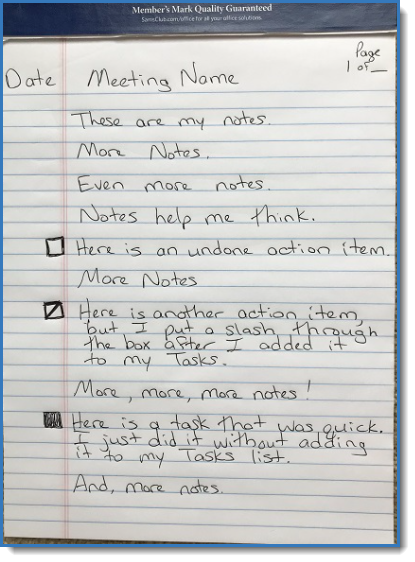
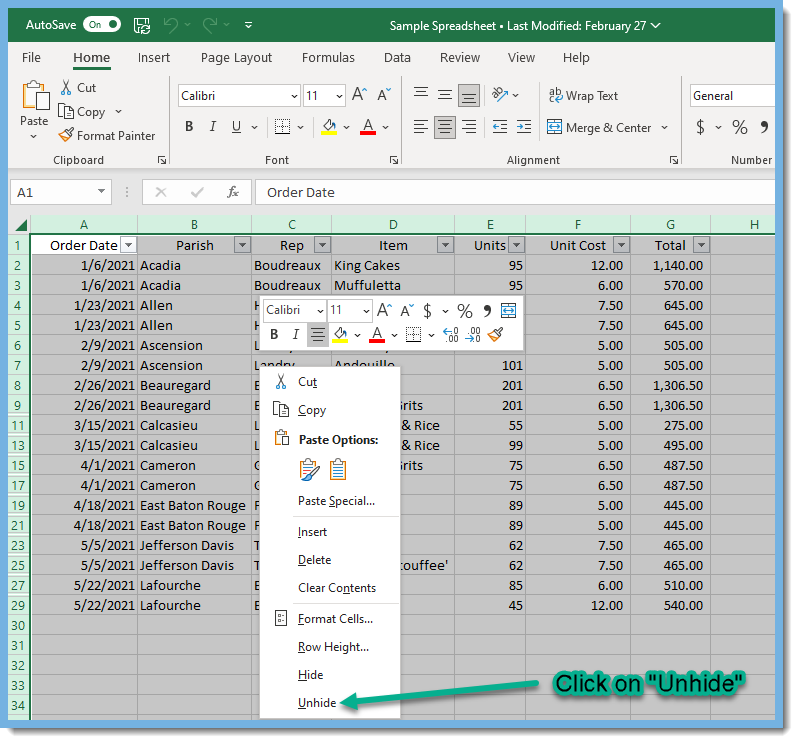
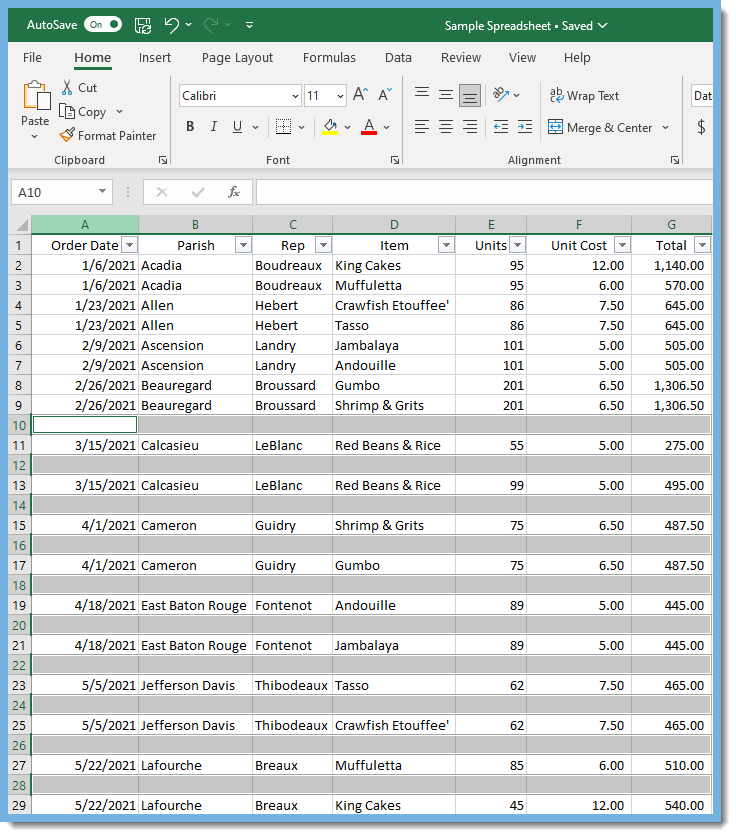
 First, click into your Action Items module in ProjectSight. If you have not yet created an action item, this screen will be blank.
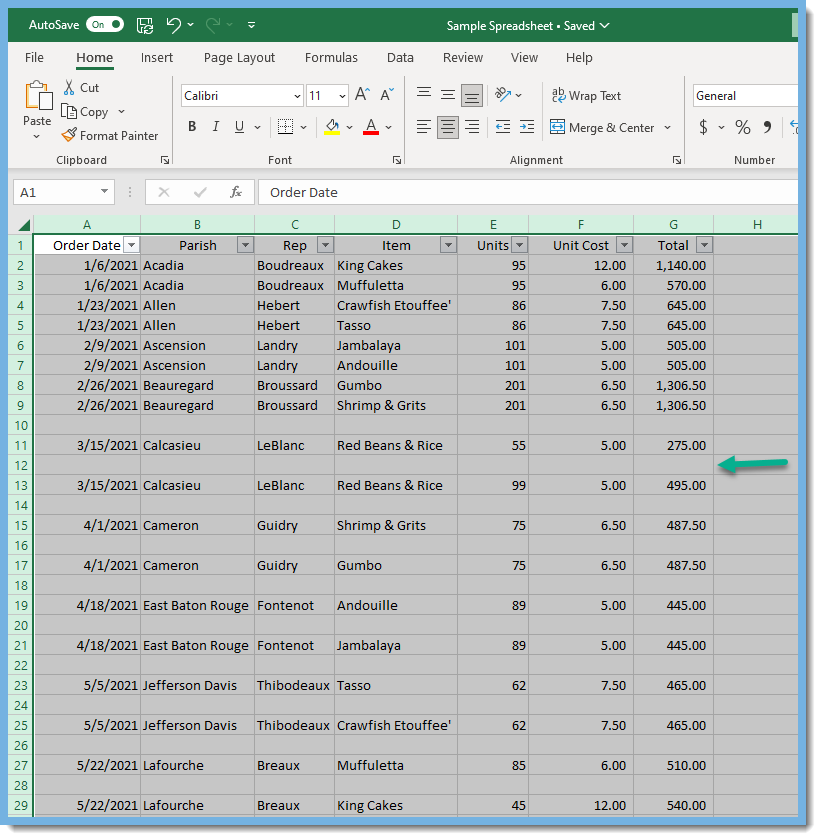
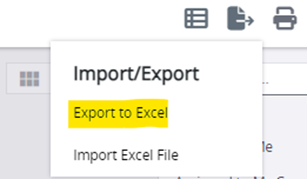 Rather than painstakingly entering our action items manually one at a time, the user interface allows us to export blank data with all necessary column headers. The use of an Excel spreadsheet will provide us with an efficient means to upload several action items at once. When the sheet downloads, open it up and you will see a view similar to mine here.
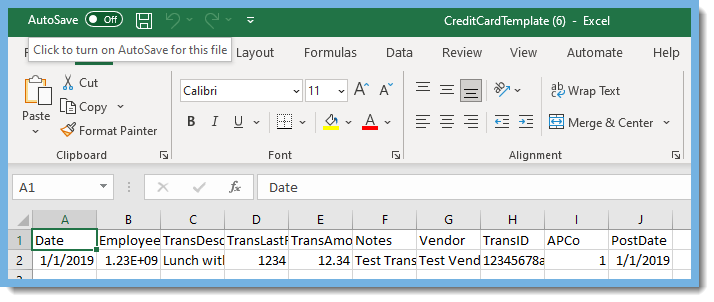
 The action items module comes standard with column headers like ‘Type’, Description’, and ‘Due Date’.
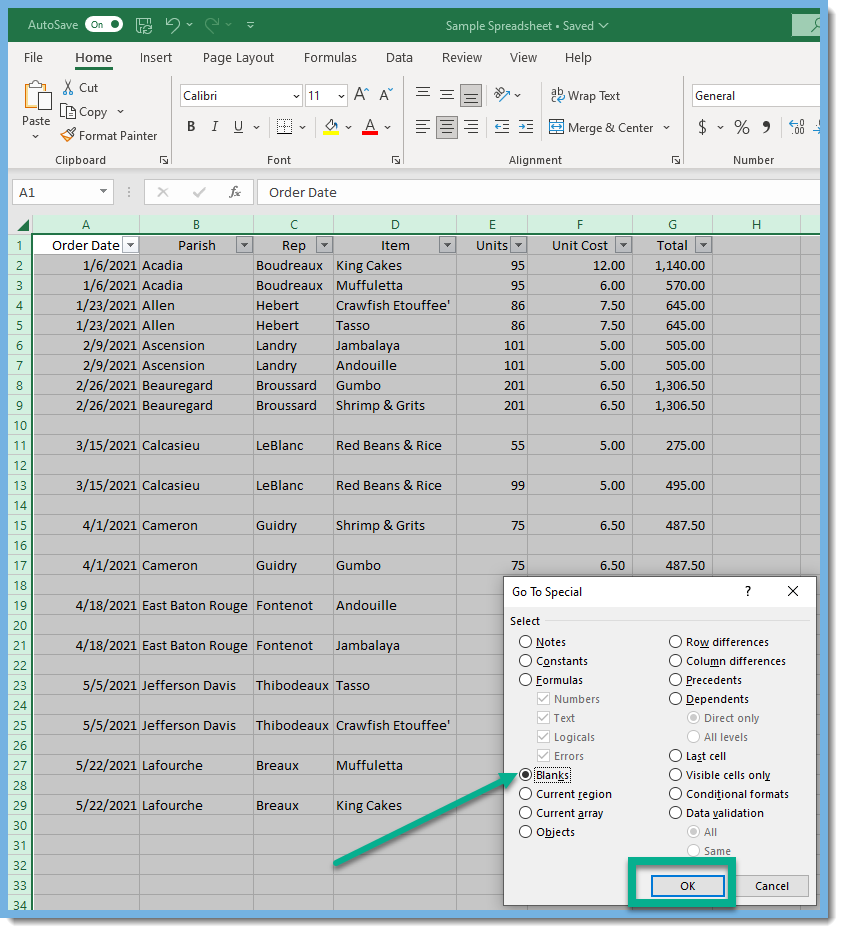
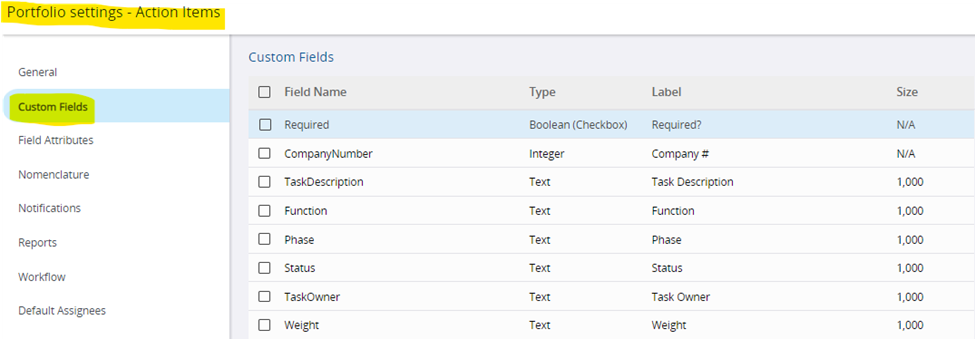 Once your column headers are satisfactory and you have your exported sheet in front of you, you can add data to the cells. For our purposes, I will add data to the following headers: Subject, Task Owner, Type, Status, Due Date, Description, Importance and Author. You can see below some of that data I added into Excel.
 Upon completion of the data upload, you are ready import your spreadsheet. Enter your Action Item screen again and select the ‘Import Excel File’ button. You can then either drag the sheet onto the screen or select ‘Browse’ to find it in your File Explorer. Upon successful completion, you will receive this confirmation page articulating the movement of your data.
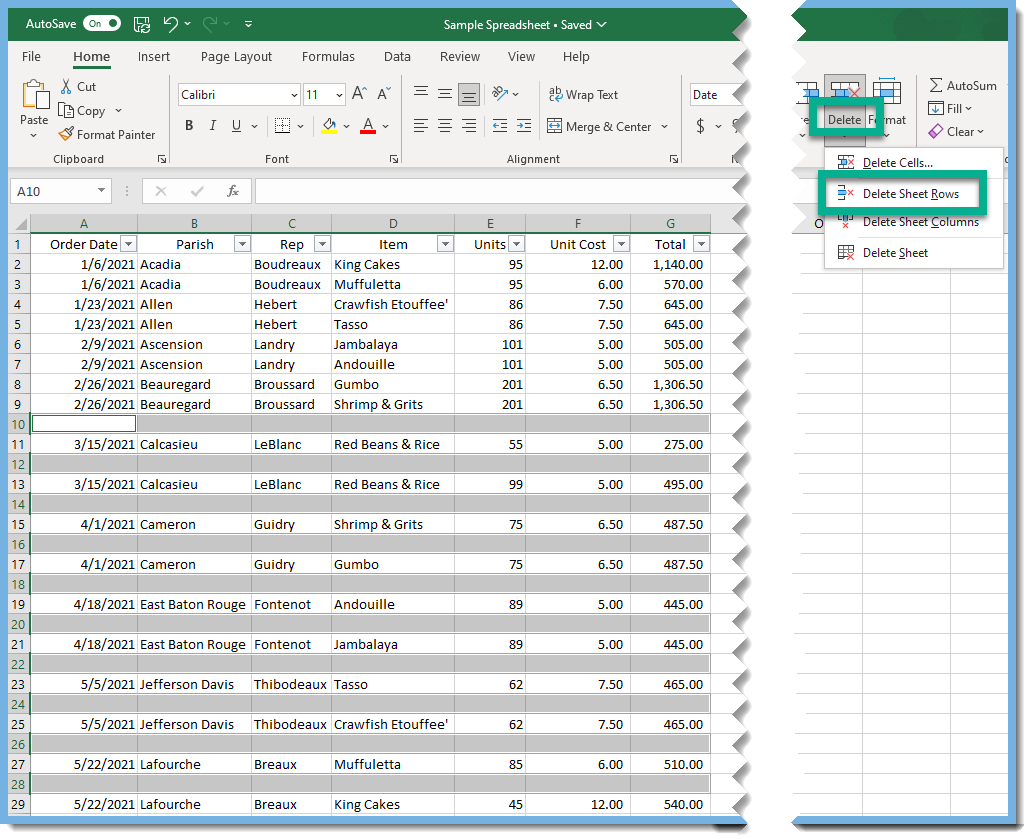
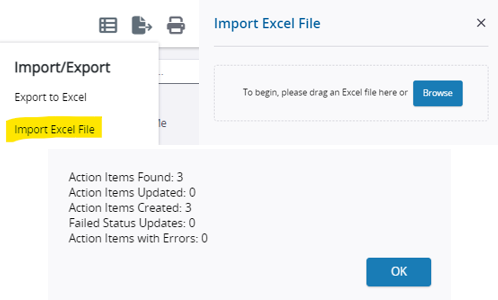 We can now see that same Excel data displayed in my Action Item module.
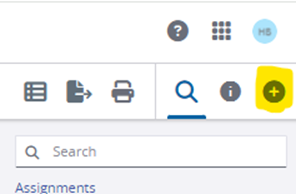
 Additionally, ProjectSight allows for dragging and dropping of different columns and the addition or subtraction of different column headers. Simply select the three-bar icon in the top right corner of the view and this screen will provide you with the ability to check or uncheck columns depending on how you want data displayed.
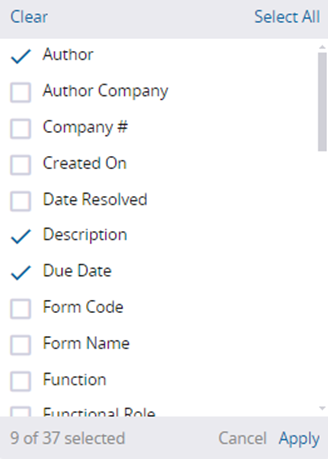 To save this view, click the ‘Save’ icon next to the plus button on the left side of your toolbar.
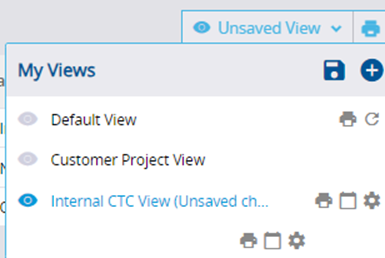 Proper task maintenance is critical for any company to remain competitive in their market and expand their business opportunities. ProjectSight’s Action Items module provides users with an interface that is both customizable and accessible that provides any data you wish to display.
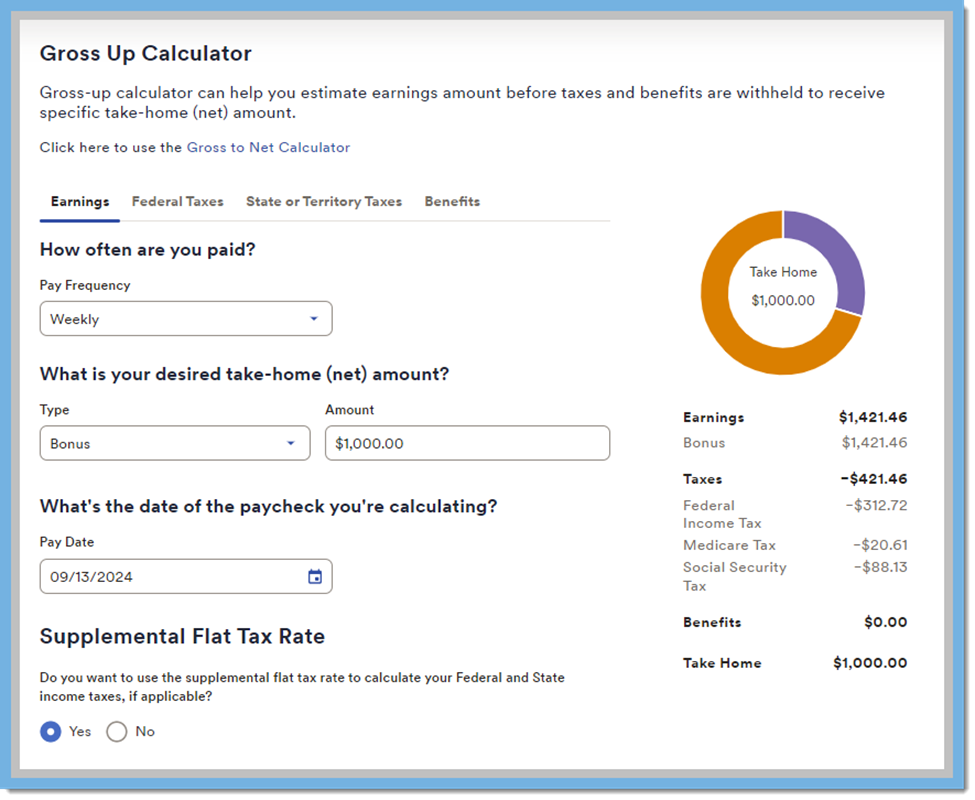
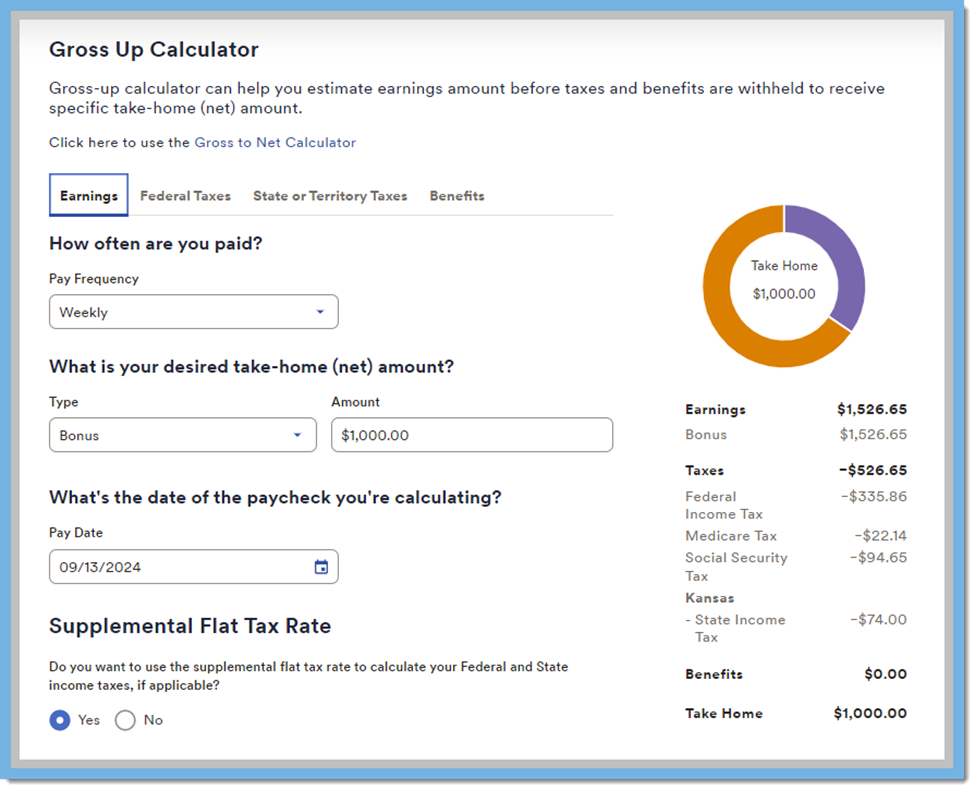 Grossing up bonuses is a thoughtful practice that can significantly enhance employee satisfaction and simplify payroll processes. By understanding and implementing this method, employers can ensure their compensation packages are both competitive and appreciated by their workforce.
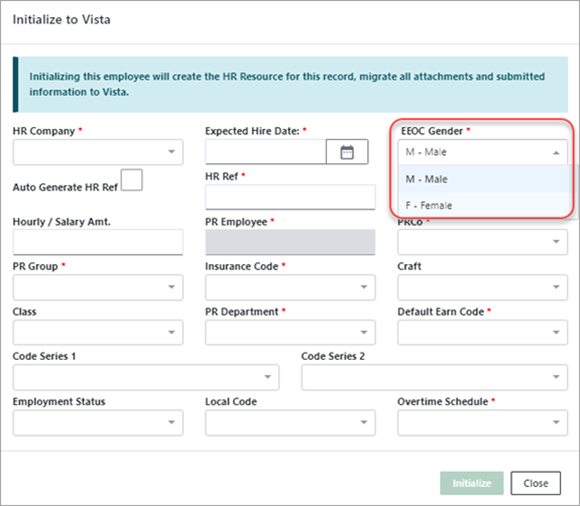
 OFCCP Compliance: If you’re working with government contracts over $10,000, you need to ensure there’s no discrimination and that you’re actively hiring veterans and individuals with disabilities.
 ACA 1094 Compliance: Employers with 50 or more full-time employees must provide affordable health coverage and file 1094 forms with the IRS. Use available safe harbors to meet affordability standards.
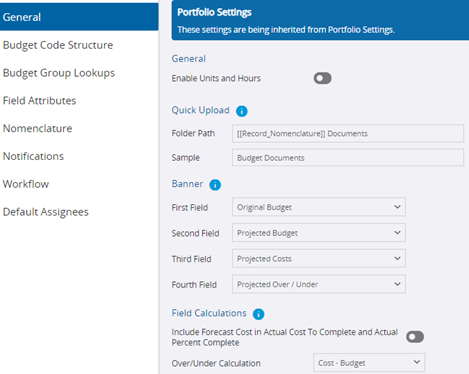 In the General tab, users can decide if they want budget units and hours utilized in their project by selecting the icon below the General header. If selected, users will have access to the Hours, Quantity and Unit Price data fields in the Budget Items, Contract Invoices, PCOs and Purchase Order sections of the Budget screen.
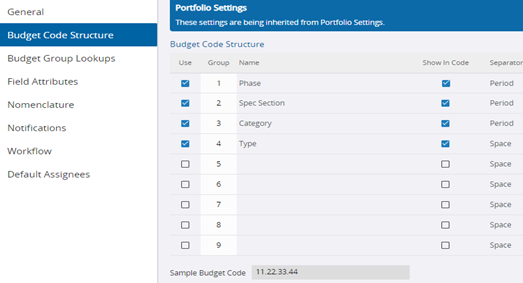 The Budget Code Structure grants users nine different groups where they can link budget code structures. With this structure tab, they can name the groups, show records/reports and select separators for the codes.
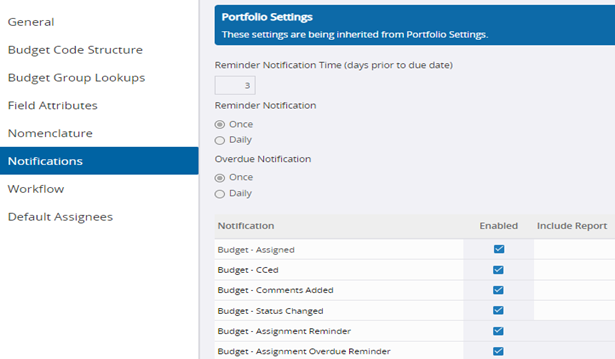 Possible Budget edits in the Notifications tab include Reminder Notification Time, Reminder Notification, Overdue Notification and Notification.
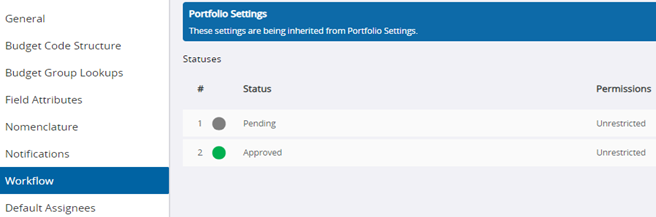 The Workflow tab outlines statuses that are available. The only possible function in Budget workflow is “record status”.
 Finally, we have the Default Assignees tab. Here, users can articulate which contacts are automatically assigned a record once they move past a non-draft status. You can assign either by a contact’s name or by a project role, in which case all users who fit that role would be assigned.
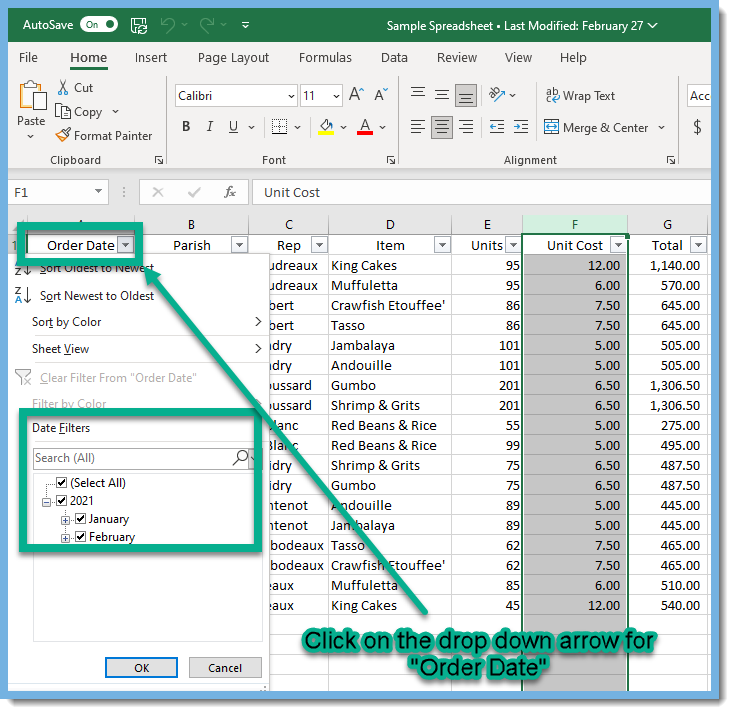
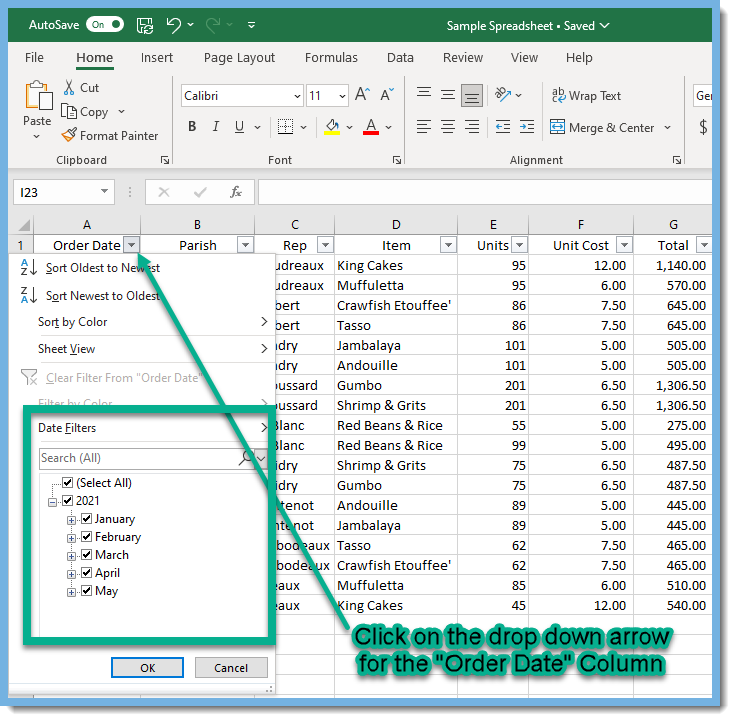
 Click the CATEGORIES button and Select Viewpoint. You can filter further if you like to show only certain Viewpoint products. Selecting Viewpoint though will give you a good starting point.
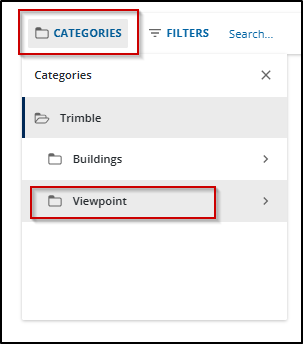 Next click on the FILTERS button and select Price. Some courses are fee based, primarily instructor led courses, however there are plenty of free courses to take advantage of. Select the Enroll option to see all of the free offerings.
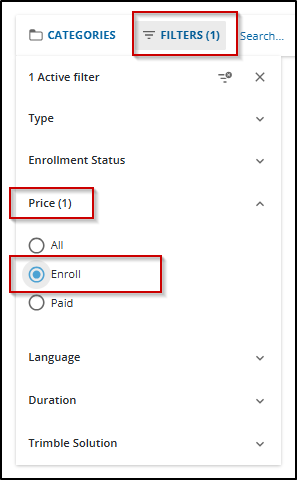 Here I can see that there are 267 free courses in the Viewpoint category. Some things to note are the amount of general construction knowledge courses such as the Intro to Construction Accounting course. Great for the up and coming construction admin professional. Navigating Vista is a great course for employees that are brand new to Vista. I like to call it Vista 101. Note the New tags showing newly published content as well as some of the role based learning plans like the Vista Controller Learning Plan.
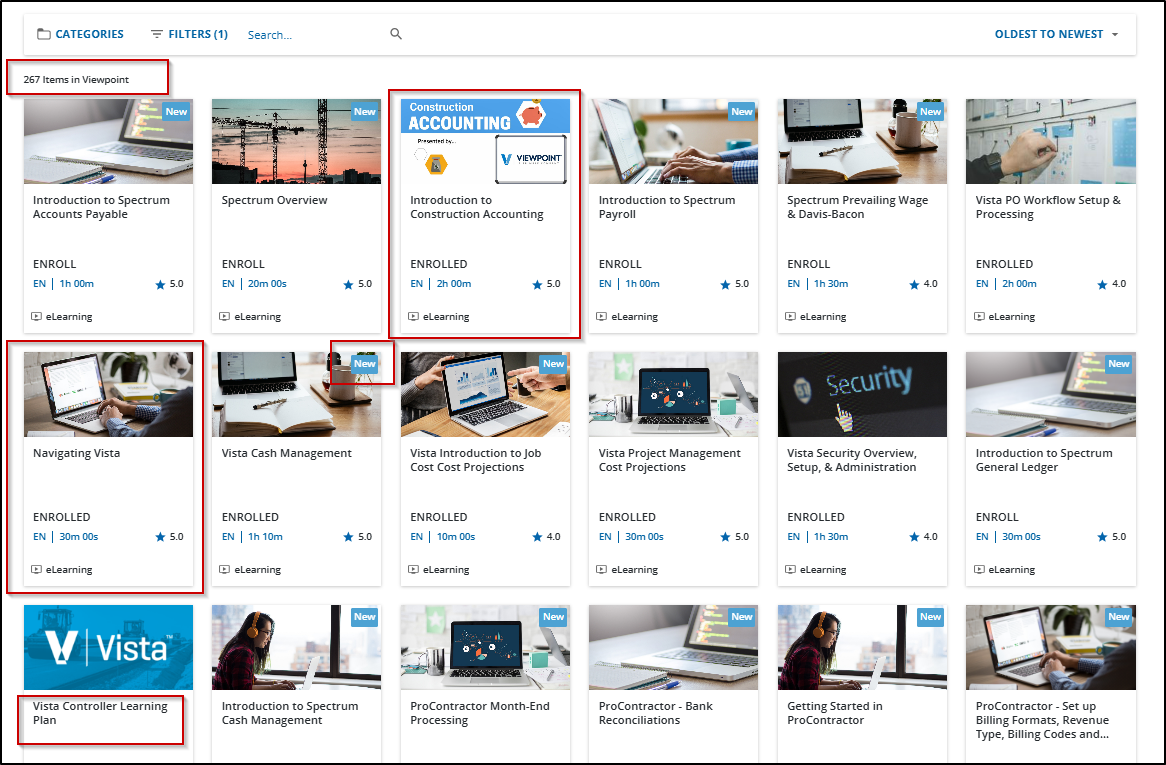 Whether you are looking for a course around Vista, VistaWeb (financial controls, HR Management, Field Service, etc), Viewpoint Team, Project Sight, or any other Viewpoint product, you'll find a course to learn something new here.

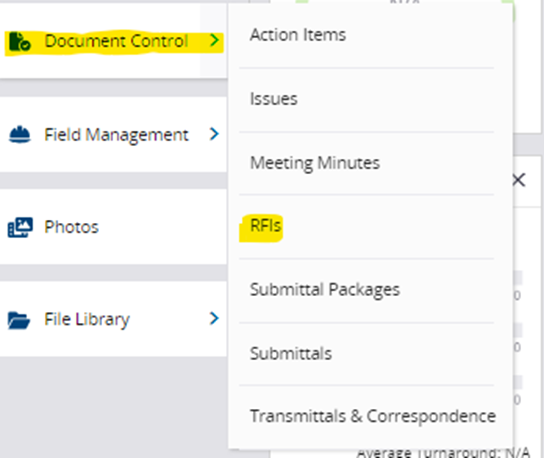
 Document Control:
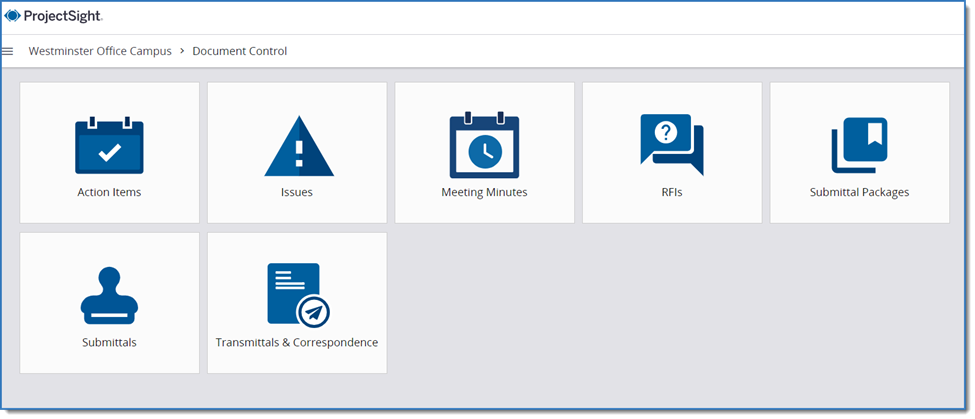


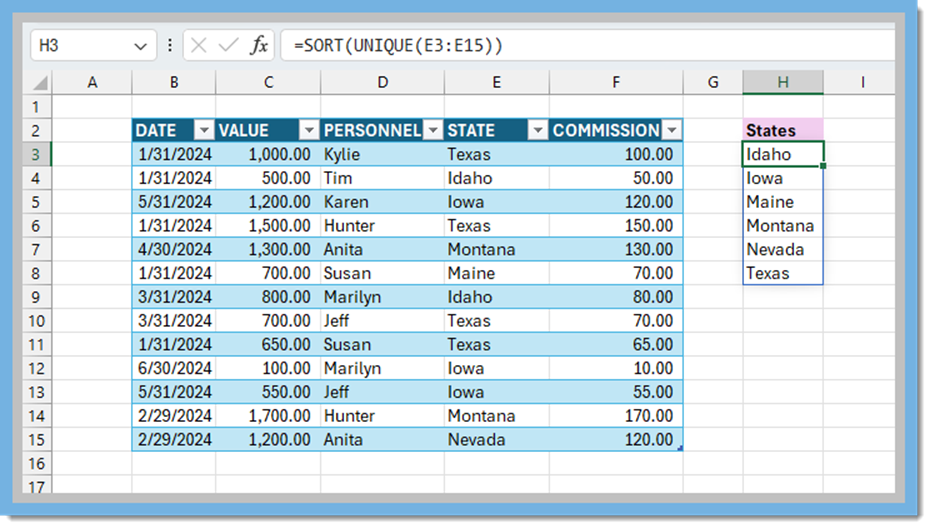 If you use a table, your formula will be converted to look like this:
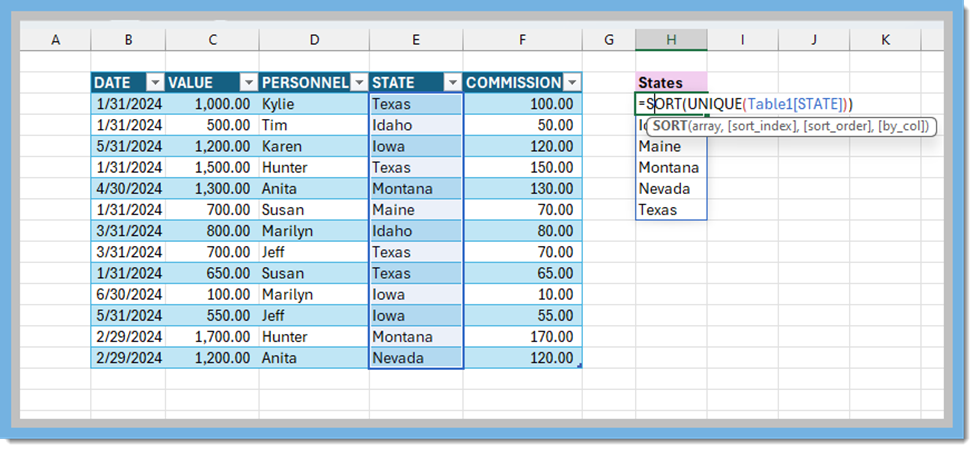
 You can also explore how to combine the UNIQUE function with other functions to achieve specific results.
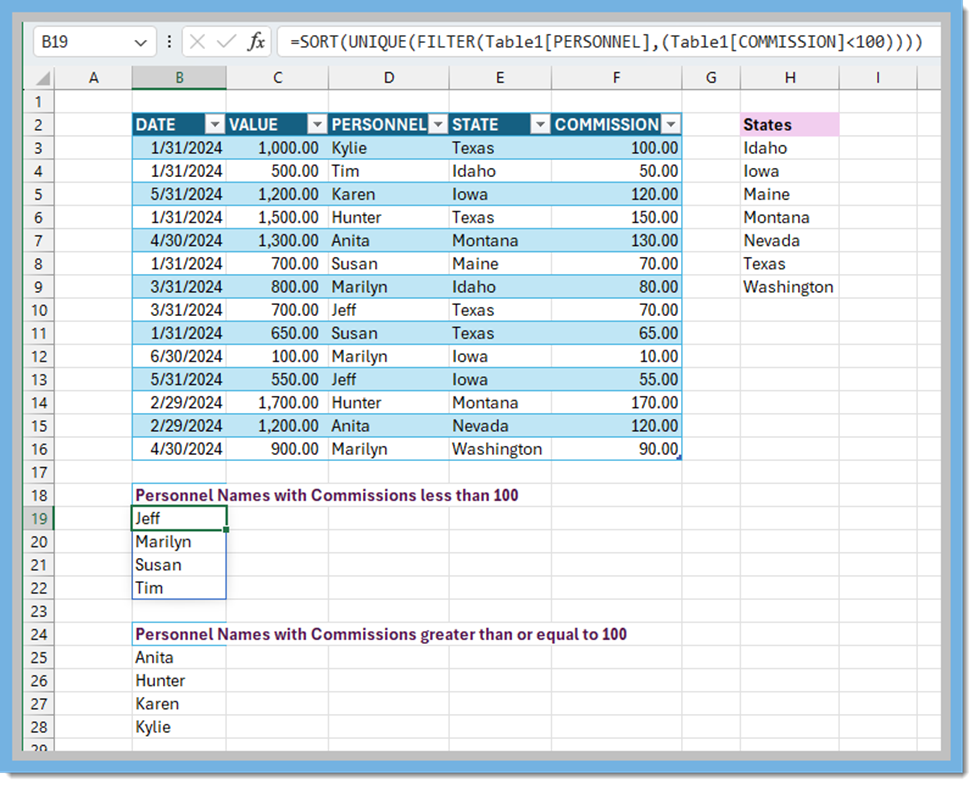
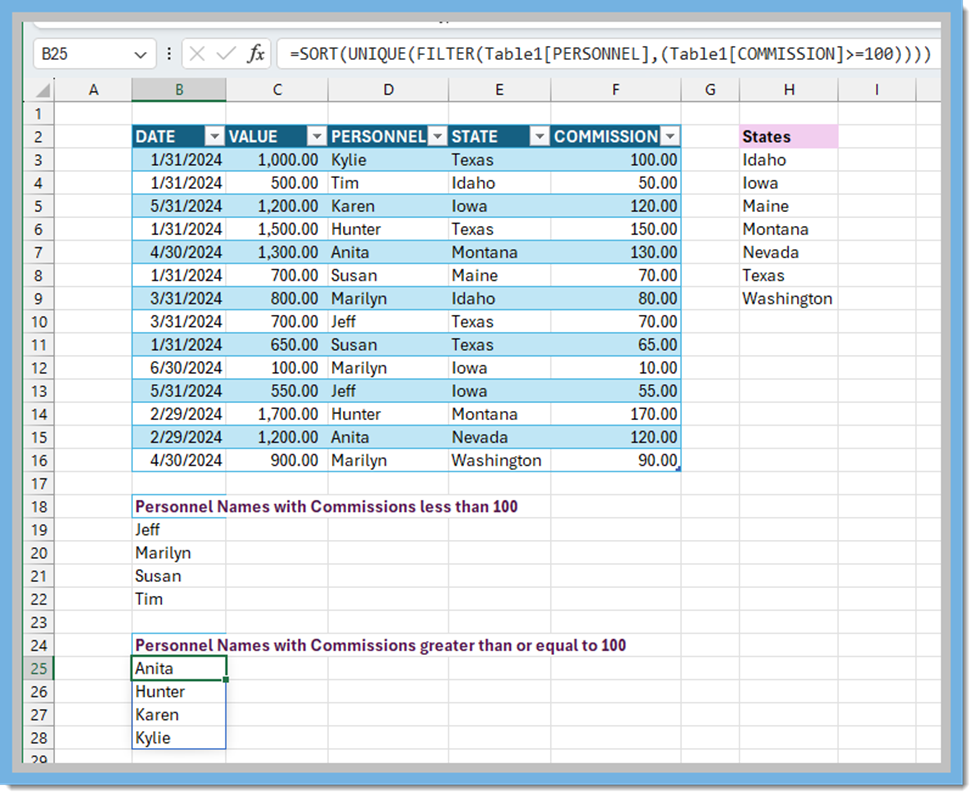 Consider using these techniques to analyze and summarize your data in your Excel spreadsheets. As you know there are many ways to get the correct data in excel. I hope this helps and provides you with a new formula to use. Feel free to customize these formulas based on your specific context.
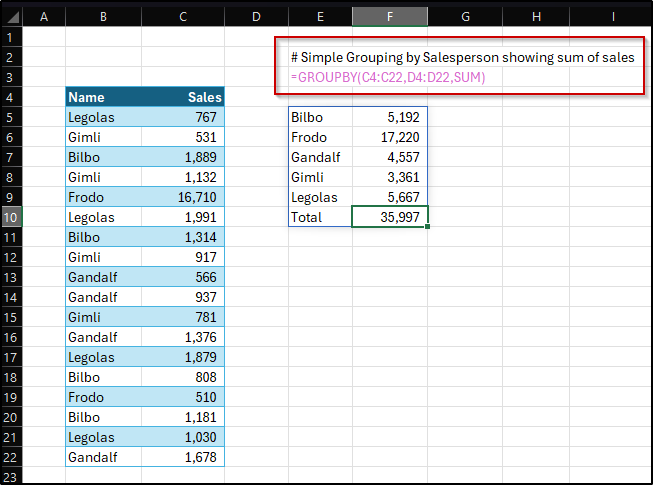
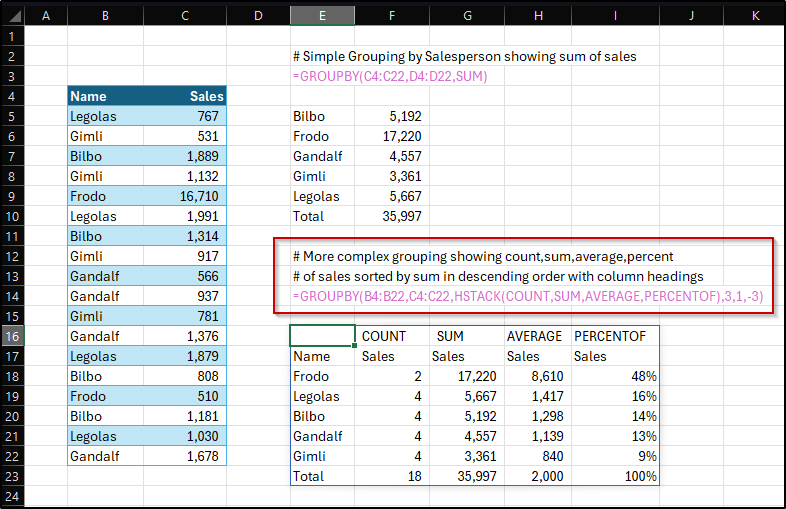 Well, that's a pretty nifty trick, and the formulas change as data is updated. For instance, Gimli notices that there was a typo in his sales figure. He didn't sell 781 but actually sold 7,810. And, we got a new salesperson. By changing the number all the formulas update. BINGO!
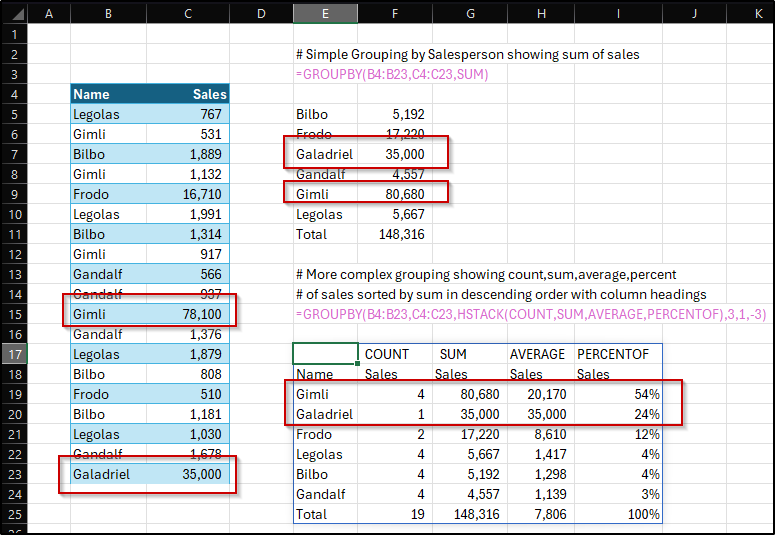 Next time you want to do a quick aggregation in Excel, give GROUPBY or its sibling PIVOTBY a try.

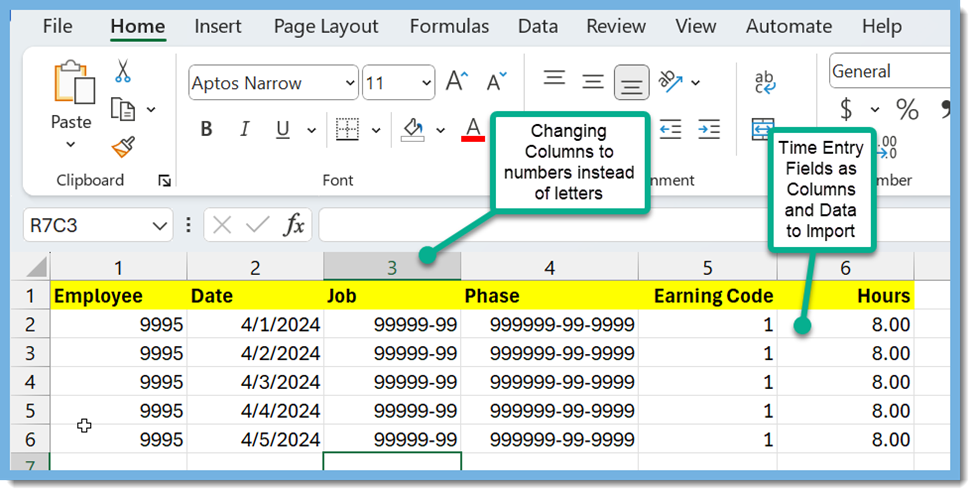
 Open an excel file, enter the data to import
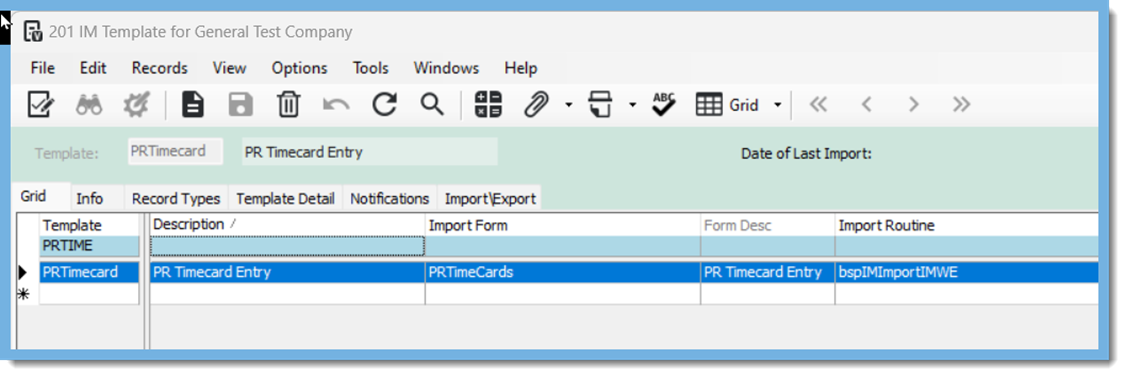
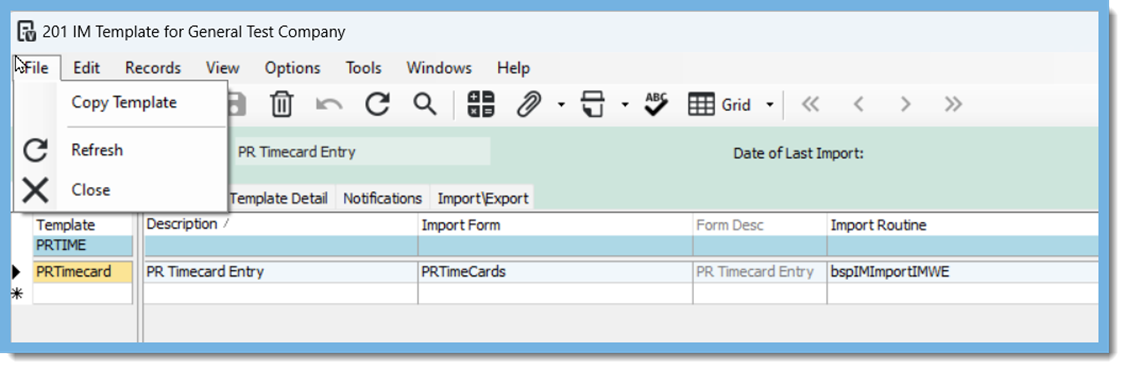
 In IM Templates we will now copy the preexisting template and map our columns for importing
 Enter in a New Template Name, in this example CTPRTime is the Template, Enter the Description, and Copy
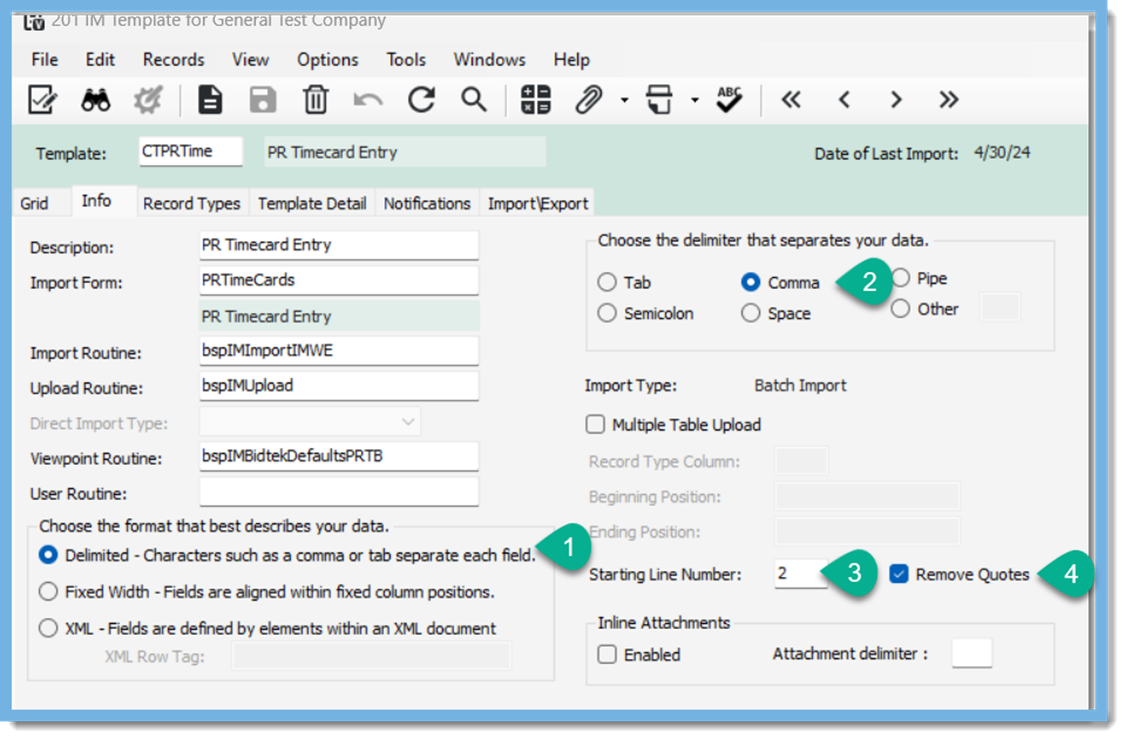
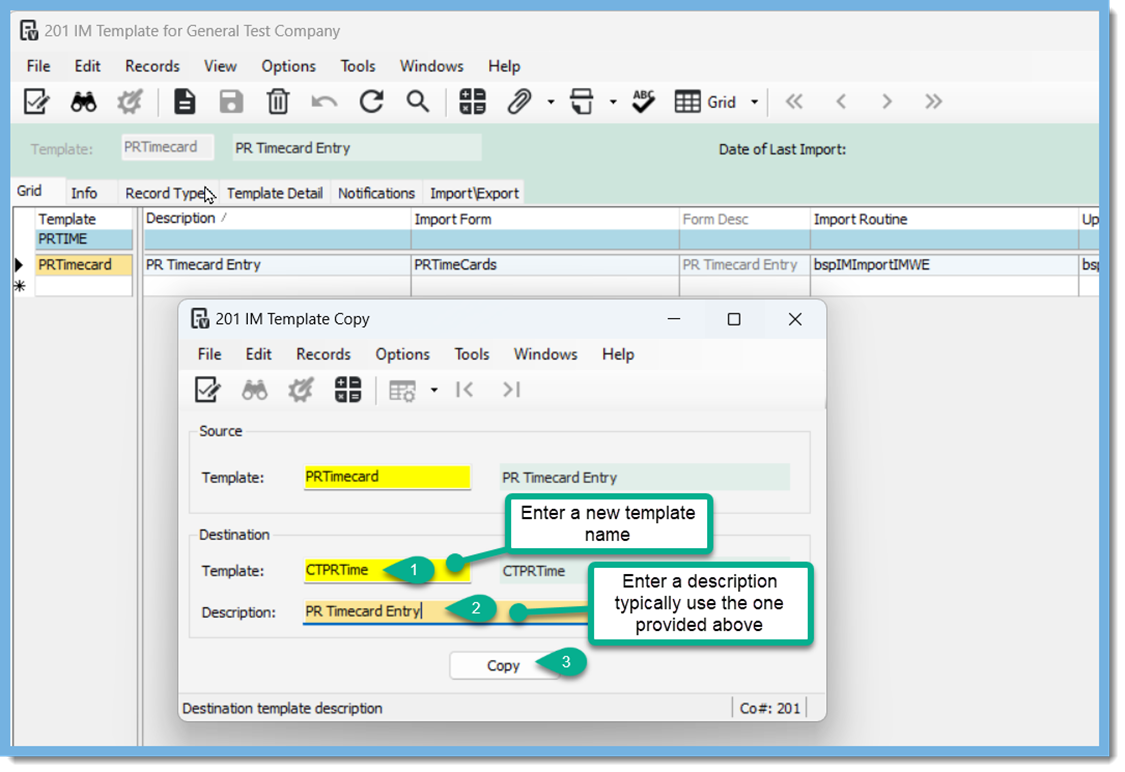 Now we edit the Info Tab on our New Template CTPRTime
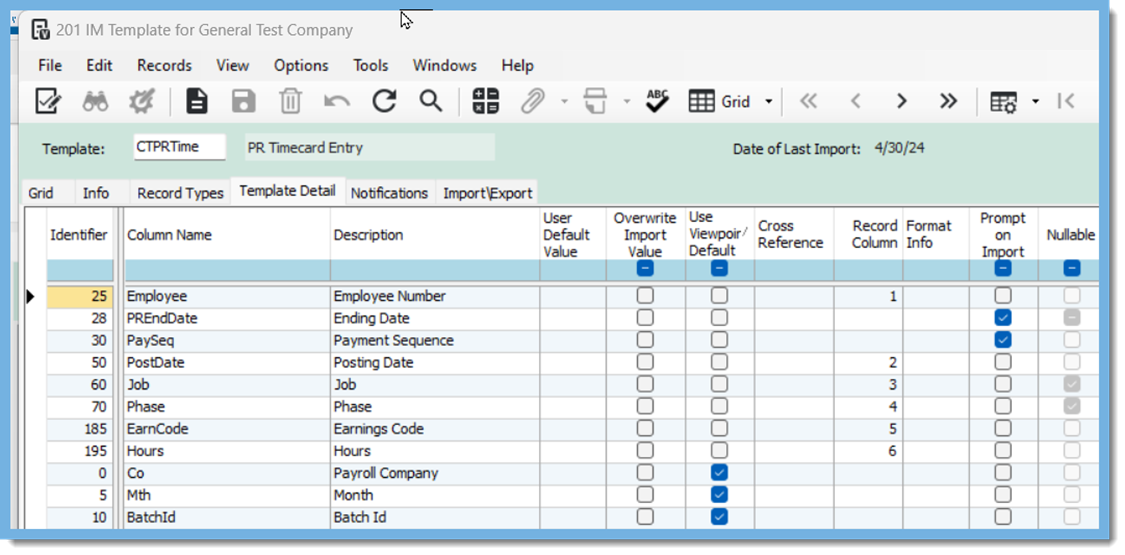
 Now we edit the Template Detail on our new import template
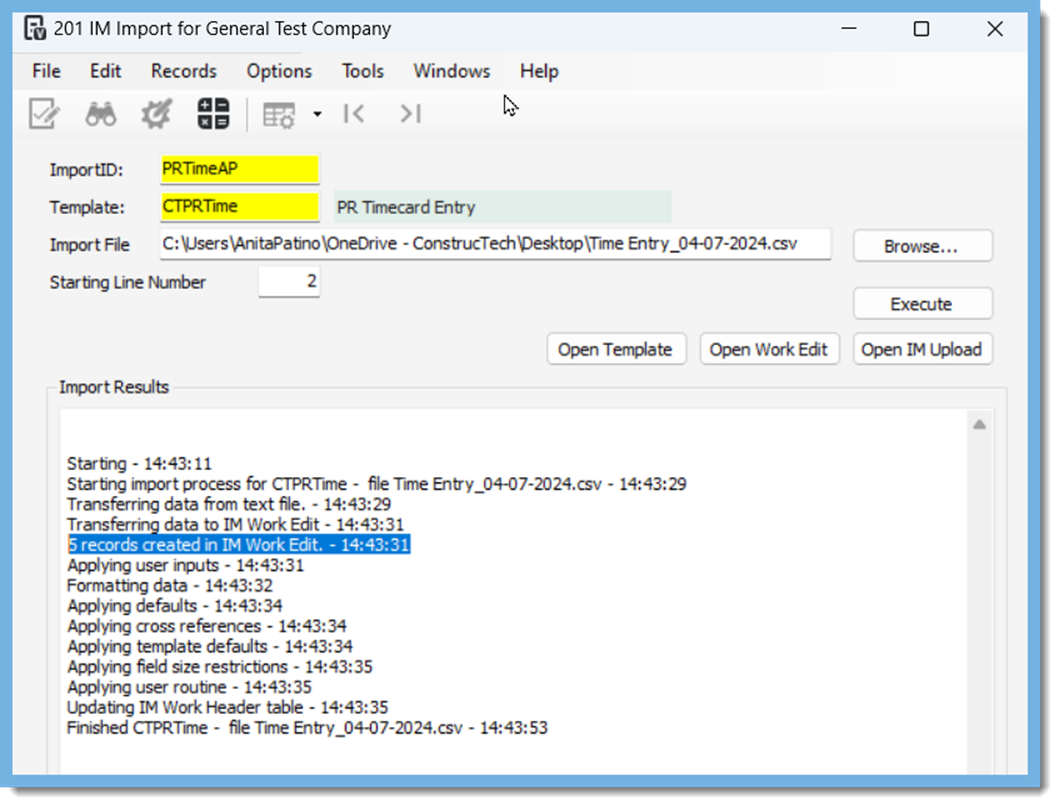
 Now we Import
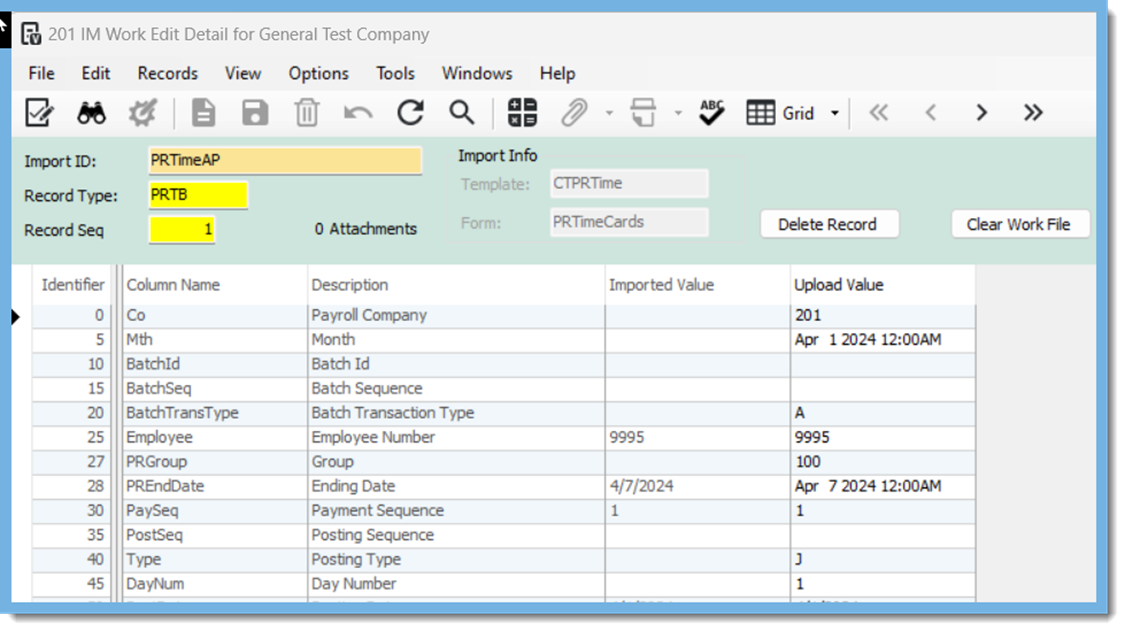
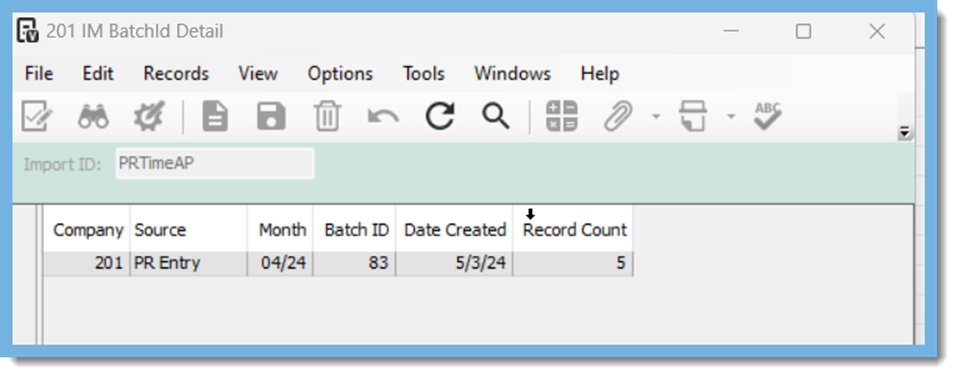
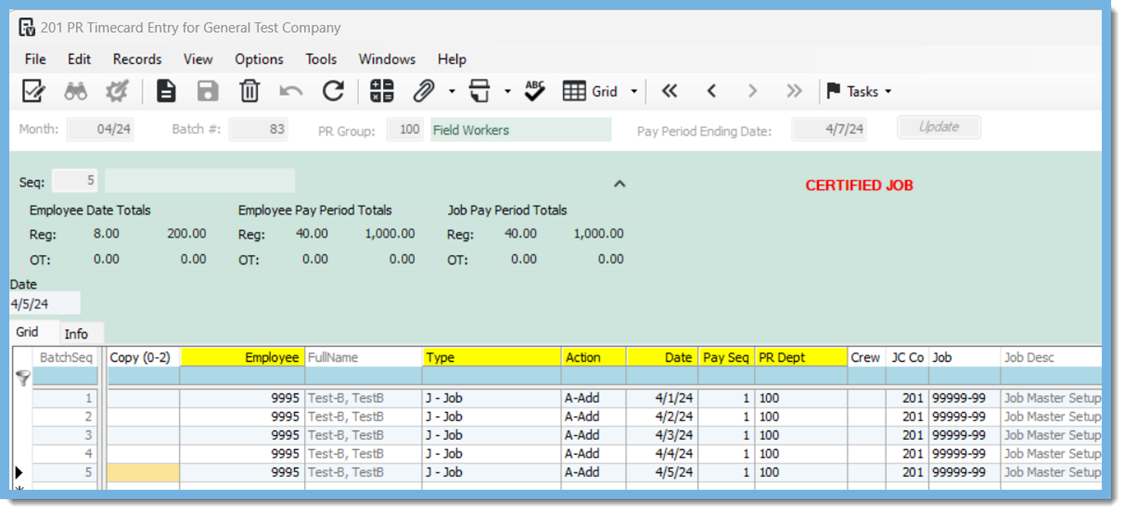
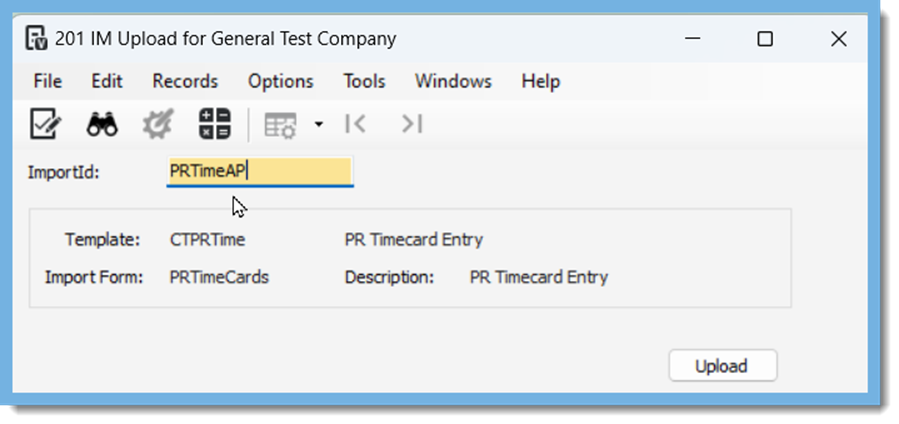 Now you will be given the Batch ID
 As always, if you need assistance with any Vista processes, please visit our website Constructech Consulting and Book a Call with one of our consultants.
 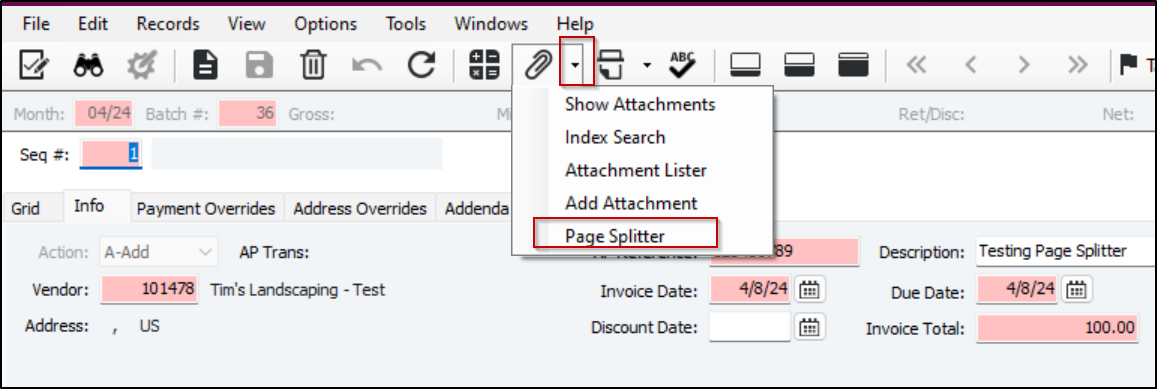 From there a window will open up and you can drag/drop a pdf containing multiple pages from your computer. You used to be able to drag/drop right from Outlook but the New Outlook no longer supports that. In that case, I recommend drag/drop to the desktop and then drag/drop to the Page Splitter...or click the browse button to find the PDF file.
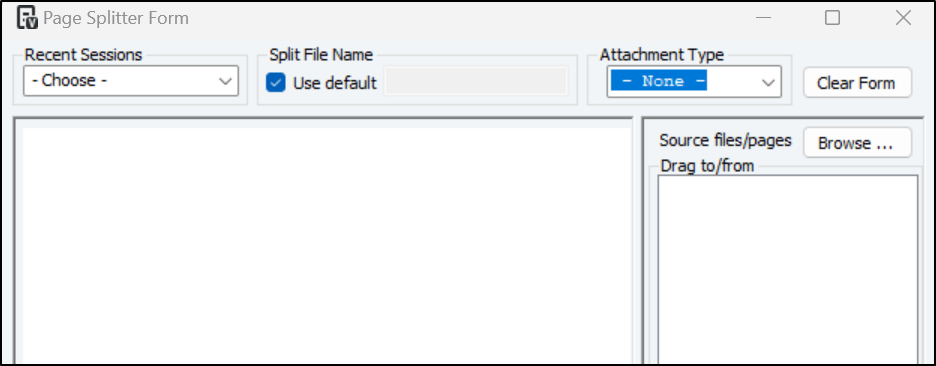 From there you can easily grab a pdf page (or use your CTRL key to click on multiple pages) and drag/drop them into the AP Invoice. In this example, I highlighted page 1 & 2 and dragged them into my invoice. The Page Splitter copied the 2 pages into a single document and attached it to my invoice. It also grayed out Page 1 & 2 in the Page Splitter window letting me know I had processed those pages from the original PDF.
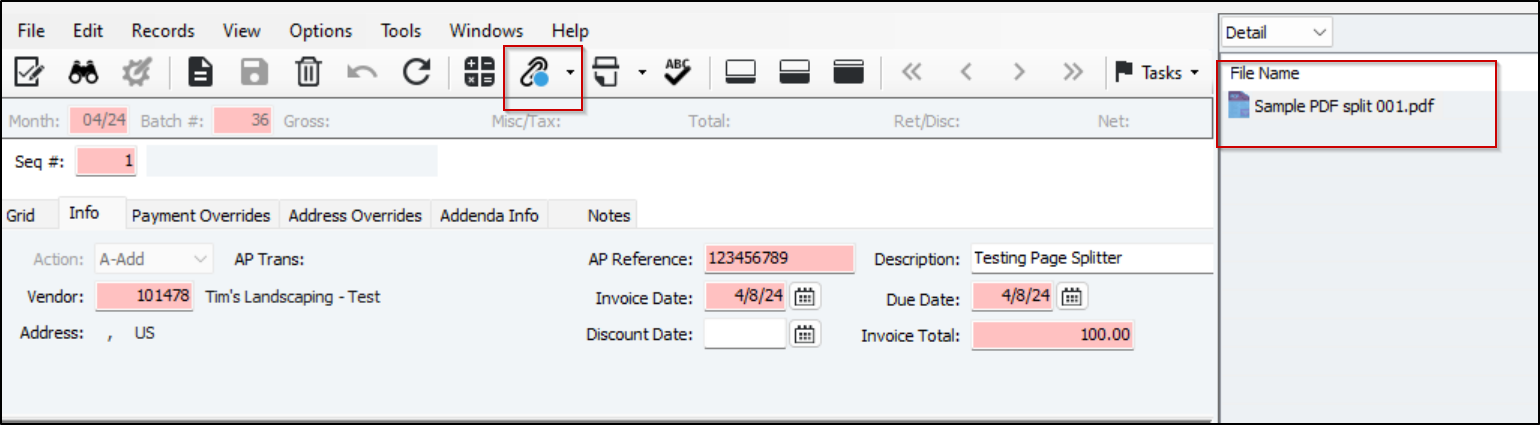
 The Page Splitter has other options such as assigning Attachment Security Types, changing the file naming convention, or having the ability to save your progress and pick up where you left off at a later time.


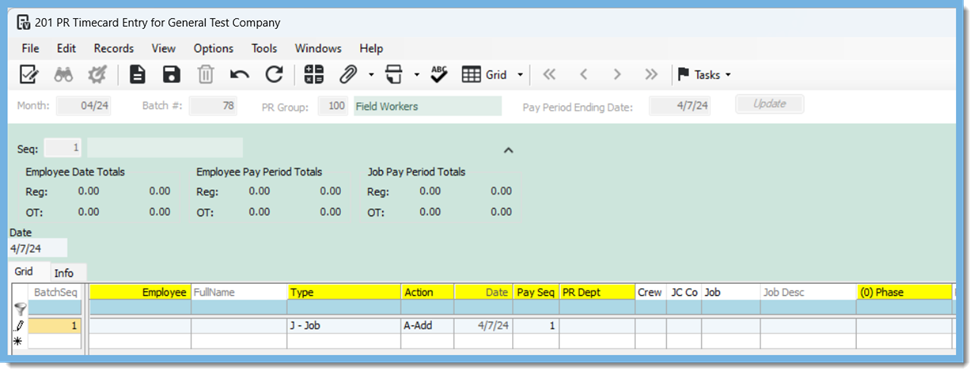
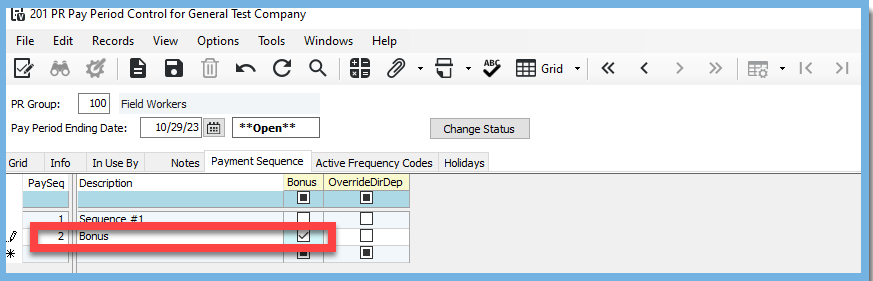
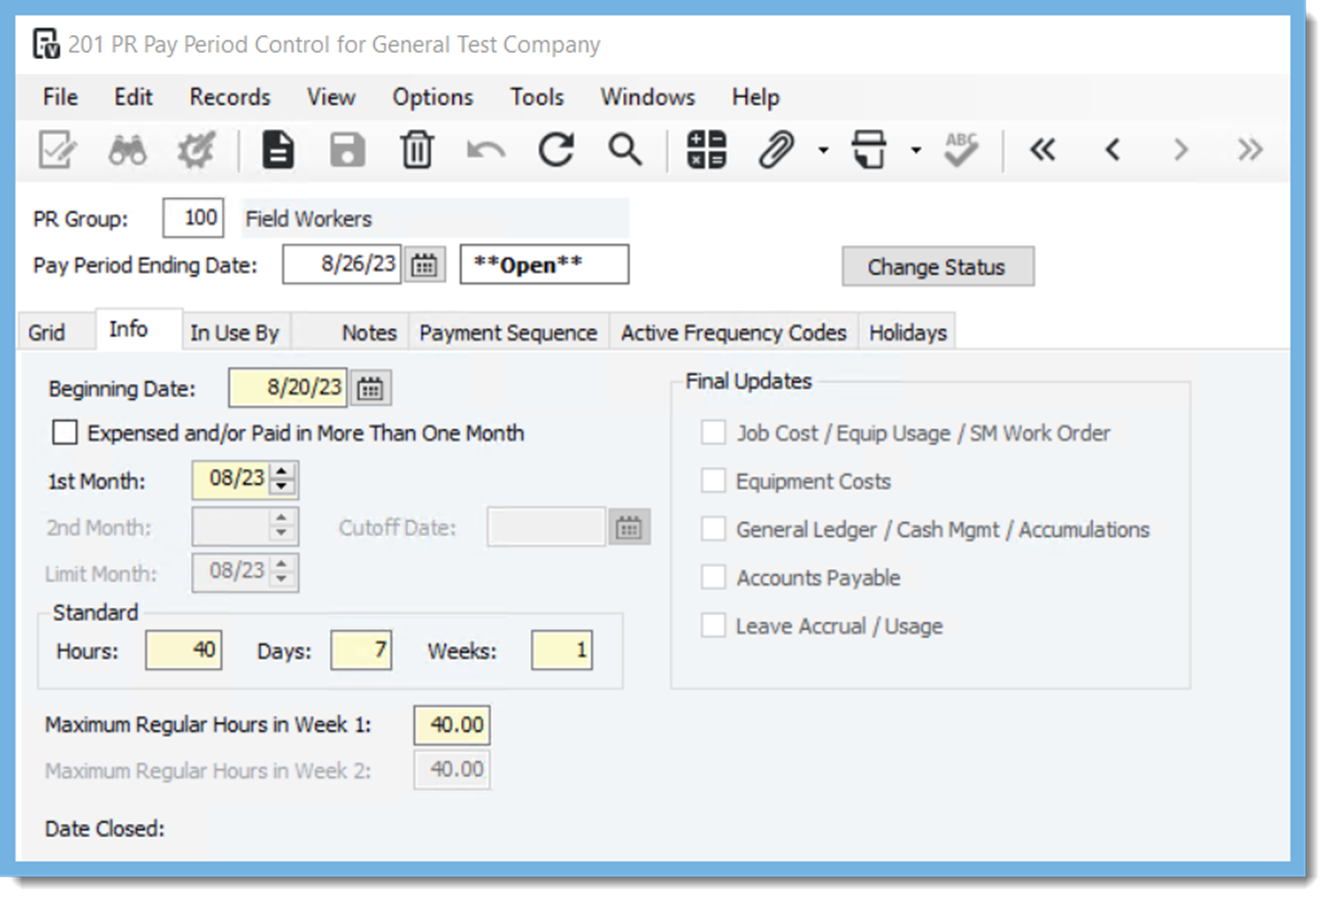 Sequence 1 exists on Pay Period
 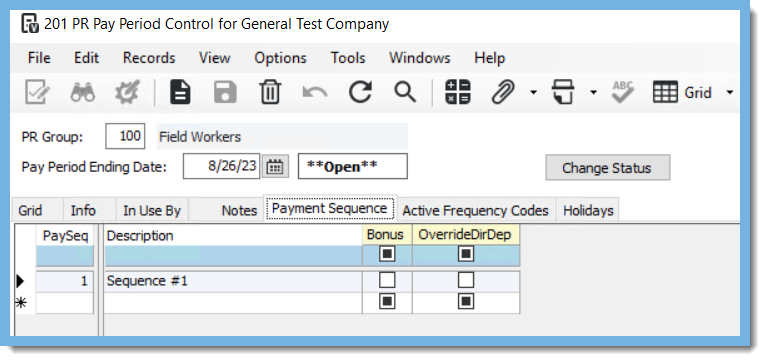 Active Frequency Code on existing Pay Period
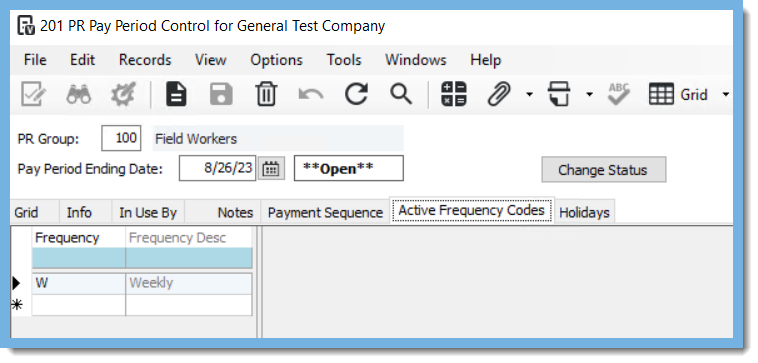
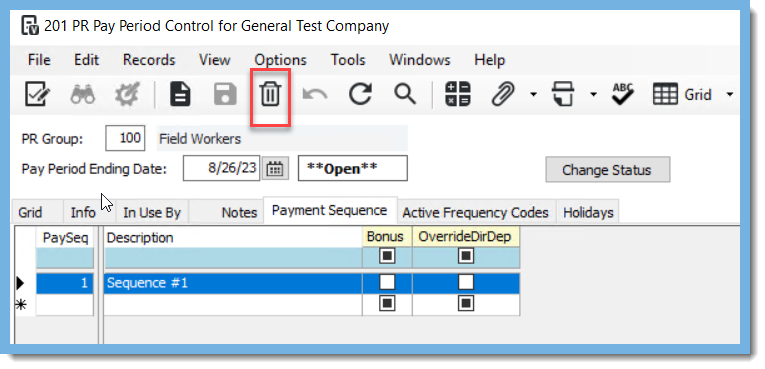
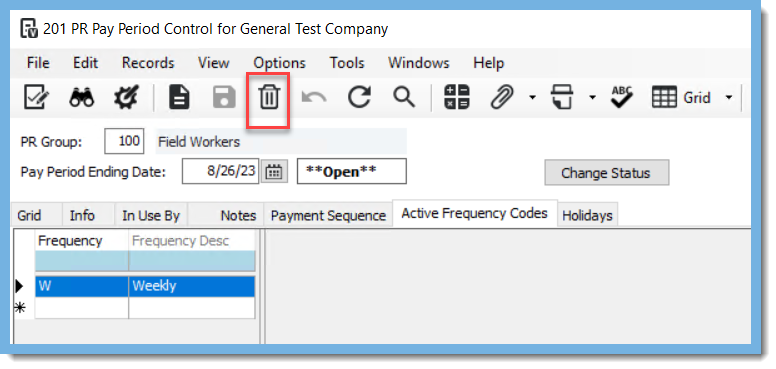
 Below screen shows after pay period has been deleted
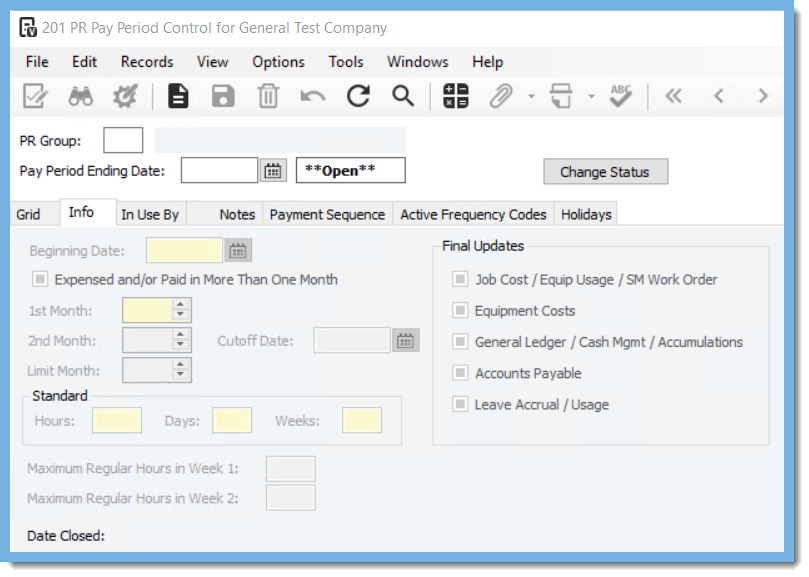 As always, if you need assistance with any Vista processes, please visit our website
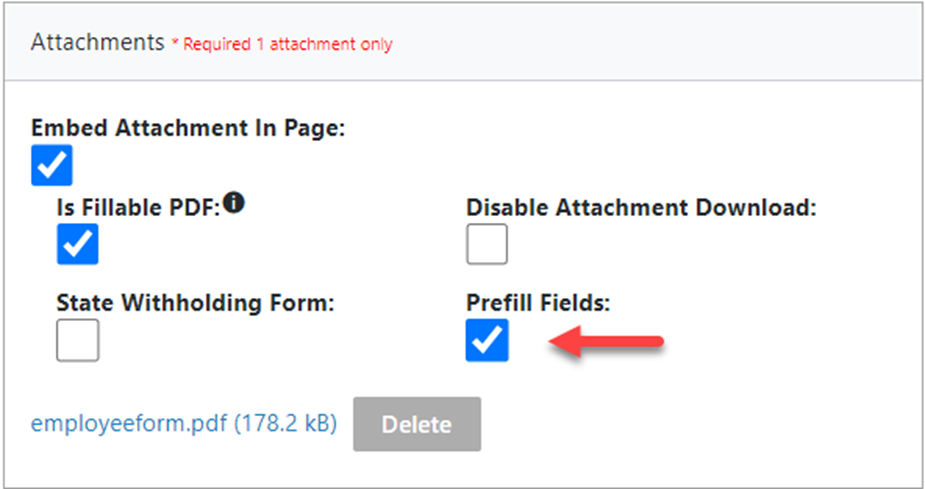
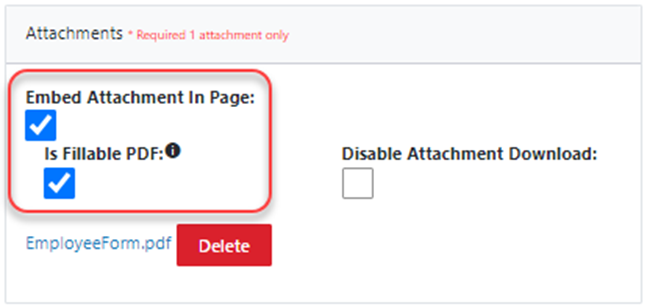
 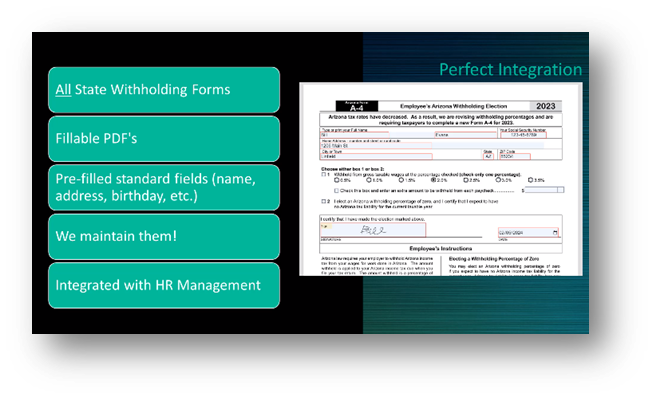 state withholding forms into Vista HR Management's Onboarding module. With just a click, these fillable PDFs are ready to roll, automatically pre-filled with default fields based on new hire information. And the showstopper? Values from these forms effortlessly flow into Vista PR Deductions, ensuring a smooth and error-free process.
 Now, initiating and completing verifications is as easy as pie, with case details magically transformed into PDFs attached to onboarding profiles. Compliance has never been more elegant!
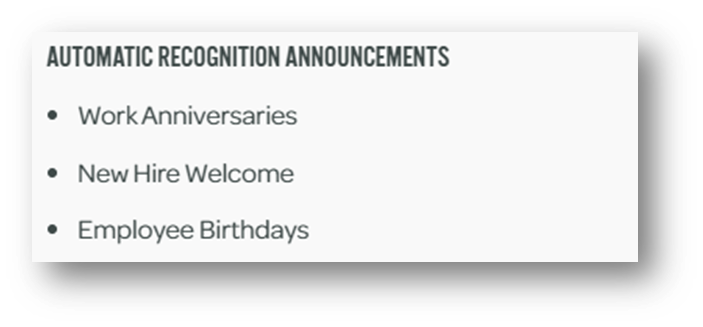 Fiddletree's Automatic Recognition Announcements are here to steal the spotlight. From work anniversaries to new hire welcomes and employee birthdays, Vista HR Management becomes the ultimate celebration hub. Boost morale, foster camaraderie, and watch productivity skyrocket!
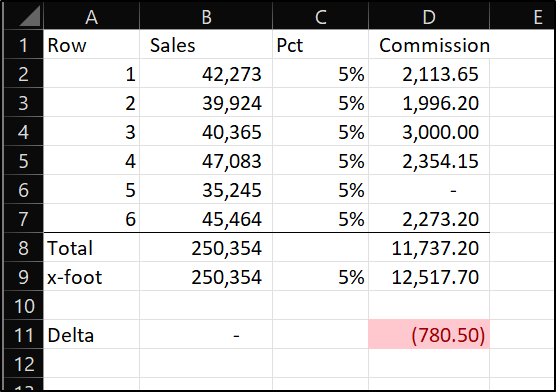 To inspect cells to see if they contain a formula or a value you could cursor around to each cell and look at the formula bar, or you could simply show all cell formulas or values. To do this, head to the formula bar in Excel and select Show Formulas.
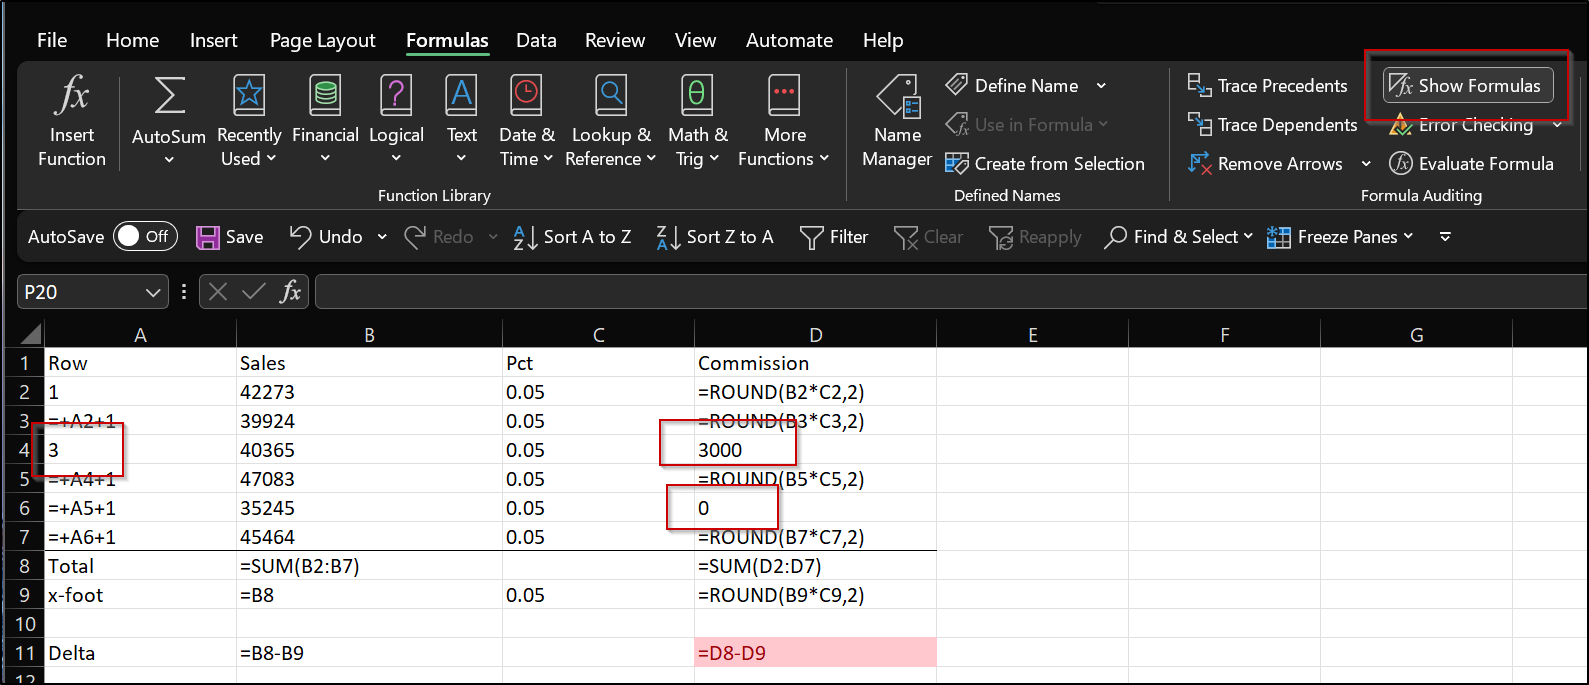 For more tips to help make your job and life easier, feel free to subscribe to our blog. Our team of Trimble Viewpoint Vista, Sage 300, and Excel experts are ready to help you with any challenge. Click the Book-A-Call button to schedule an appointment on our calendar that fits with your busy schedule.
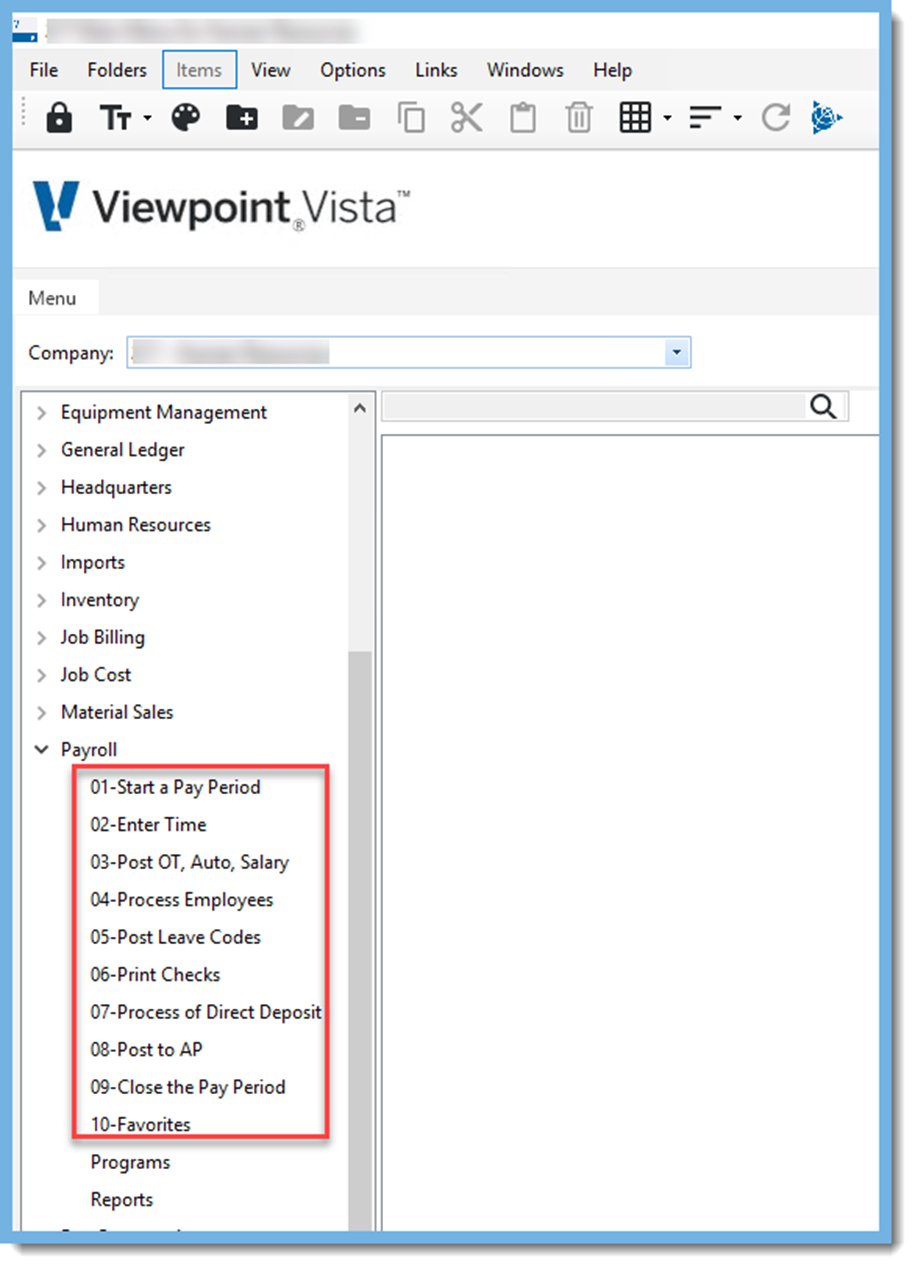
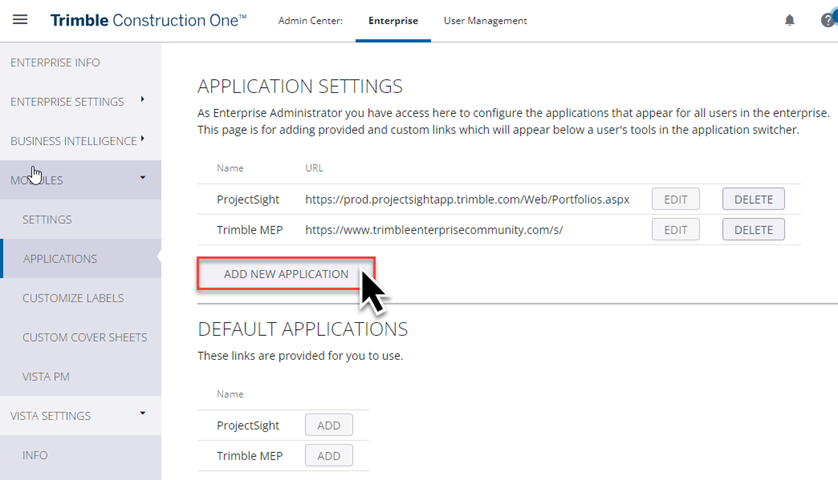
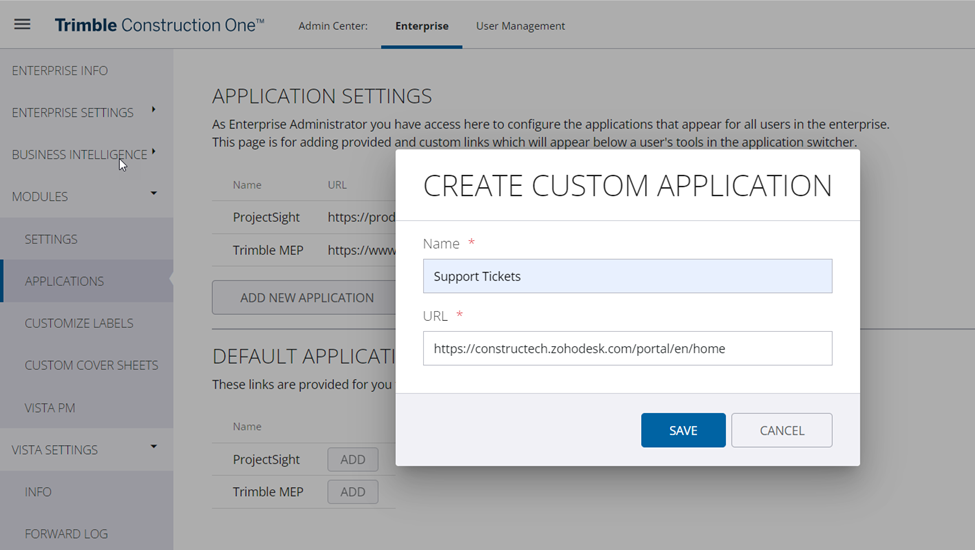
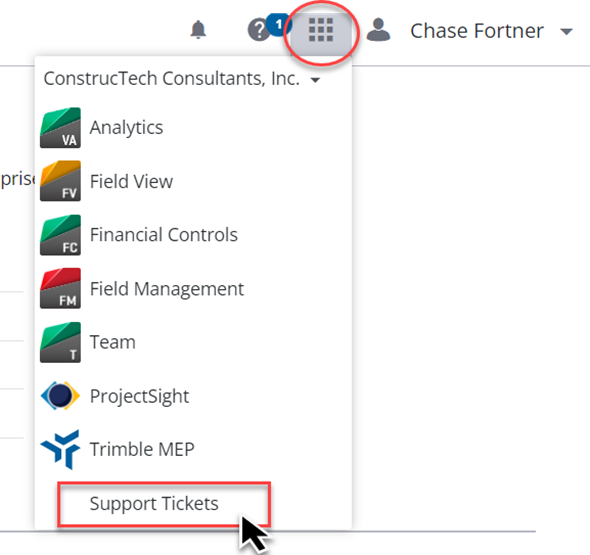
 And add the required domain extension.
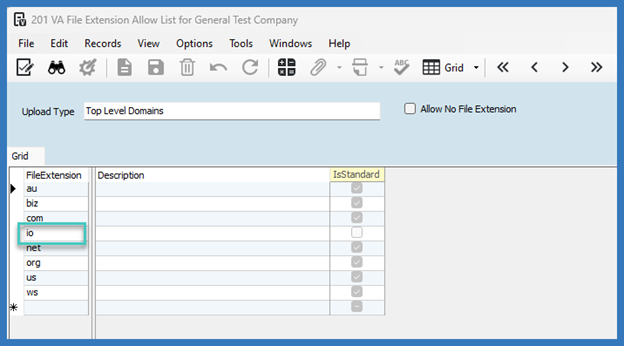 This will allow you to add the website within Vista and when you click on the globe button, it takes you to the website!
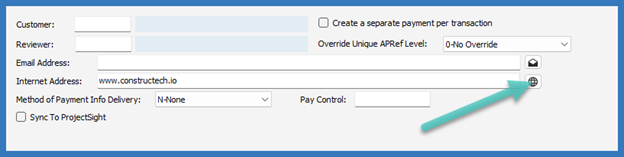 As always, if you need assistance with any Vista processes, please visit our website - ConstrucTech Consulting to Book a Call with one of our consultants. While you are there, sign up for our monthly newsletter to make sure that you do not miss out on our Tip Tuesday articles. You can also follow our ConstrucTech page on Linkedin!
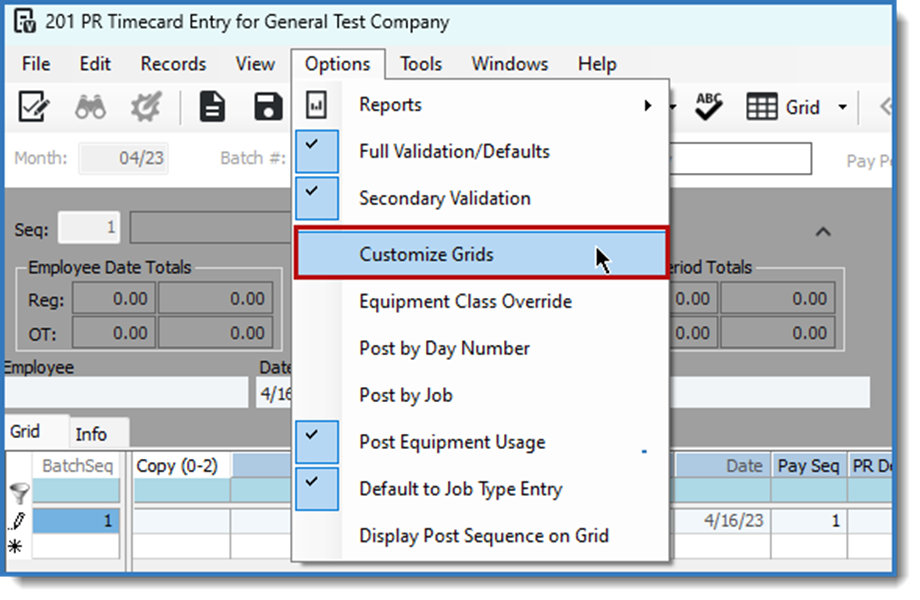 Tailoring the Employee Column:
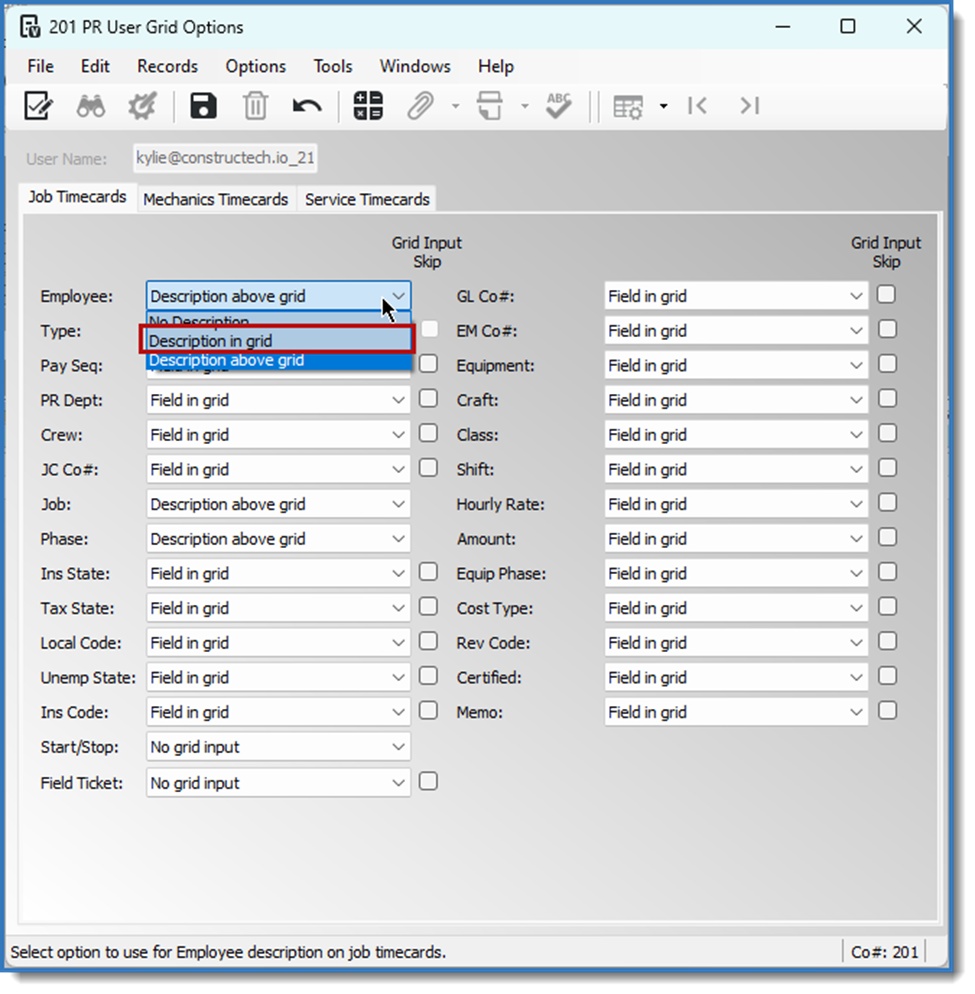 Extending Customization Across Fields & Tabs:
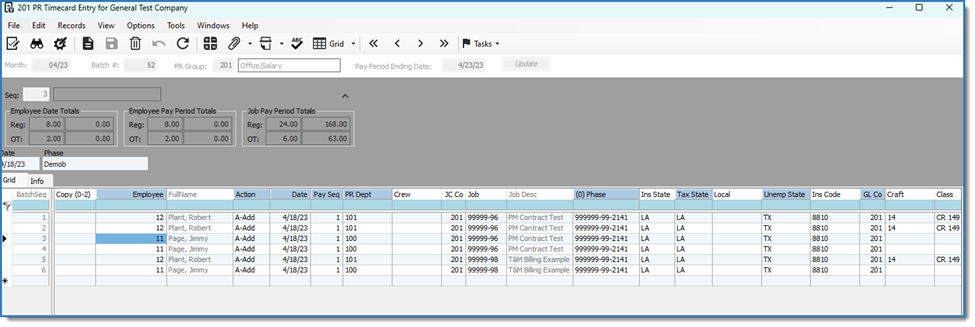 With these simple yet powerful customizations, you'll notice a new column added to your timecard entry grid. This column will display the descriptions you've chosen alongside the relevant data.
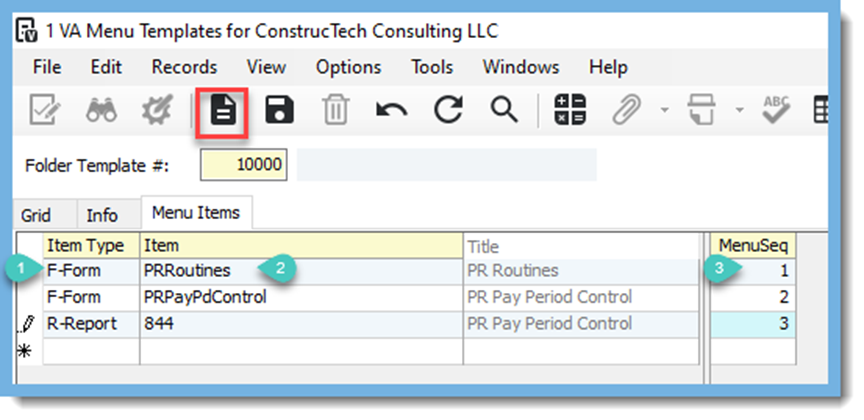
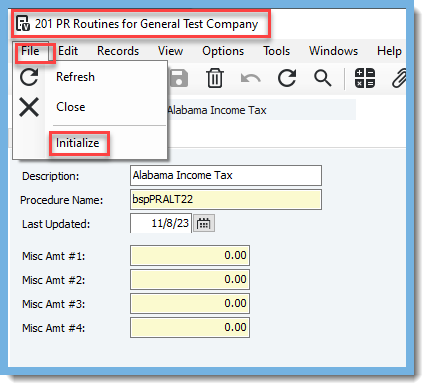 Go to PR Routines in the Payroll Module. Click on File and then Initialize.
 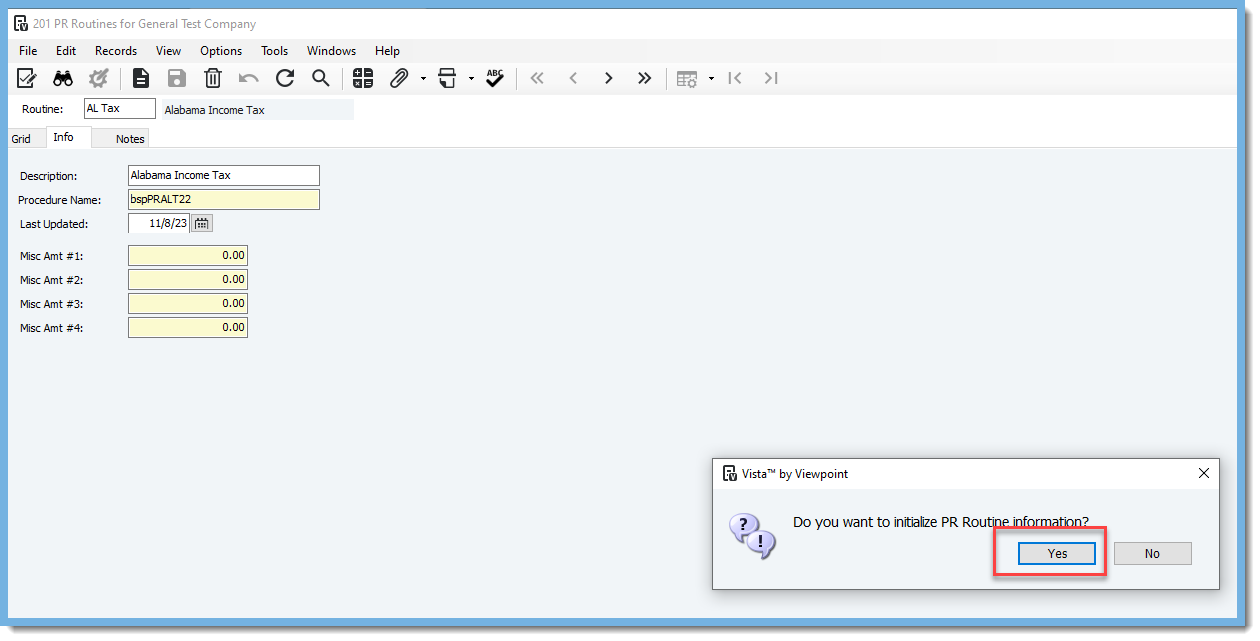 A box with "Do you want to initialize PR Routine information?" will pop up. Click on Yes.
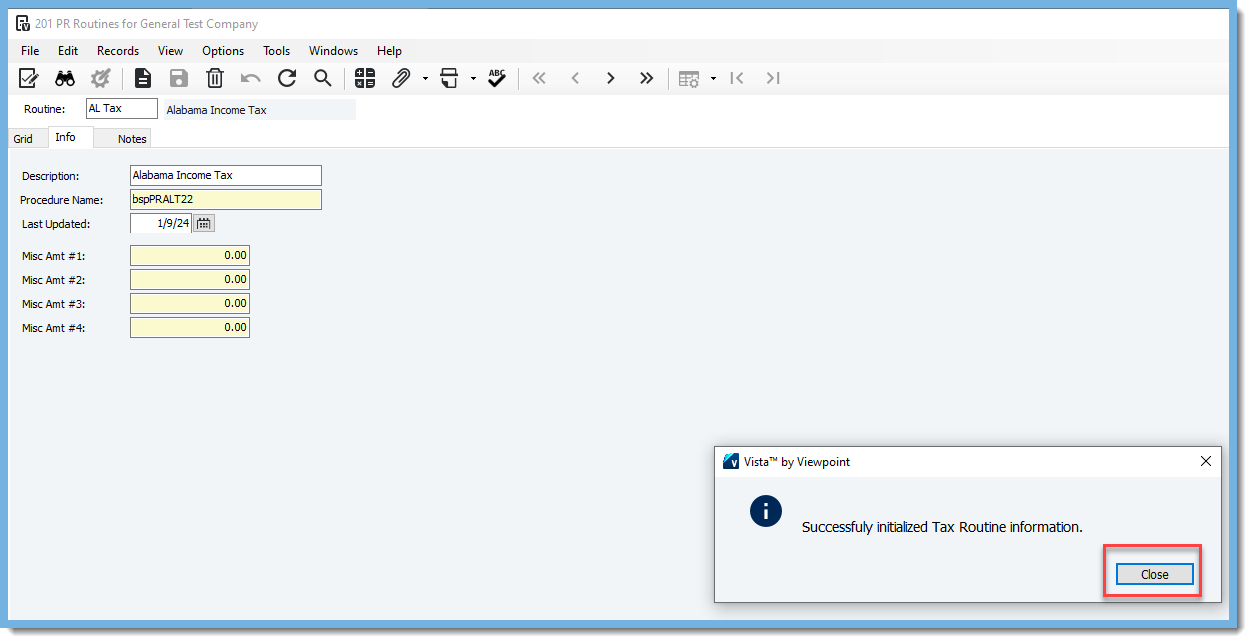 A box with "Successfully initialized Tax Routine information." will then pop up. Click on Close.
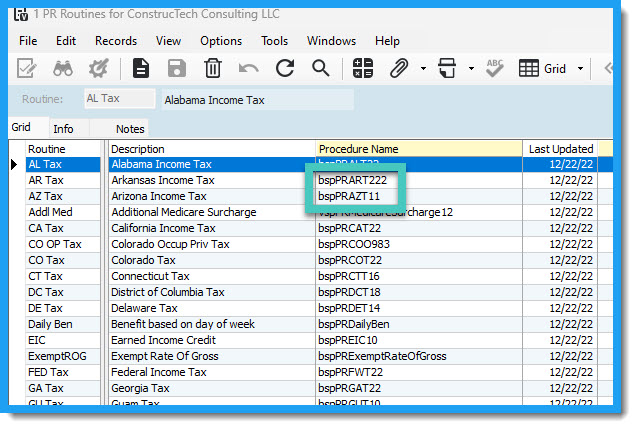
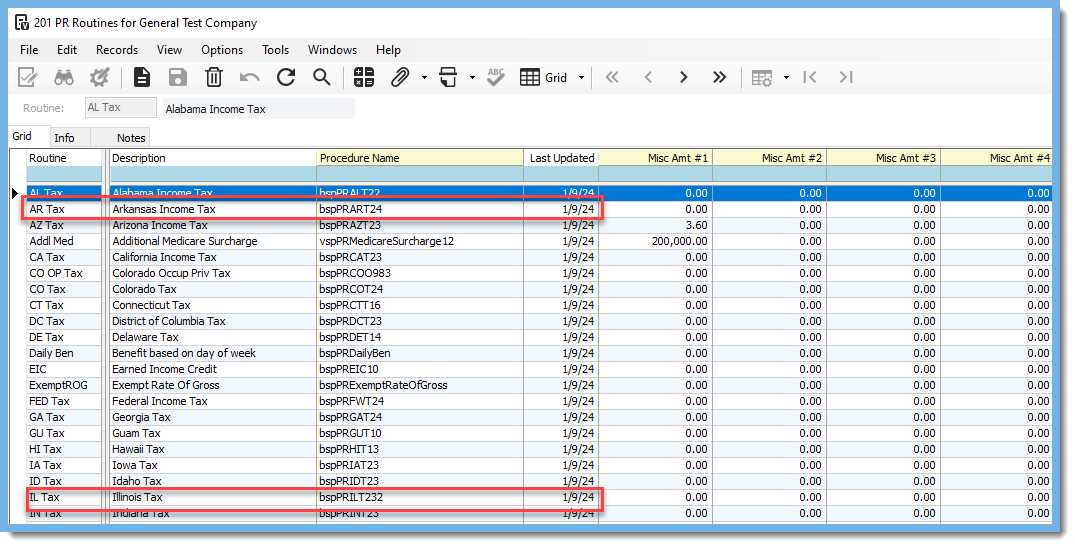 Go to the Grid and check to make sure that the "Last Updated" column has the current date. Also, for the Routines that have changed, you will see a 24 behind the Procedure Name.
  As always, if you need assistance with any Vista processes, please visit our website for

 Welcome to a world where the new isn't strenuous but a step towards streamlined efficiency! Connect with ConstrucTech Consulting to learn about this helpful tool and many more.
 Hopefully this little tip can help you with exporting data into Excel.
 The Unveiling Trick:
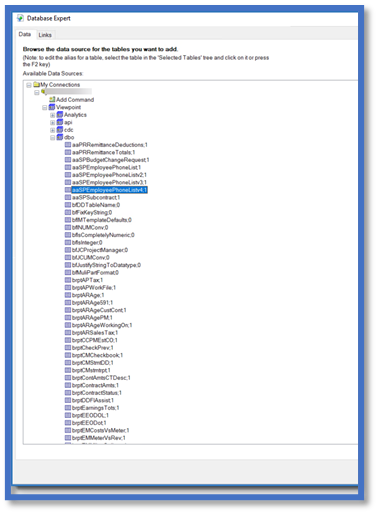
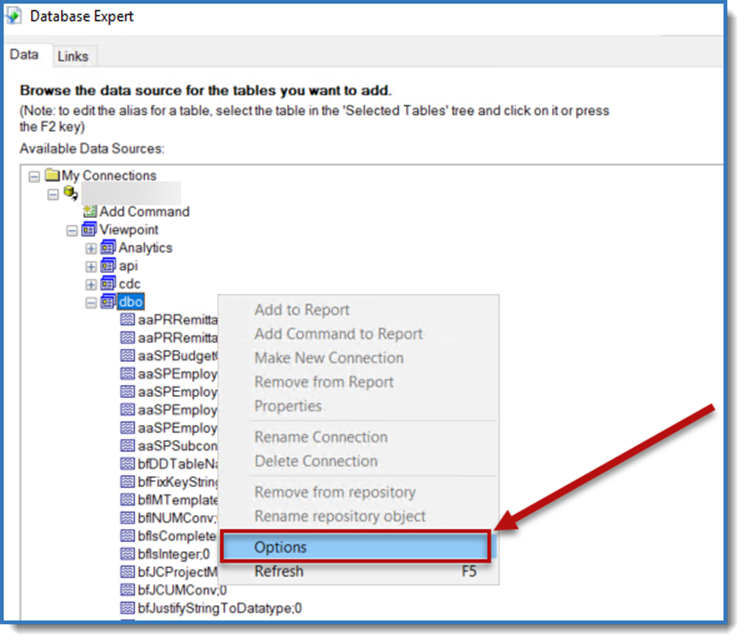 In the Data Explorer section, you'll spot a mischievous checkbox labeled "Stored Procedures." Ah-ha! Uncheck that little rascal. I know, it sounds counterintuitive – why uncheck stored procedures when you're on the hunt for a custom view? It's one of those quirky things that only Crystal Reports seems to understand.
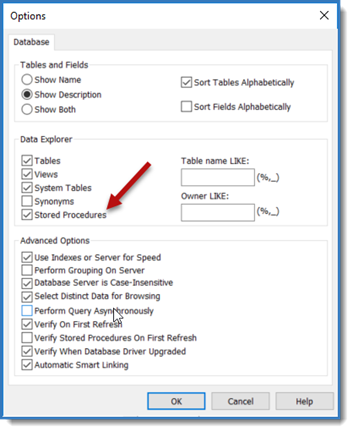 The Moment of Revelation:
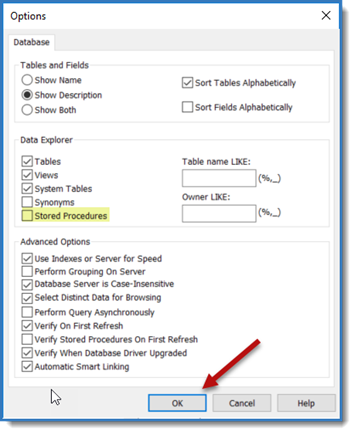 Now, right-click again under "My Connections" and select "Refresh."
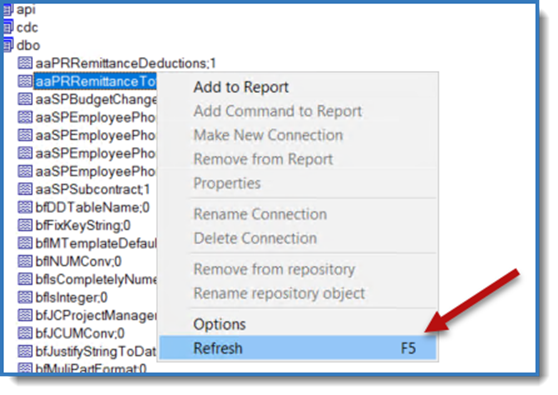 Behold! Return to your dbo, and there they are – your custom views and tables, basking in the glory of rediscovery. It's like finding a hidden passage in a labyrinth – perplexing but so very satisfying.
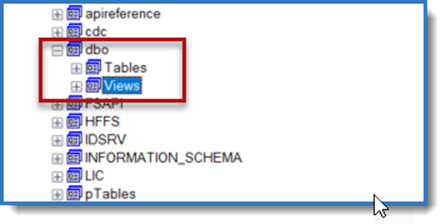 The Tricky Little Guy:
 And there you have it – the not-so-secret secret to unveiling your custom views in Crystal Reports. Remember, in the world of data reporting, sometimes you must dance to Crystal Reports' whimsical tune. So, the next time you find yourself on a wild goose chase for your custom views, just uncheck that pesky "Stored Procedures" box, hit refresh, and watch the magic unfold.
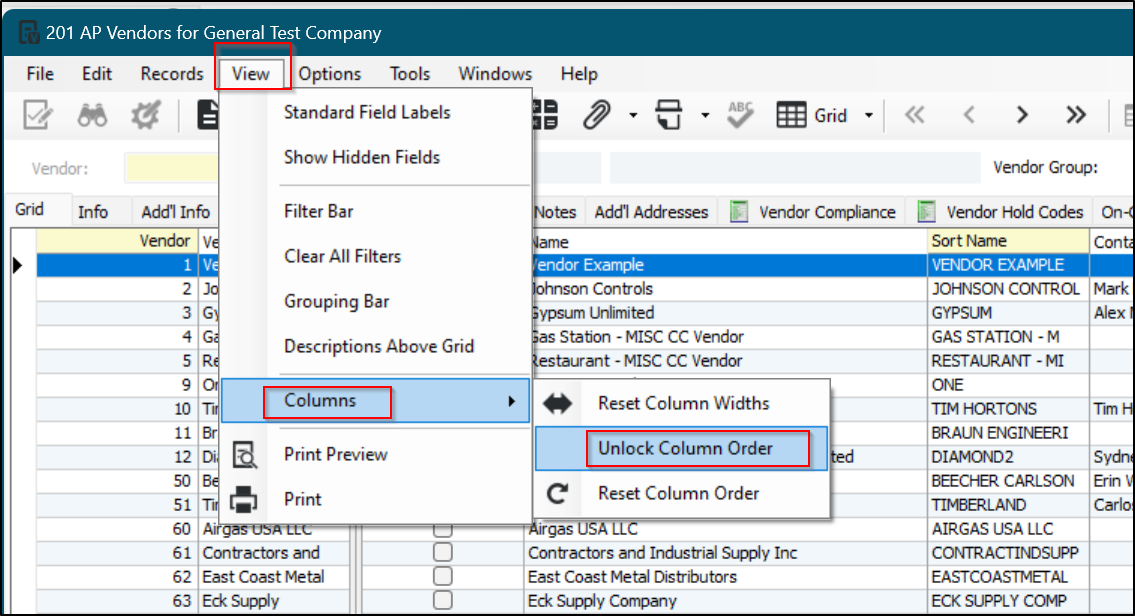
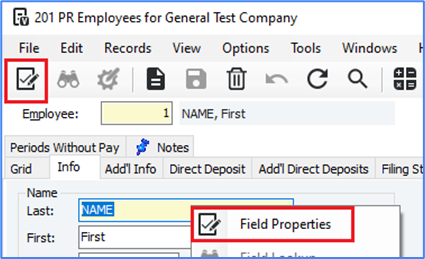
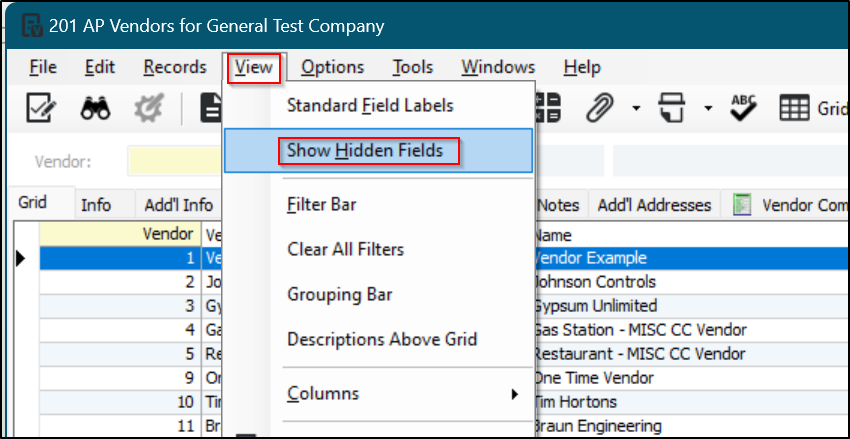
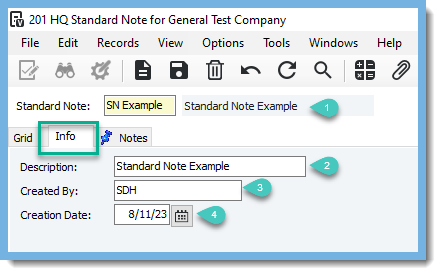
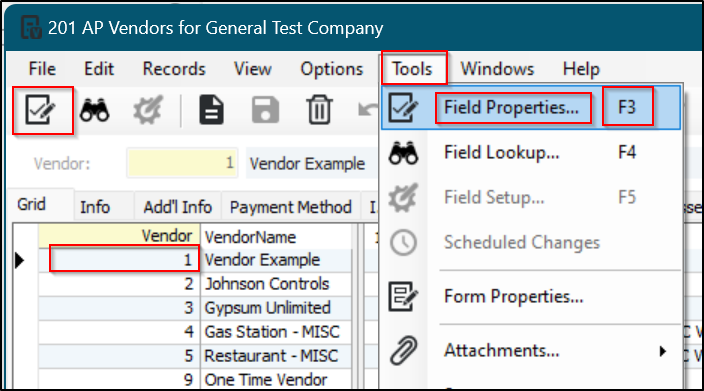 There are lots of options in the Field Properties. The option we are looking for is called Show in Grid. You can uncheck this box for any fields you don't want to show on the grid. These are usually fields you might never or very rarely use.
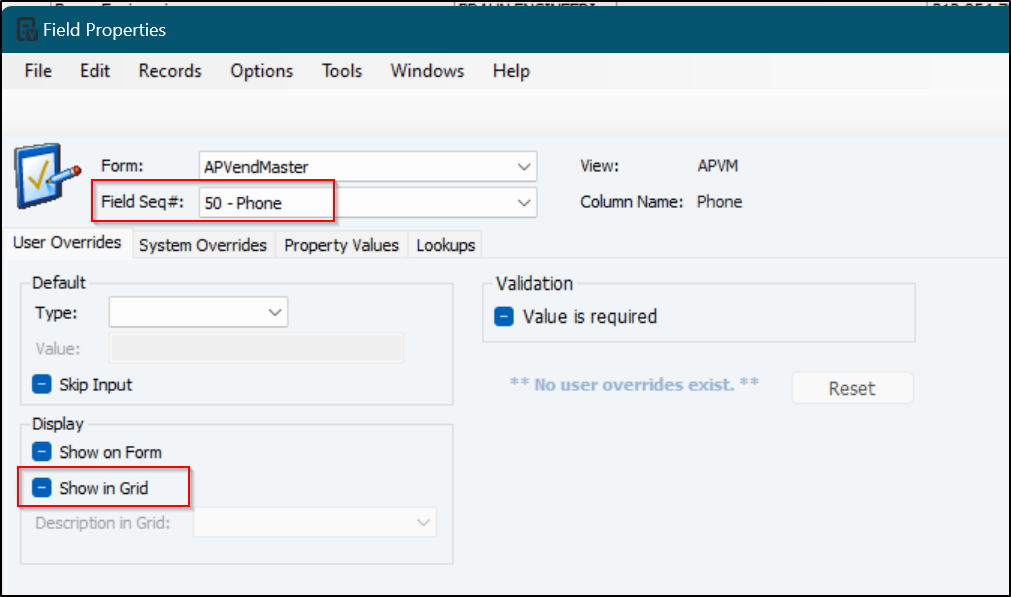
 As you embark on your meeting journey with Read, you'll discover a world of efficiency and effectiveness. In real time, Read provides gentle nudges to elevate the meeting quality and effortlessly manages meeting notes. And after the meeting concludes, it's Read that steps up to deliver a comprehensive meeting summaries, sparing you the hassle.
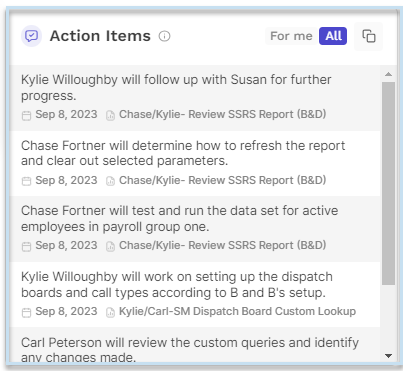 Post-meeting, a treasure trove of insights awaits you in the form of a meeting report. Transcript summaries and video playback are just the beginning – you'll also delve into the most significant moments based on engagement. It's like having a highlight reel for your meetings, boosting engagement as Read takes care of the note-taking.
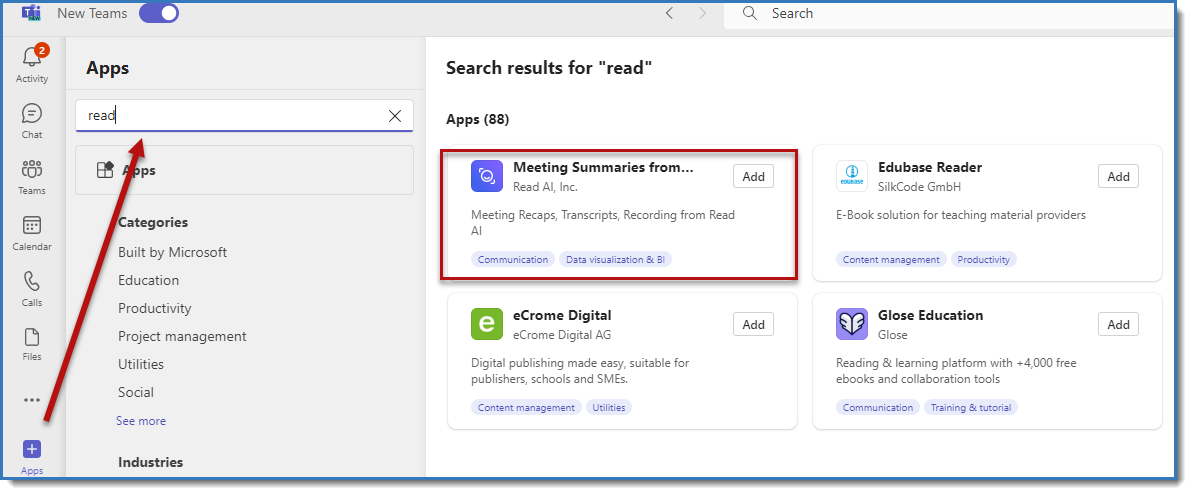 Sync your calendar to let Read know when to jump into action, and feel free to fine-tune the settings during onboarding. For Zoom users, adding Read ensures you unlock its full potential.
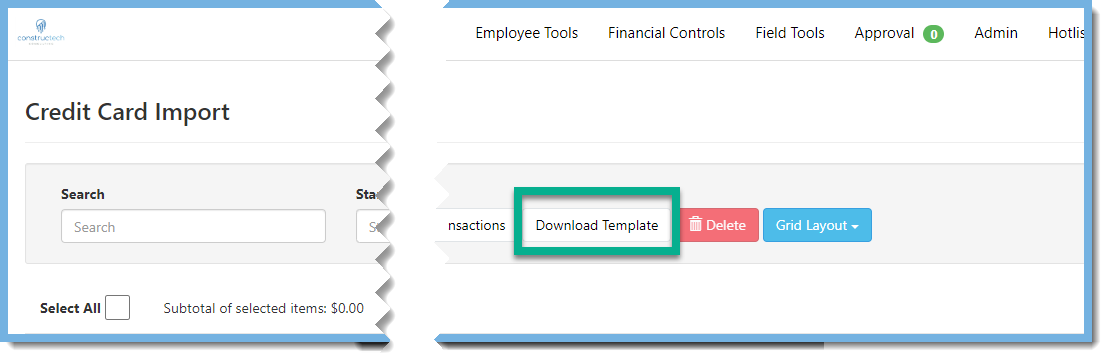
 T
T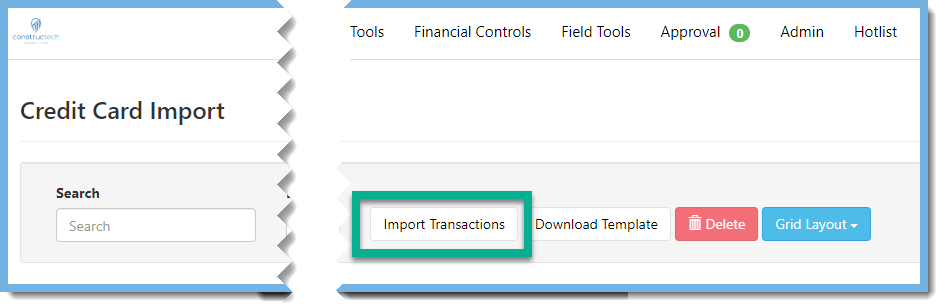

 ConstrucTech’s
 Check out Blog - ConstrucTech Consulting for more tips and tricks every Tuesday!

 Once you are redirected to Viewpoint Help, select Reports Catalog.
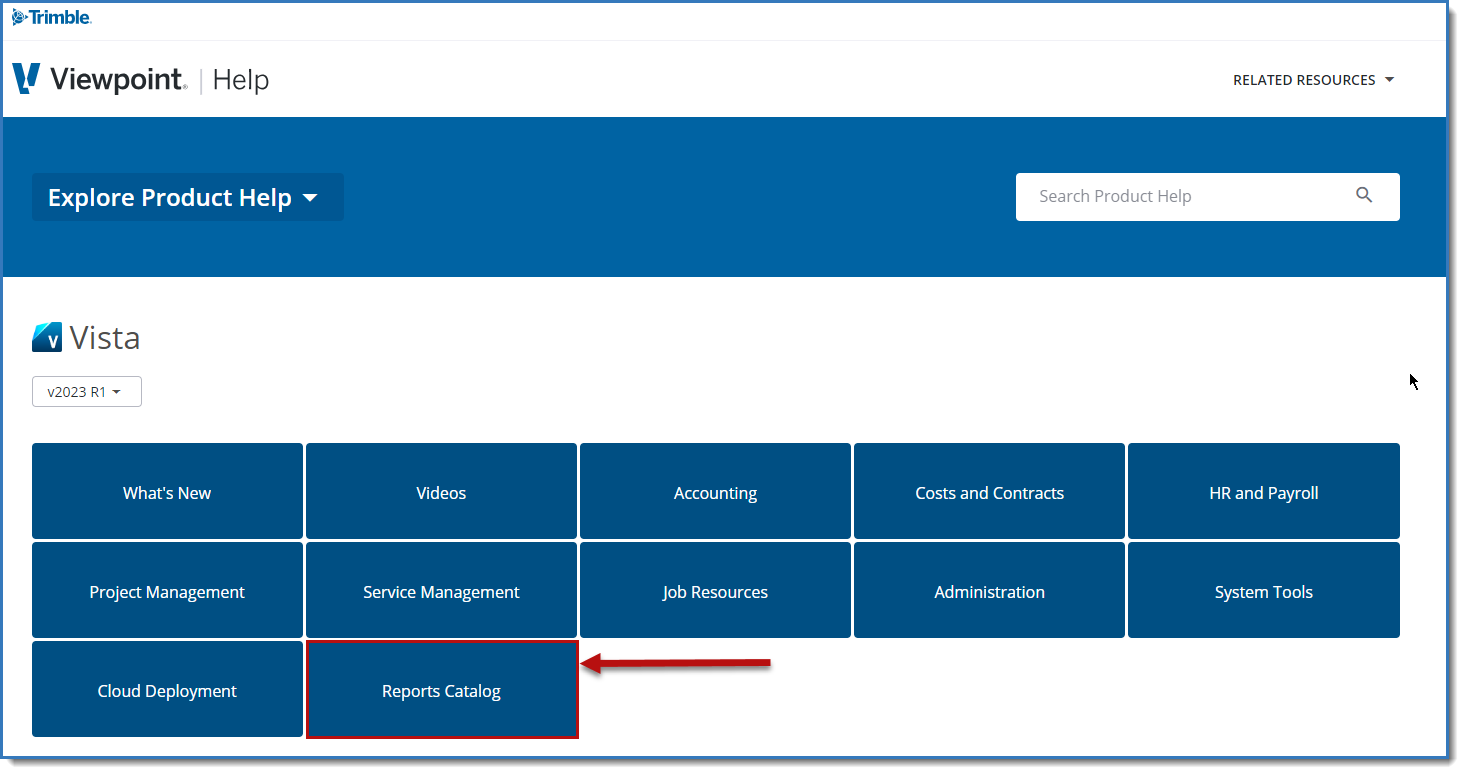 Here you will be provided a list of all the standard reports for each module.
 WAIT, it gets even better!
  No need to dread this process next time you are looking for that perfect report.
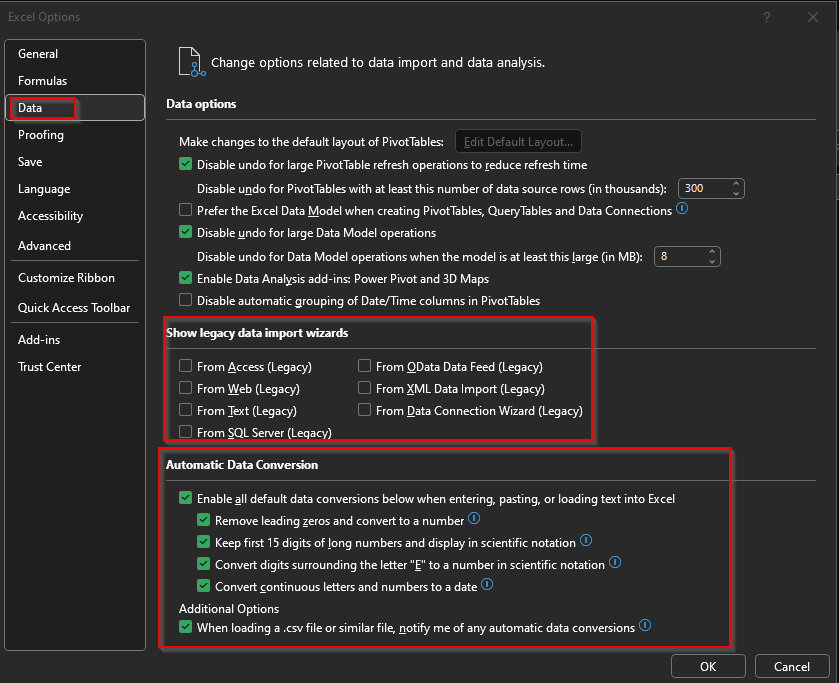
 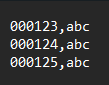 Rather than opening the .csv in Excel, instead try opening a blank Excel workbook. Then head to the Data menu, Get Data, From File, From Text/CSV.
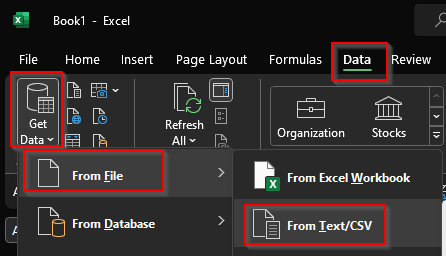 Select the file and choose Transform Data.
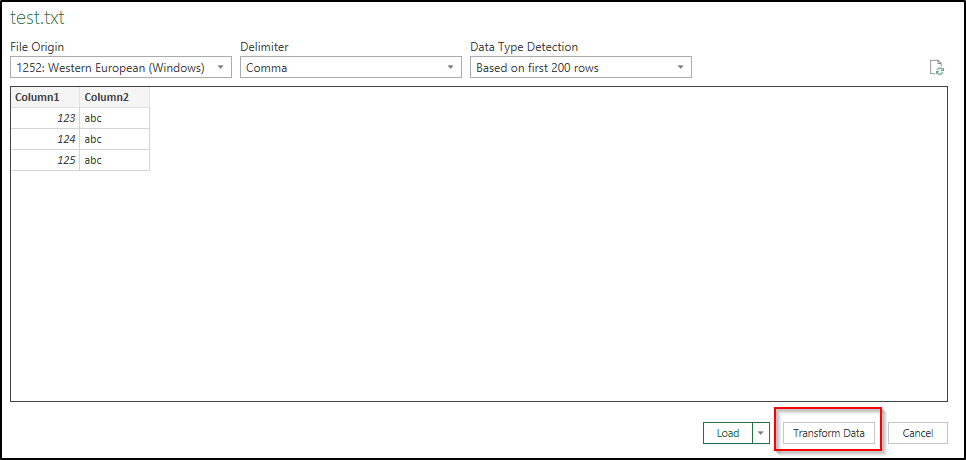 PowerQuery will attempt to guess the data types just as Excel would, only we can now change that guess in PowerQuery, unlike Excel.
 Click the icon in the left corner of the header and choose something different.
 Voila, our data is now ready to load into Excel as intended without any erroneous auto-corrects.
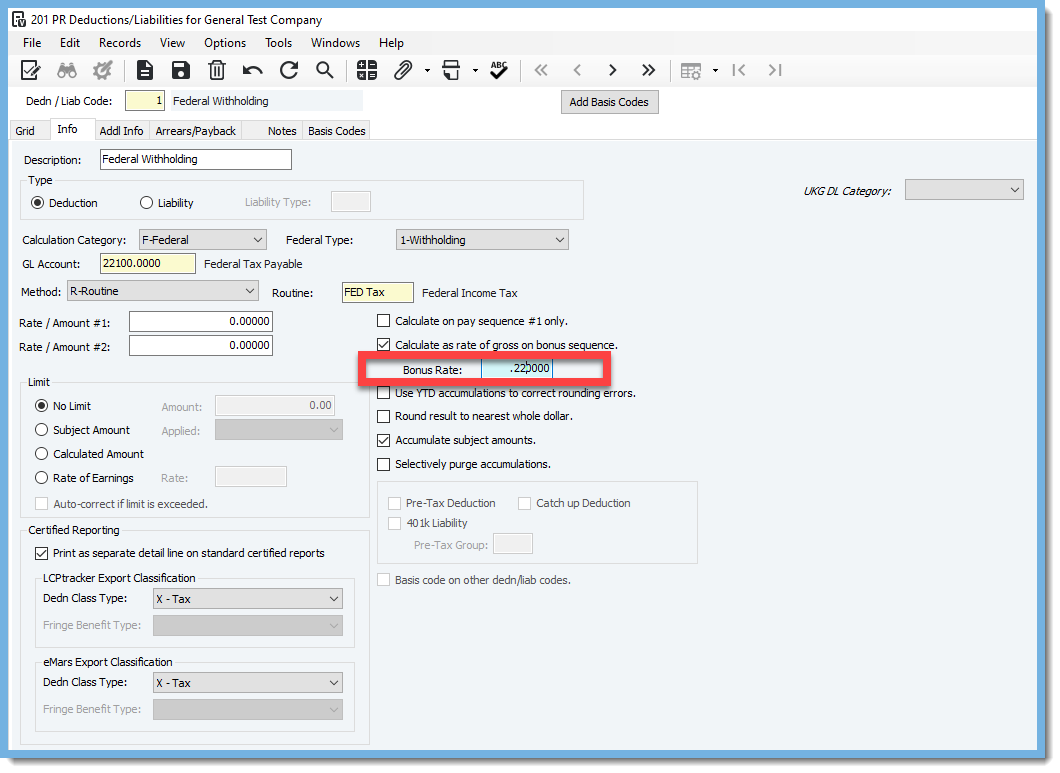
 Hopefully this simplifies things and makes your federal withholdings calculate perfectly!
 Job Billing Invoice Delivery - email invoices to customers. We have been waiting for this too. There is the ability to assign the invoice formats on JB Company Parameters and you can override that at the AR Customer level and/or at the contract-level. An override for the recipient of the emailed invoice can be made on the JC Contract, JB Progress Billing, JB T&M Edit, or on the new JB Invoice Delivery, if necessary. One concern is that the JB Invoice Delivery does not include attachments. The Billing Compiler in Financial Controls is still the best place for that process.
 Payroll Period Close Process - when running the close process on a pay period, the system will ask if you want to run the accrual/usage update for employee leave. This is nice because not running that final leave update is usually what holds up running the GL Month Close.
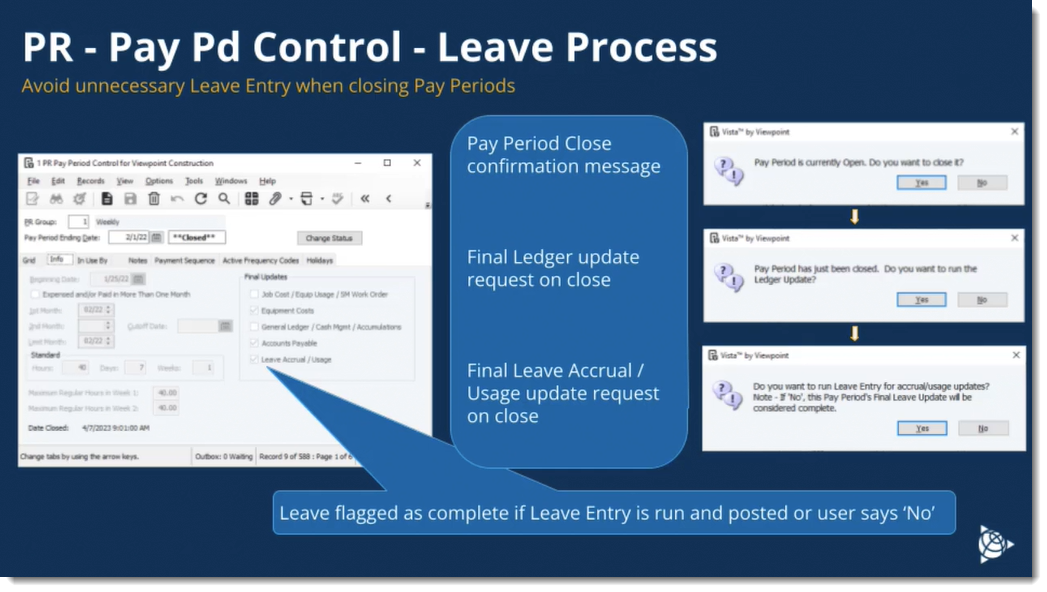 Background Jobs - when running a process that takes an extended amount of time, like printing payroll checks or direct deposit stubs, you can let that run in the background and continue on with your work. If you ever want to check on the progress, you can go to Main Menu > View > Display Job Queue to see the Background Jobs form.
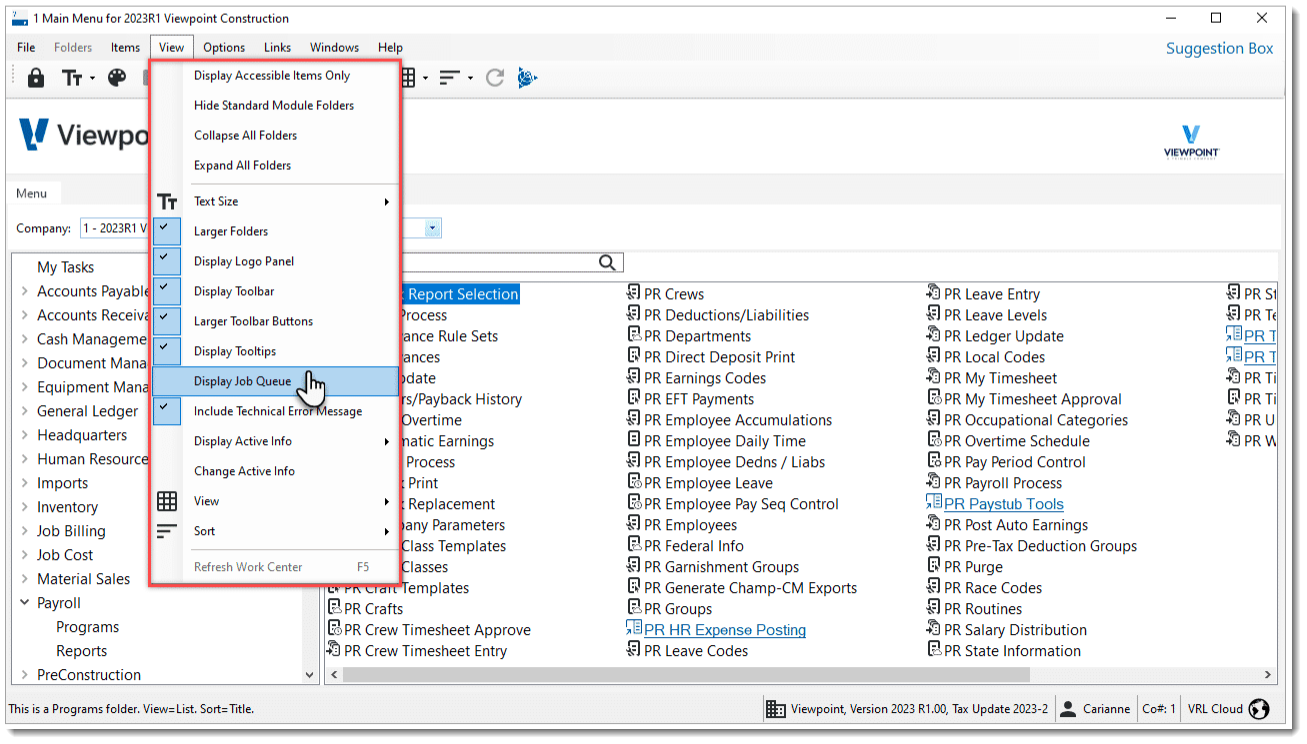 Improve Tool Tracking and Job Cost Allocations with Hilti ON! - An integration is in place that will not only track tools but will help to automatically allocate tool use and costs to jobs.
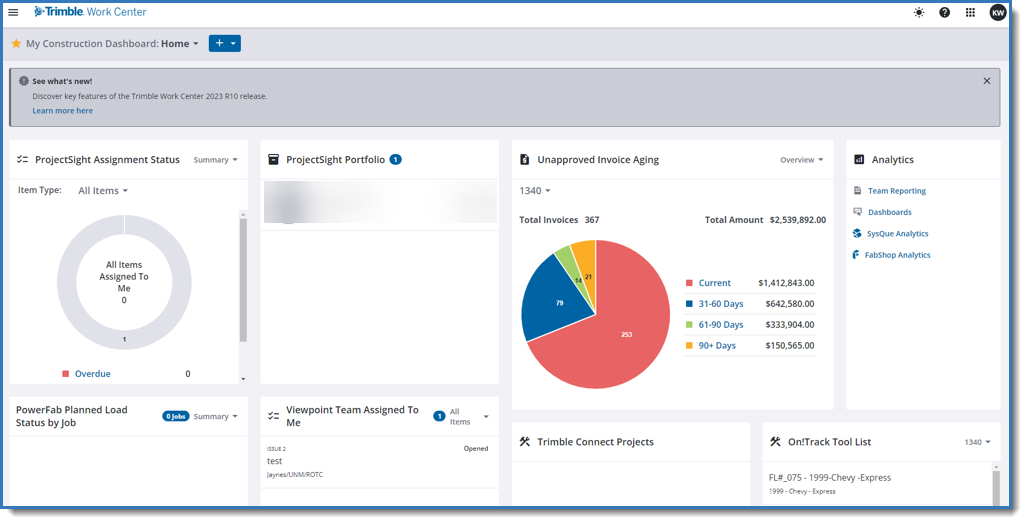
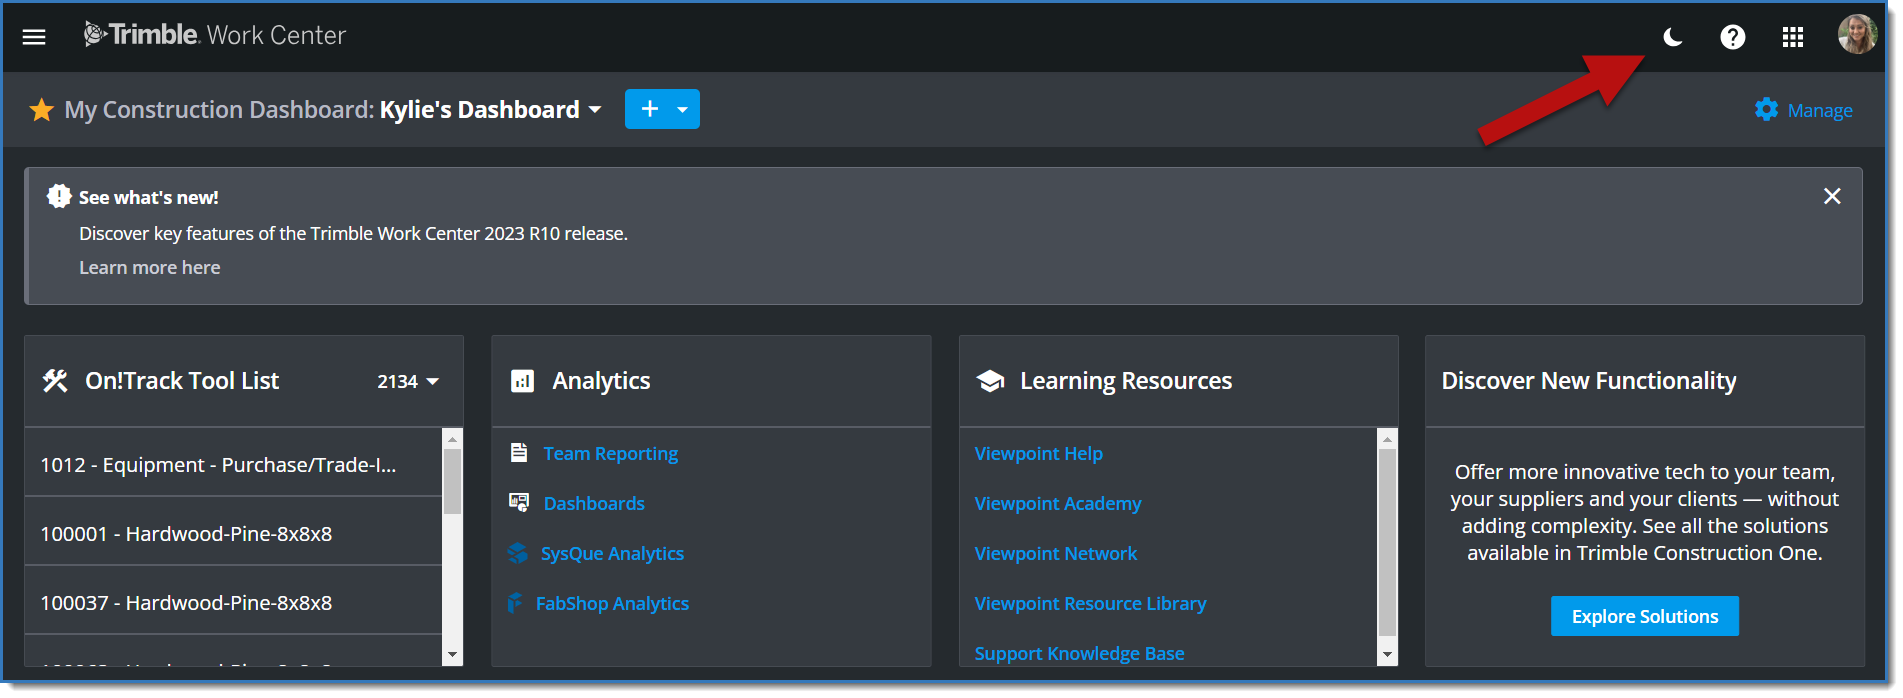
 TC1 Access - Trimble Work Center - you can now access the Trimble Work Center from the Vista main menu by clicking the Trimble Work Center icon in the toolbar. If you are using SSO to log into Vista, it will automatically launch in a separate tab without having to log in again.
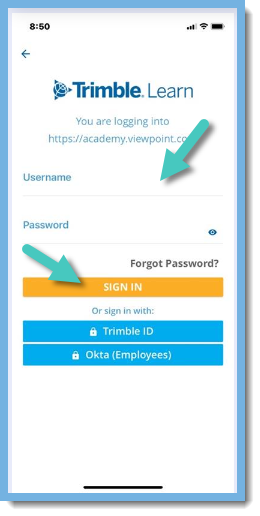
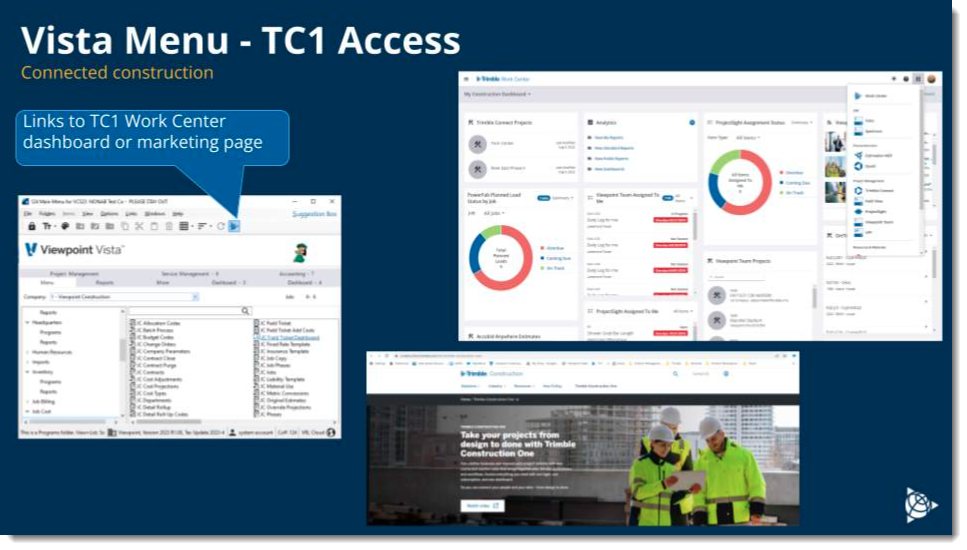 Updates to the Login Screen and Desktop Icon
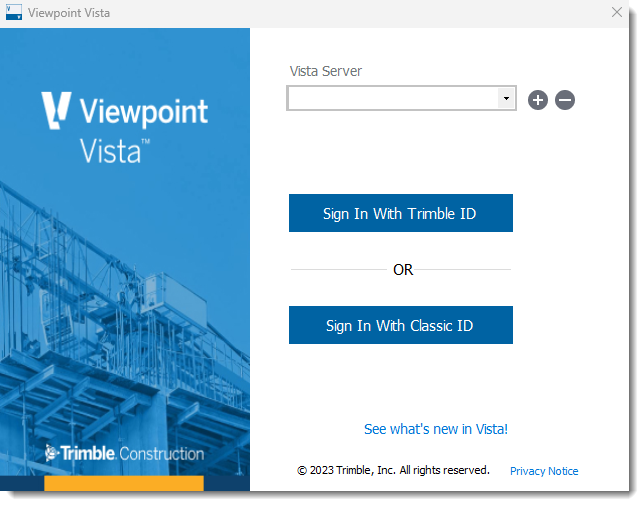 The Vista desktop icon will be updated to the following:
 Aatrix History Filtering by Report Type - you will now be able to filter your Aatrix filings by type and be able to review historical listing by user.
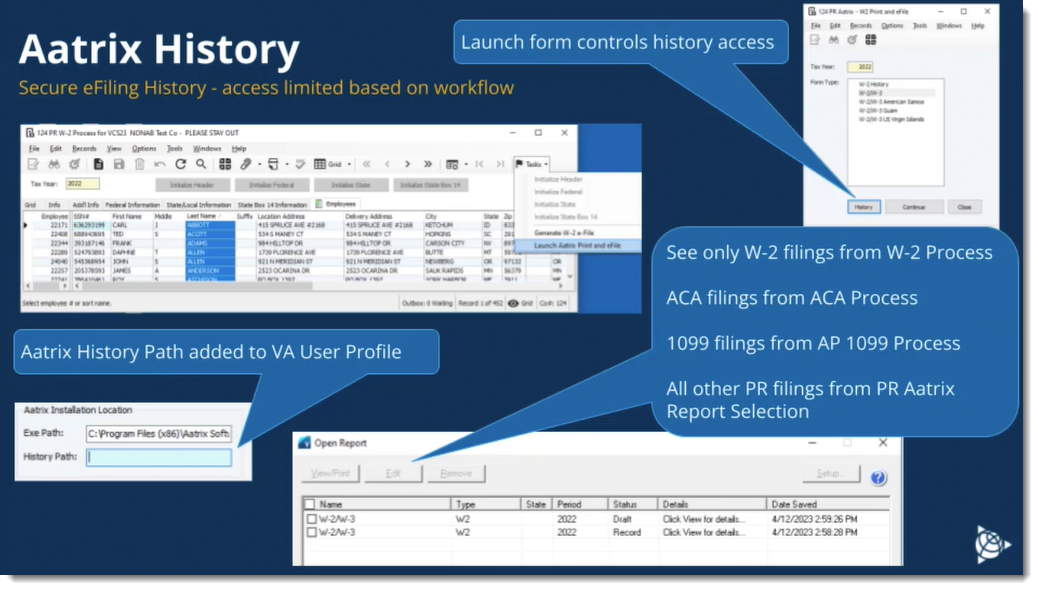 VA - New Queries that Identify Programs and Reports that Require an Office License - two reports were adding that list these programs and reports. The Office license will have full capabilities and the PM user will have restricted capabilities and costs less. Securities setting will need to restrict those PM users so that they do not access those reports because they will be counted as an Office license for that day.
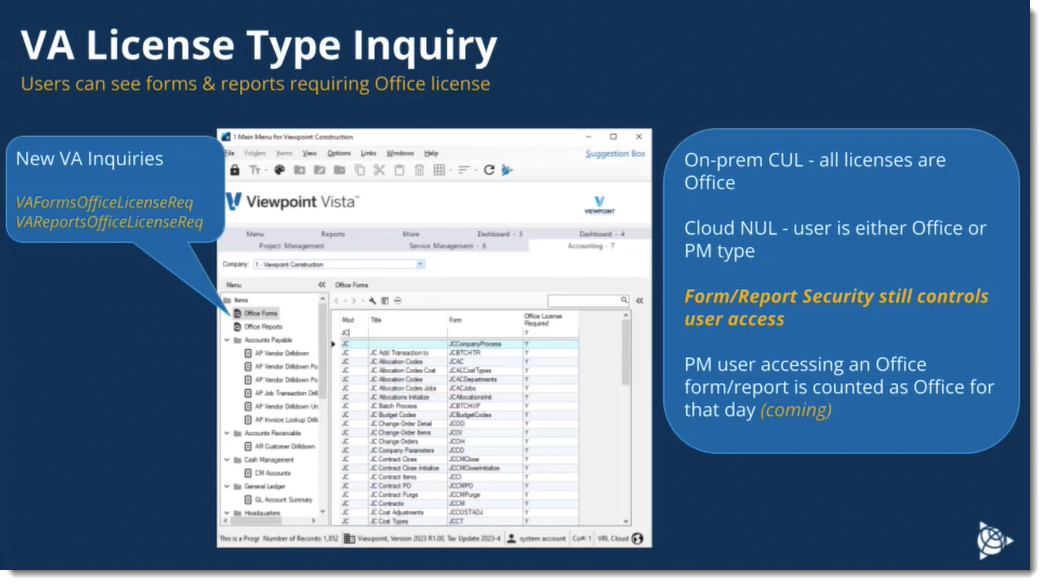 You can go to the Viewpoint Academy to read through more information and watch some short videos on some of these items.
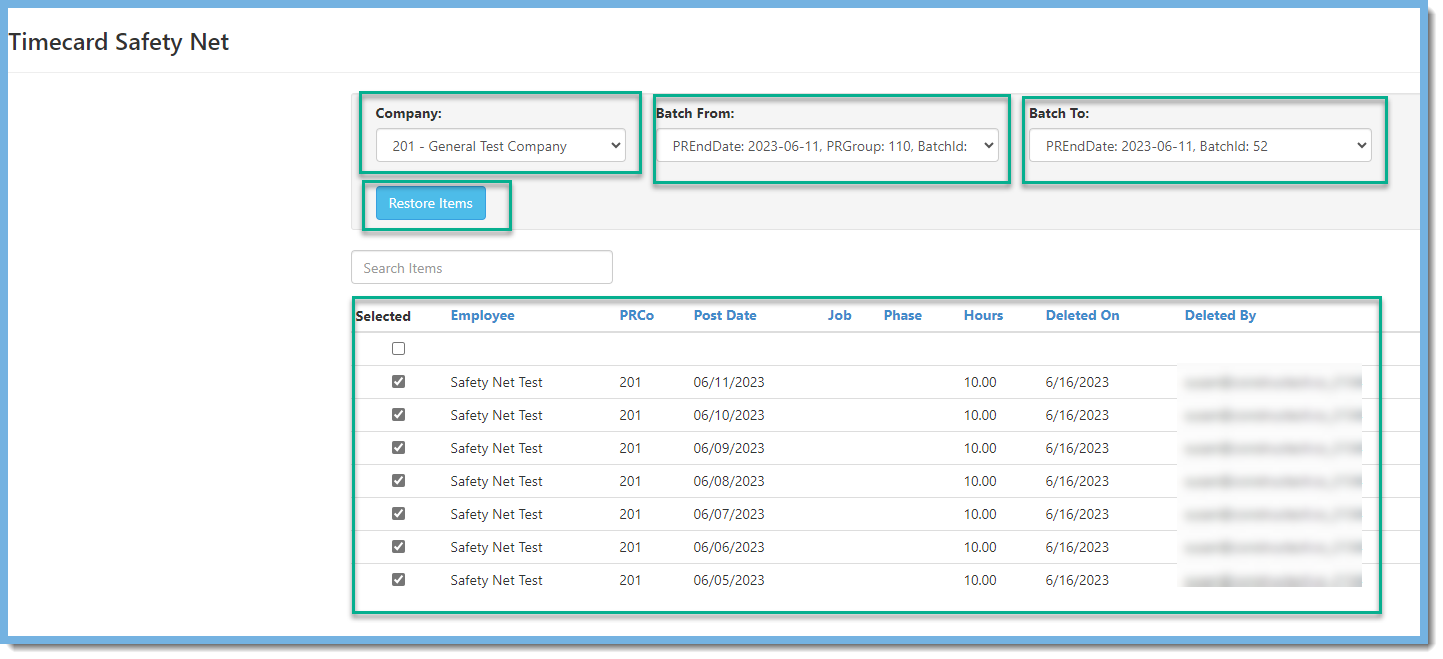
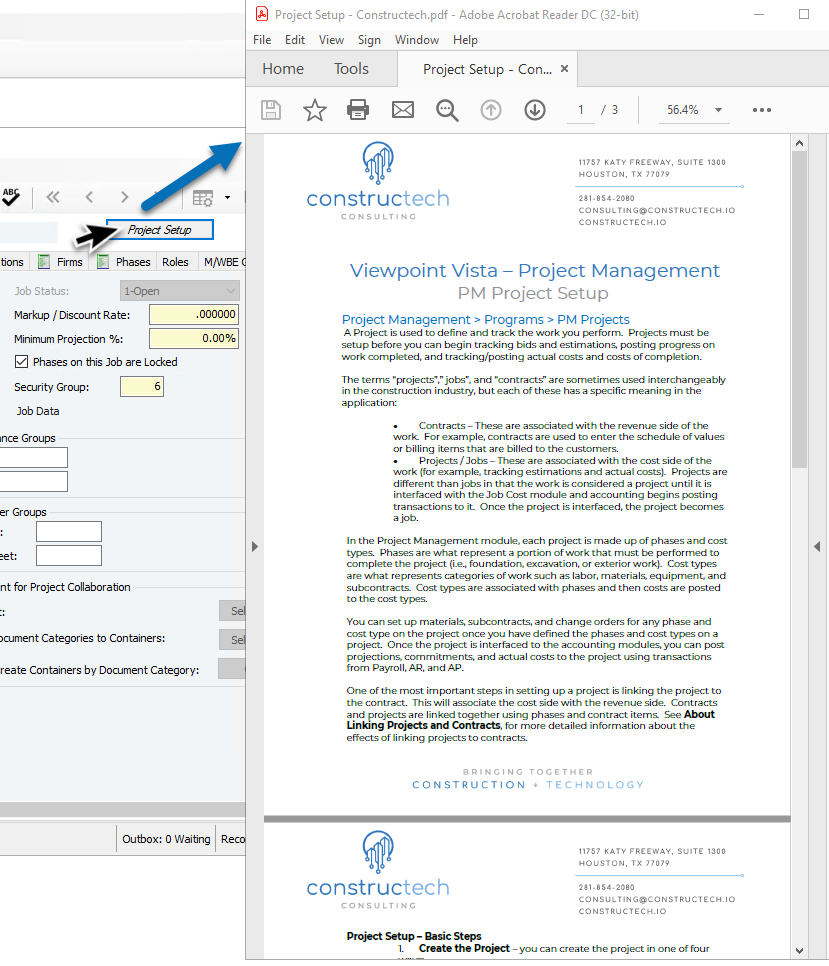
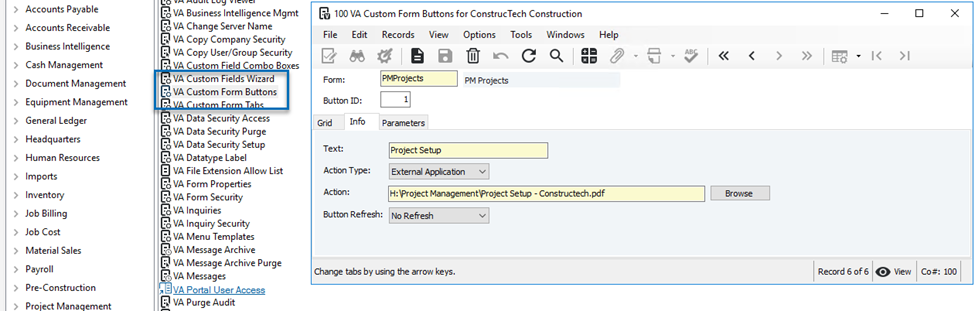
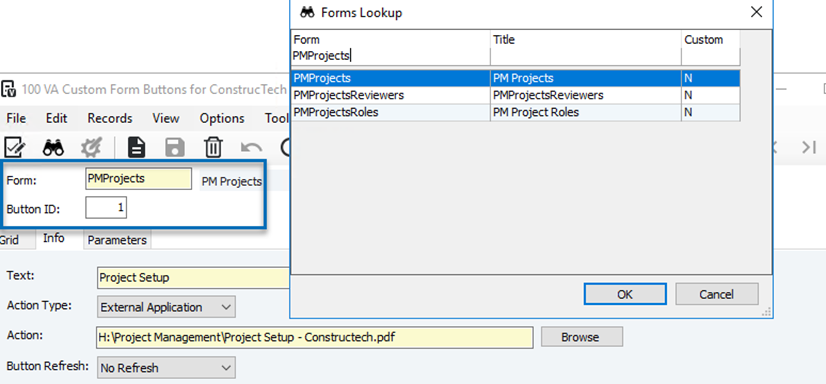
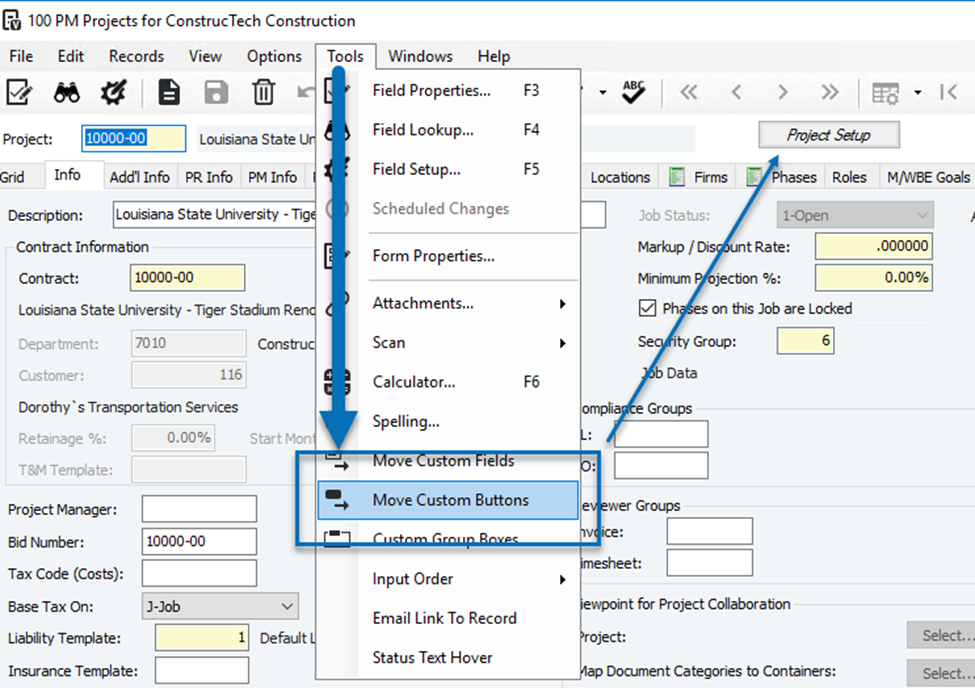
 And now you want to reference that form in an existing module within Vista.
  We can do this by adding a custom tab in PR Employees, PM Projects or JC Jobs, just to name a few, so that the records on your user defined form correlate to the specific employee, project or job.
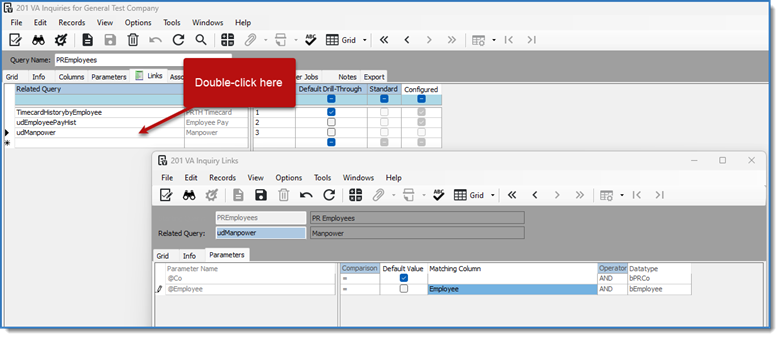
 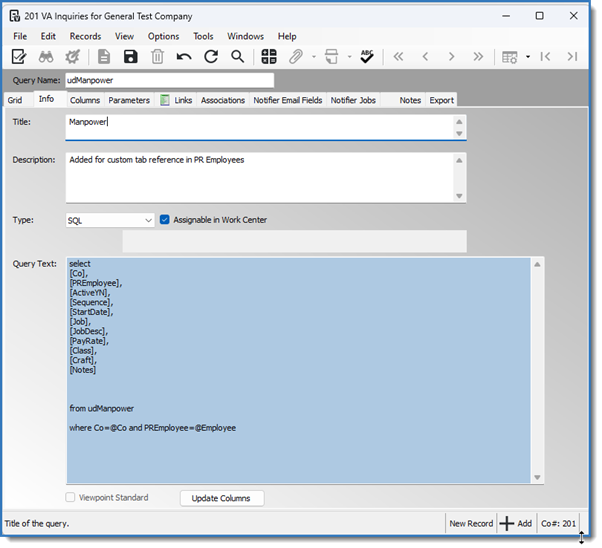 Once you have created your query, move over to the Parameters tab and make sure any parameters used in your Query Text are also assigned in the Parameters tab as well.
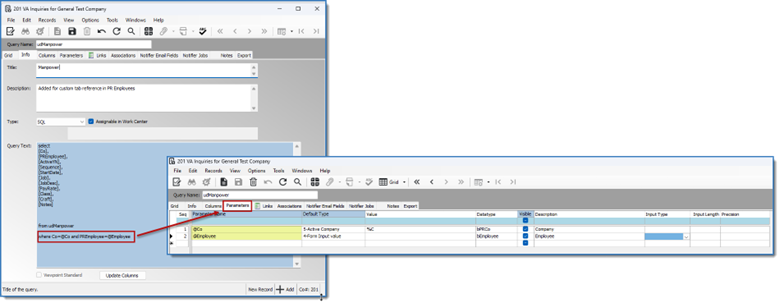 Setting these parameters ensures that when you are looking at a specific employee in PR Employees that you only see records related to that employee instead of it pulling in all the records from your user defined form.
  While selected on the PR Employees inquiry, locate the Links tab.
 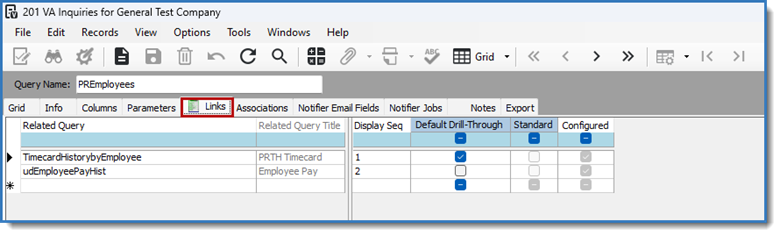 Now, and this part gets a little confusing, so try and stay with me, we want to link the new VA Inquiry we just created to the already existing PR Employees inquiry.
 Once you have entered your parameters, select save and you can close out of VA Inquires, we are done in here.
 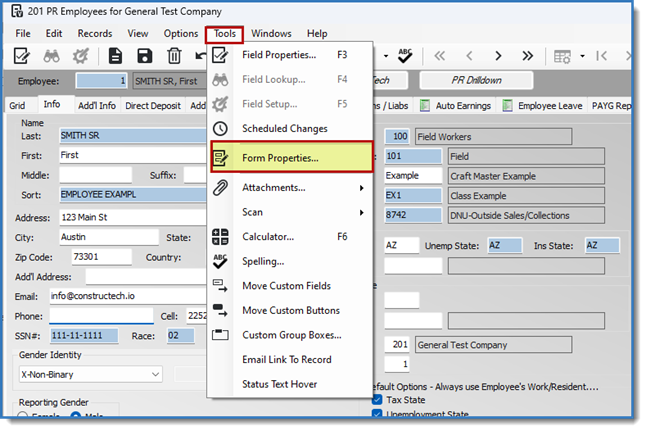 In the new window, select the Tab Pages tab, then Add to give your new tab a name.
 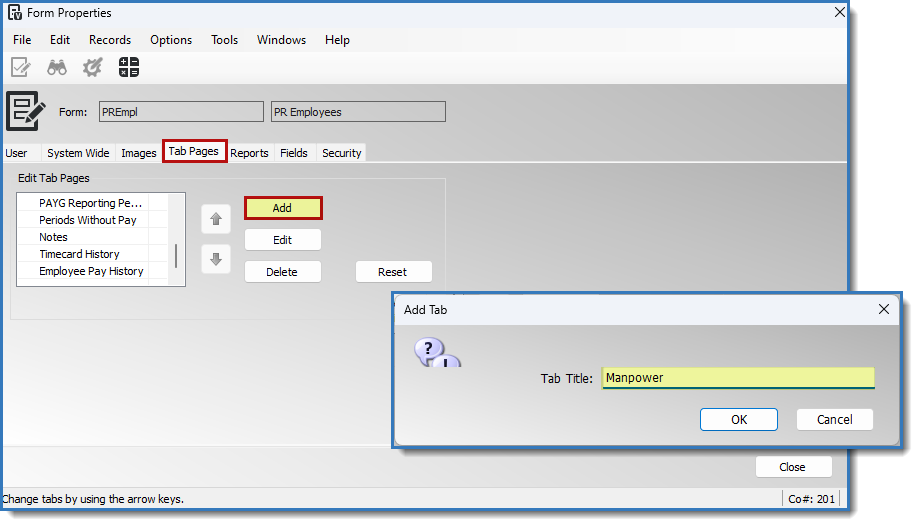 Lastly, we need to edit that new tab. Click on the name of the tab page you just created and select Edit.
  A new window is displayed to select your VA inquiry we created earlier. Change your Control Type to 3-Query
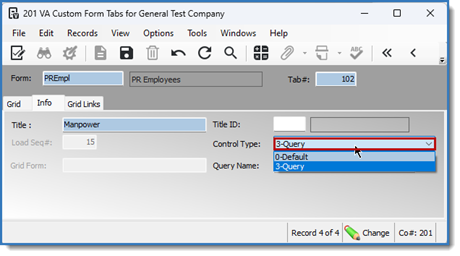 In the Query Name field, use your lookup to select your VA Inquiry you created earlier.
 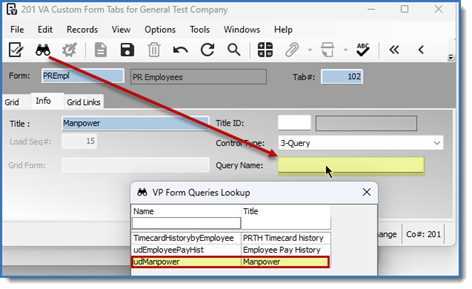 Once you have selected the Query Name, you can save and close the VA Custom Form Tabs section.
  This process can be a little tricky, so if you don't get it on the first go round don't get discouraged, we've got you covered. Now go get fancy!
  This option that Viewpoint/Trimble made available recently can greatly reduce frustrations with respect to viewing reports over VRL.
 Then from AP Transaction Entry, click the paper clip icon and Select Page Splitter
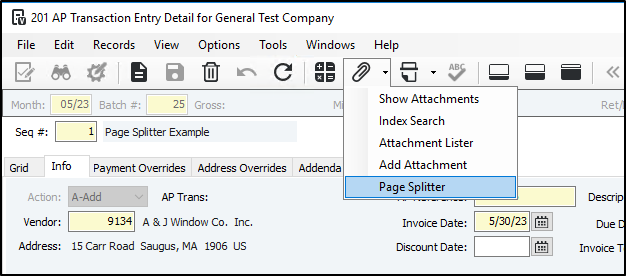 From the Page Splitter program, click the browse button to find your multi-page PDF. You can then click the various pages to view them and drag/drop them right into Vista. To drag/drop multiple pages, simply use Shift-Click or Ctrl-Click to select multiple pages before dragging and dropping.
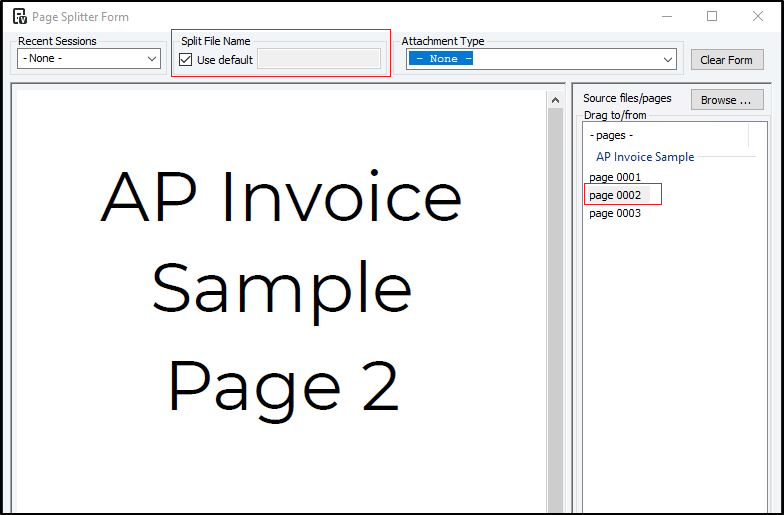 That's all there is to it. No more scanning in individual pages and having to name them one at a time.
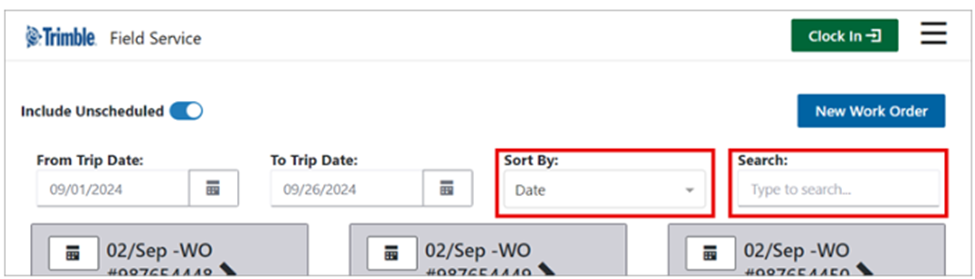
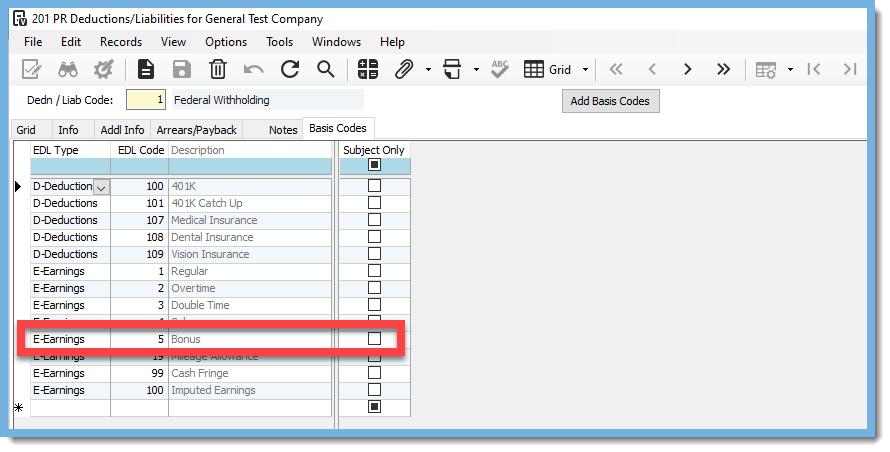
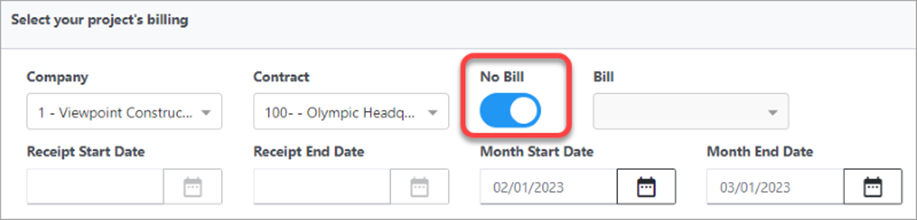
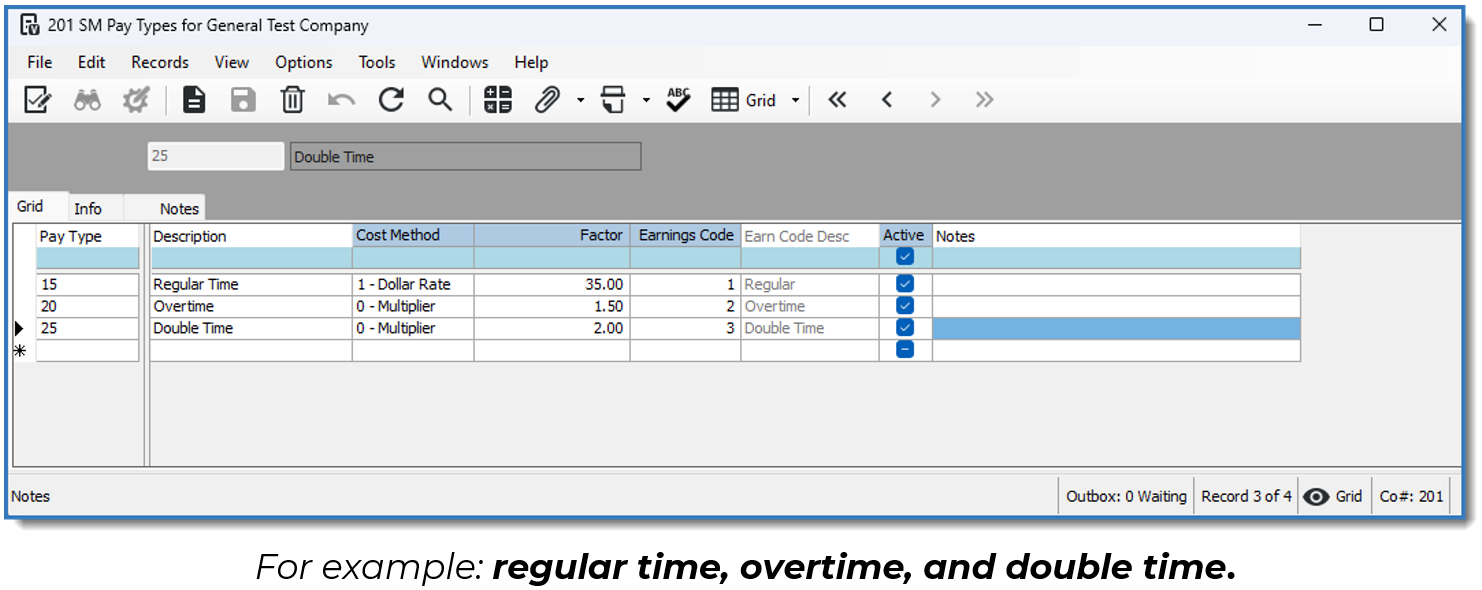 When creating work orders, pay types are used to derive labor cost estimates so that you can bill for service work before payroll is cut. The actual payroll costs are updated to the work order once you process your payroll.
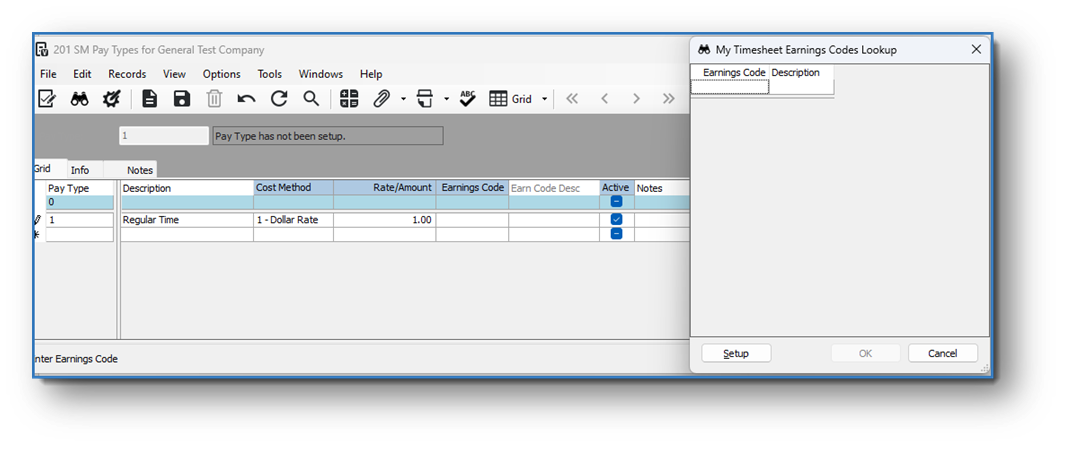 Don’t Panic! Let me show you how to fix the SM Pay Types Earn Code lookup.
 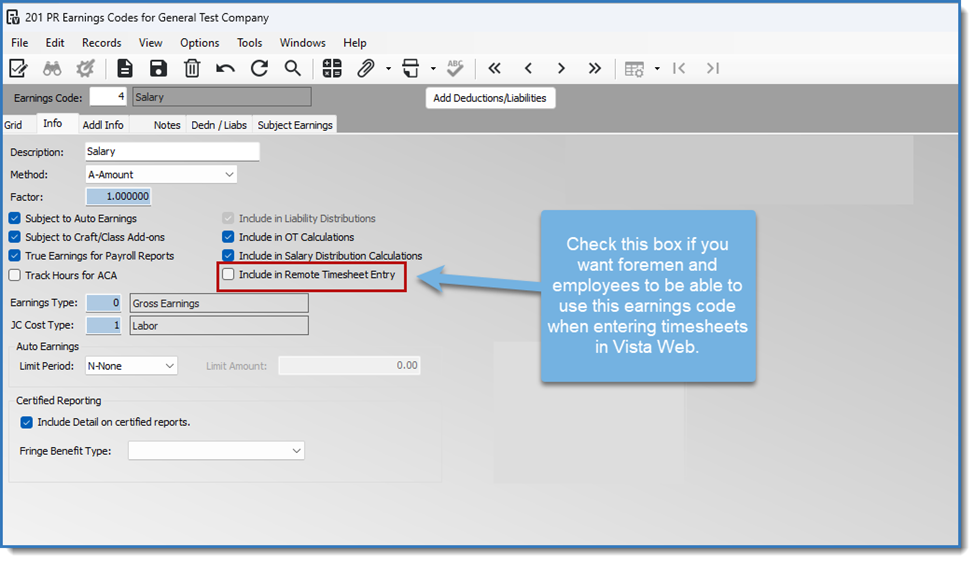 2. Once you have checked this option for any PR Earn Code that you would need to include in SM Pay Types, they will then appear in the lookup.
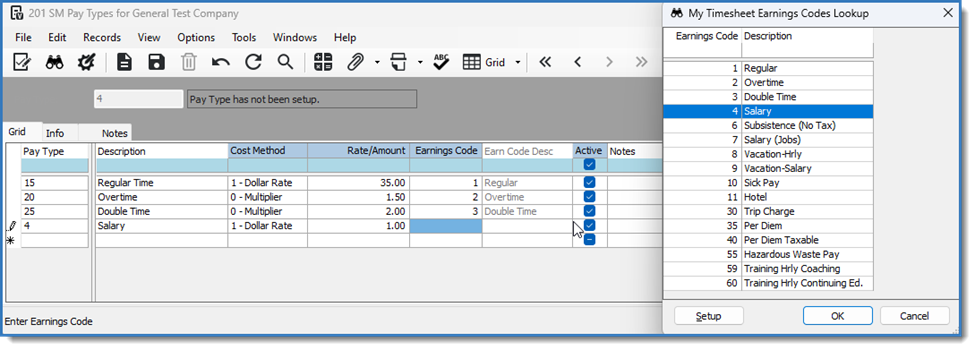
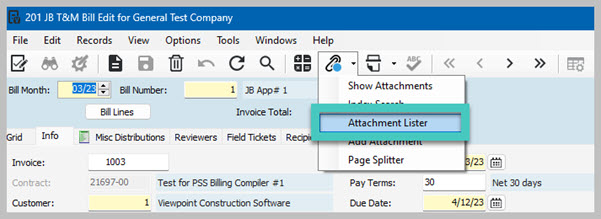
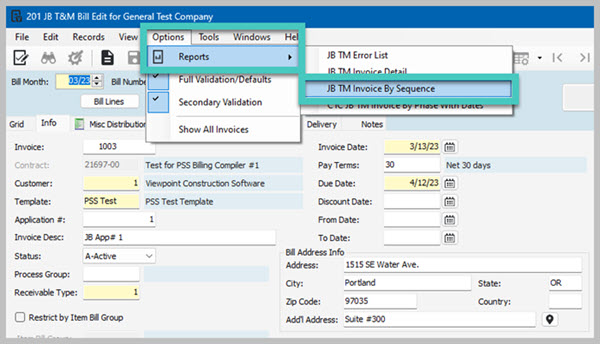
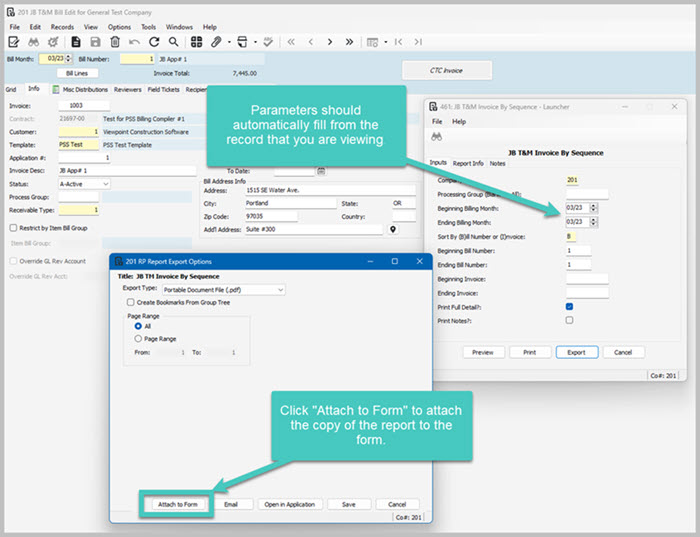
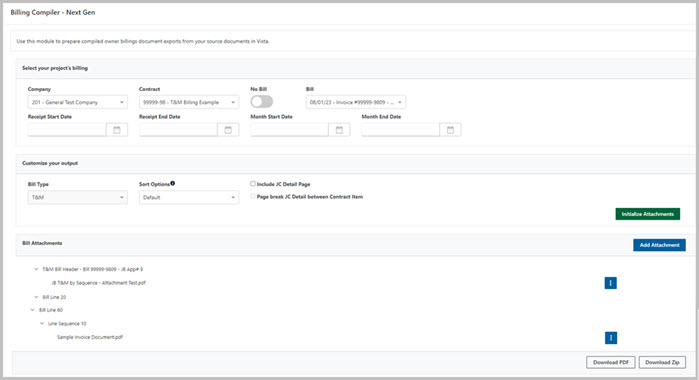
 For more information, see How to Use the Next Gen Billing Compiler.
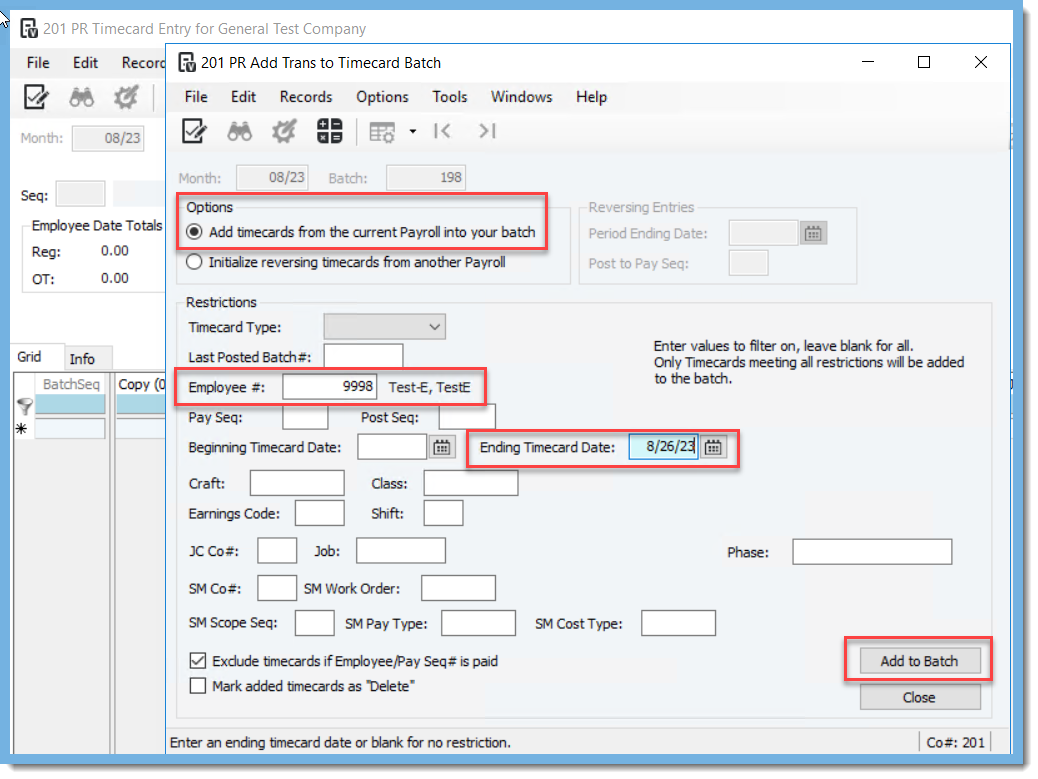
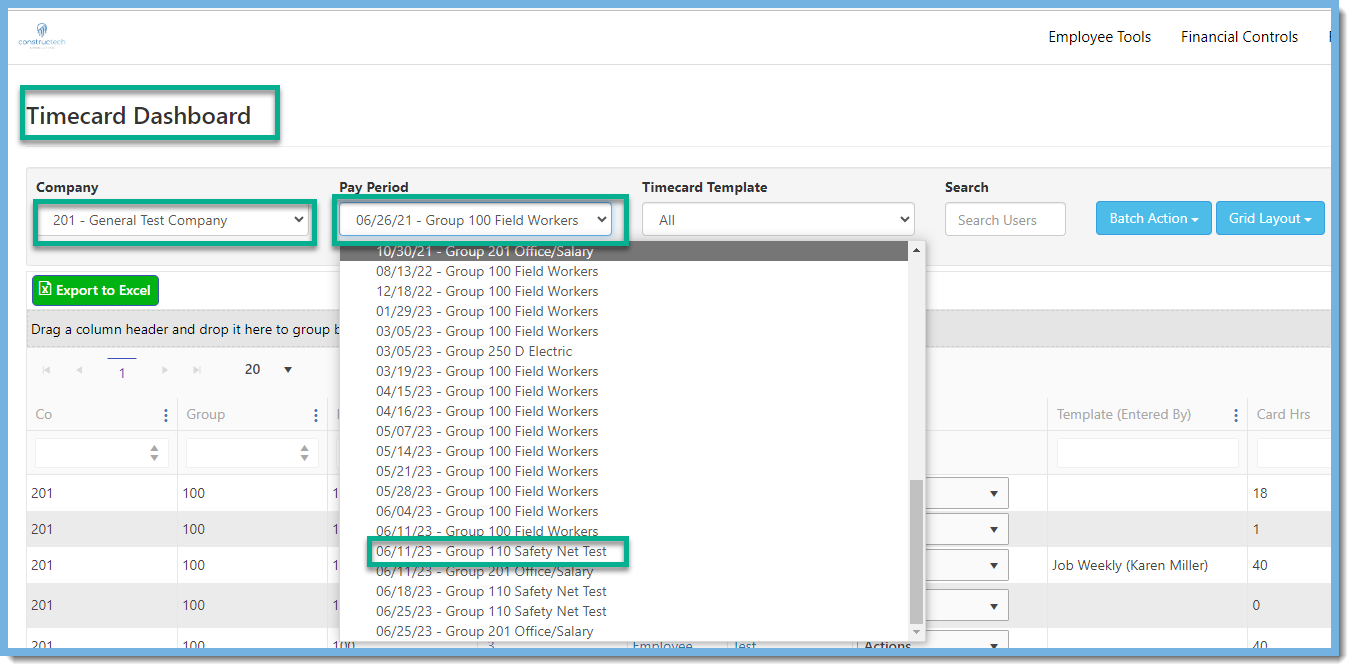
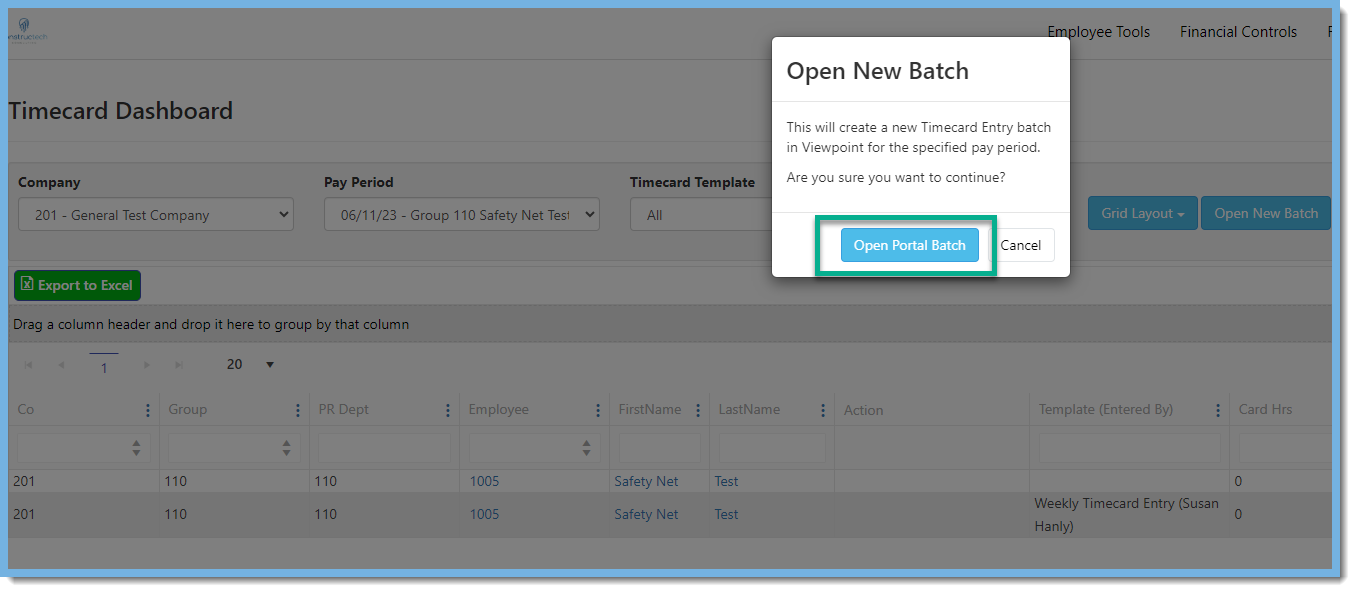
 It will ask if you are sure you want to continue, click "Open Portal Batch", and make note of the batch number by clicking the drop down on the "Pay Period" and find that current pay period. It will list the batch number in the description.
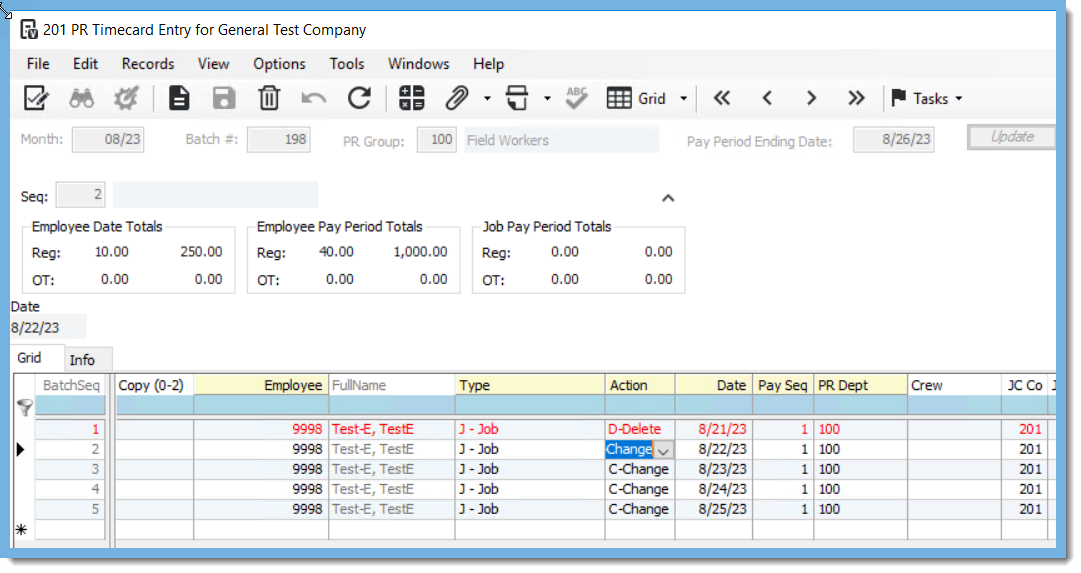
 All of the entries from any batches that were posted for the pay period will be in the portal batch again. If you need to restrict the entries to the one batch, there is a field for the "Last Posted Batch#" where you can enter the batch number that was posted. Review the results to make certain that everything is correct. Now, simply close the window without posting the batch and you will be able to see the time in the portal again.

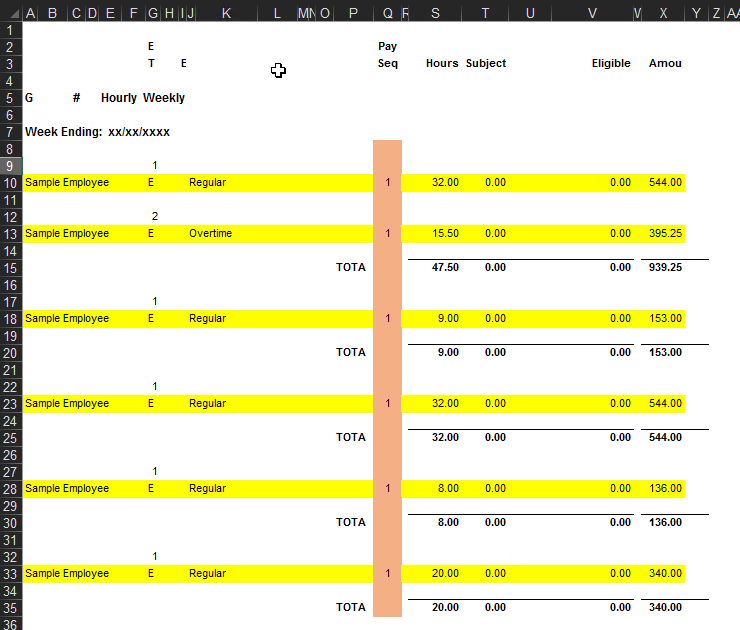
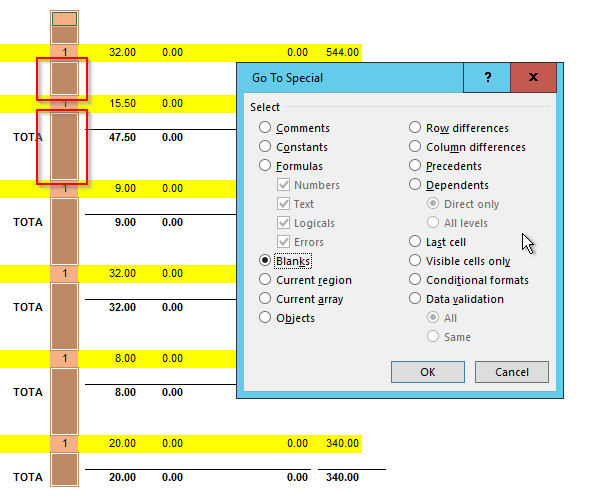
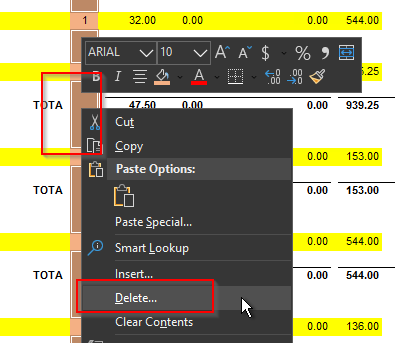
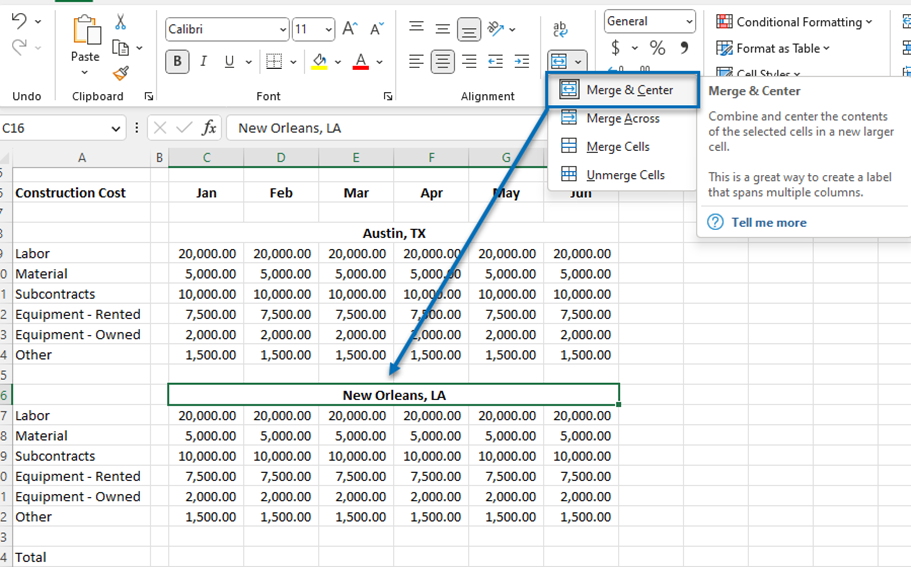 There is no doubt that this provides a much cleaner look on our schedule. So, what is the issue?
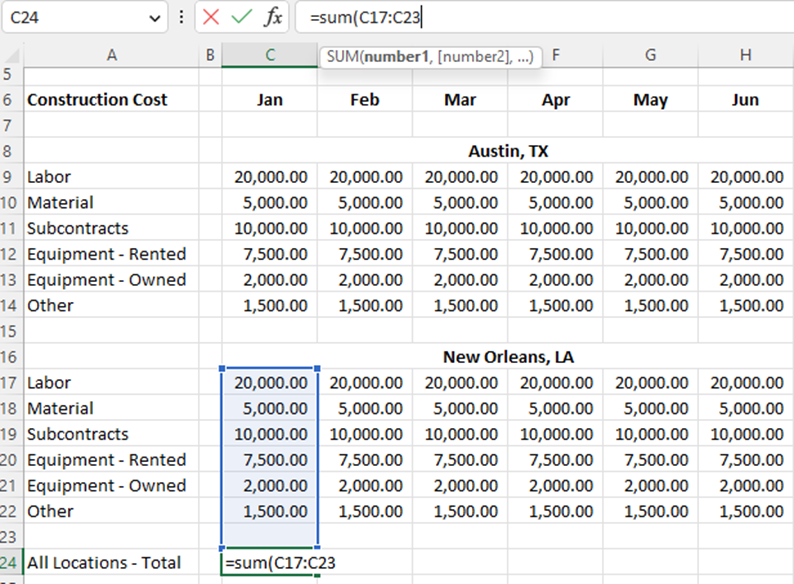 The merged cells in Row 16 restrict our ability to continue our function vertically to sum the cost for our Austin, TX location.
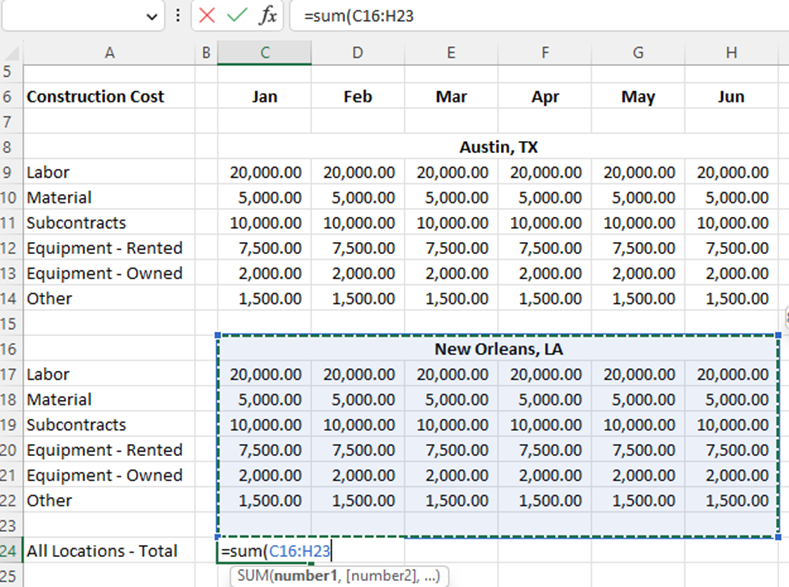 Let’s try this again and format the location title with Text Alignment: Center Across Selection.
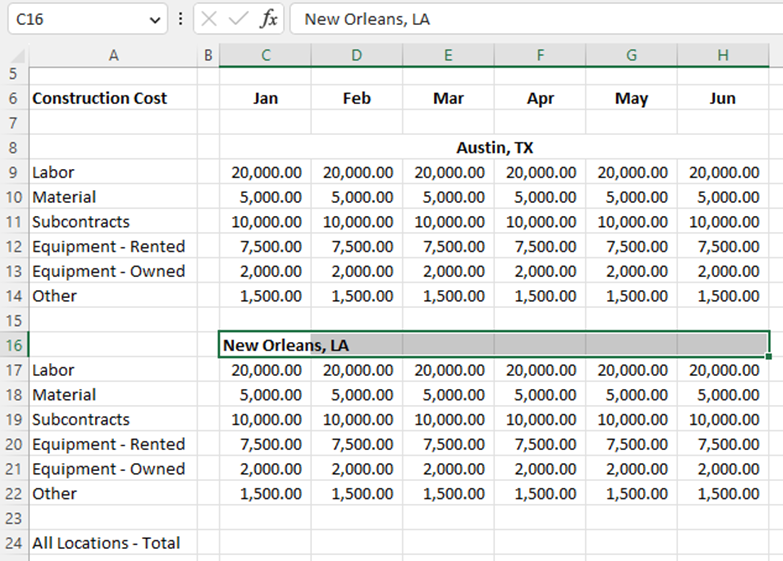 Next, right click on the highlighted cells and select Format Cells…
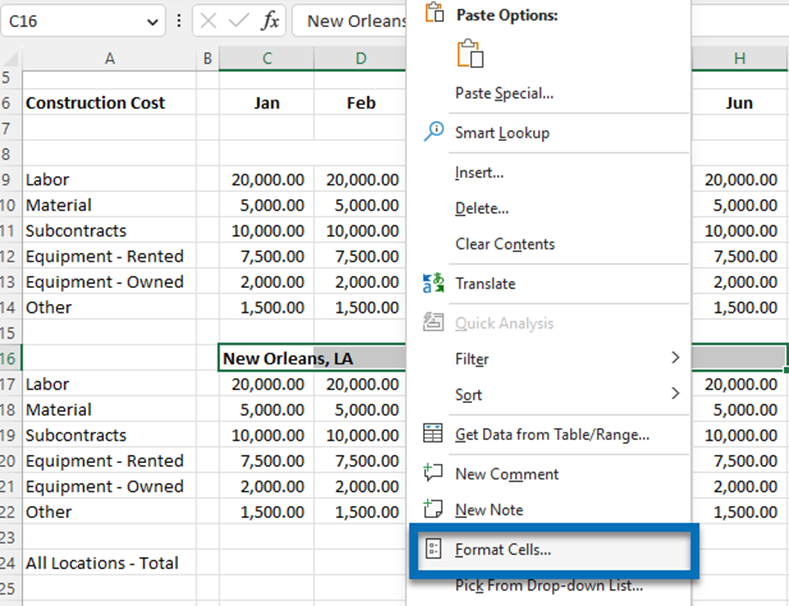
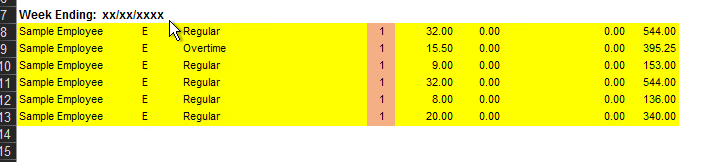
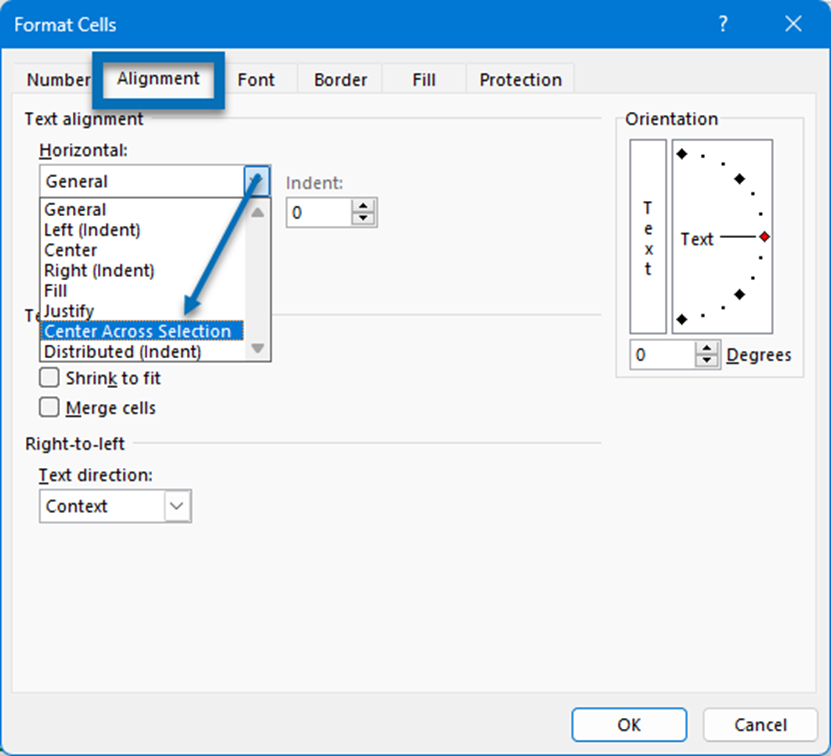 The header is now centered without any merged cells. The look and feel is identical as the Merge & Center format.
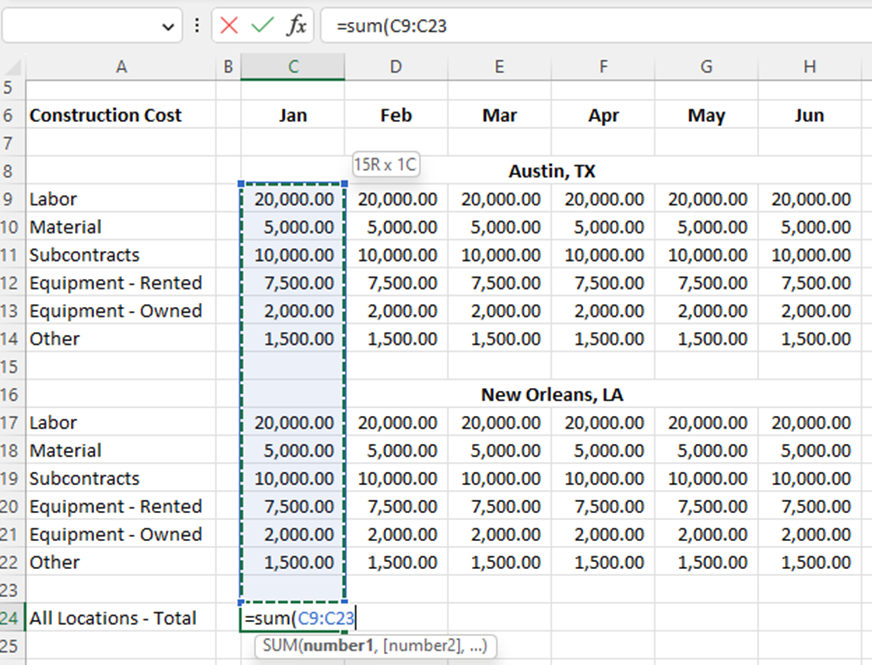 Notice that we don’t get restricted by merged cells and can continue our function for Austin, TX!
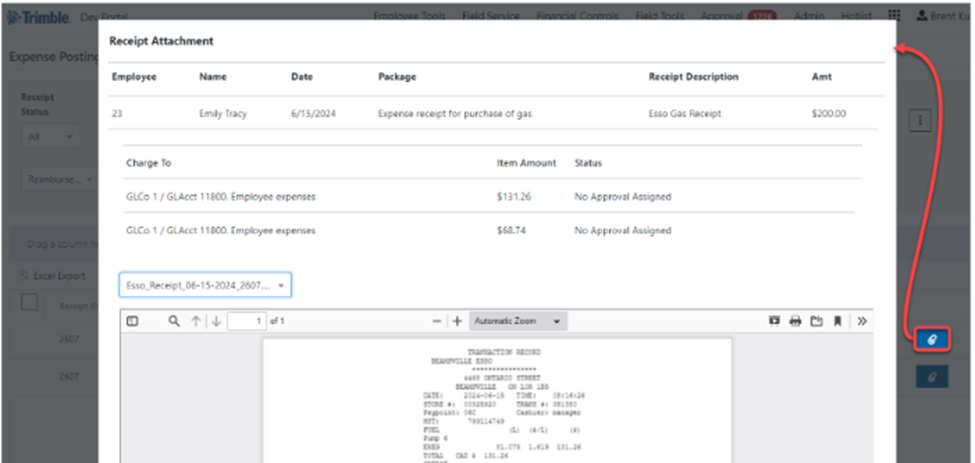
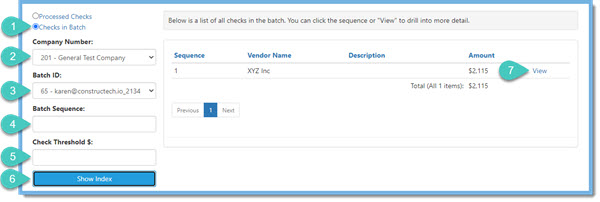 When viewing the detail of the check, it is possible to click through each check (1), it shows the check amount (2), it is possible to click through each invoice (3), review how the invoice was coded (4), review each page of the actual invoice (5), and Reject (6) any check that should not be cut. This will remove the check from the batch and email the batch creator to let them know that it was rejected.
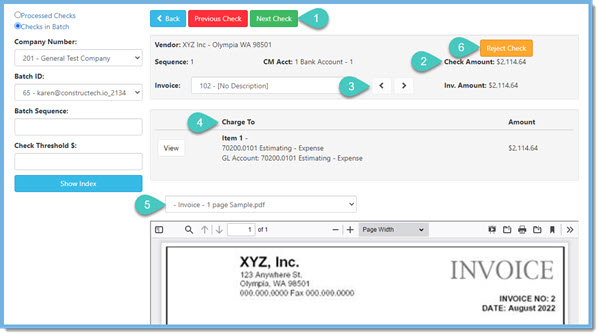 If the reviewer wants to look at checks after they have been processed, select Processed Checks and the parameters can be used to restrict the checks displayed.
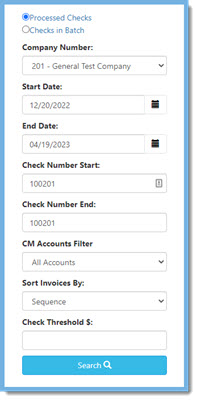 The added feature here is a View button (1) to view the copy of the check and there is an Export PDF button (2) that will download a copy of the check along with the copies of invoices that were paid.
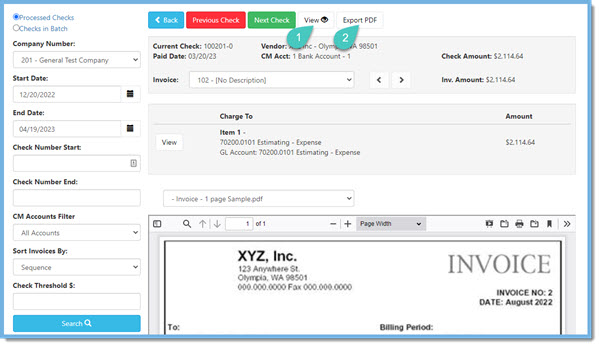
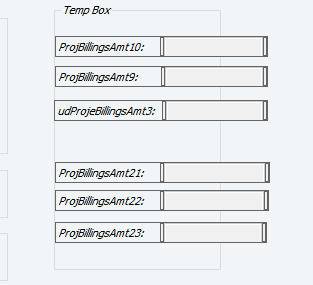
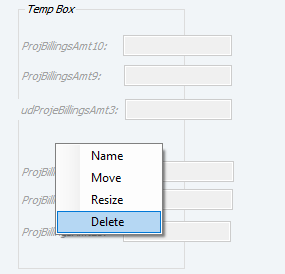
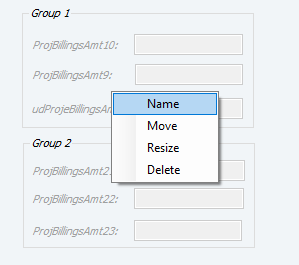
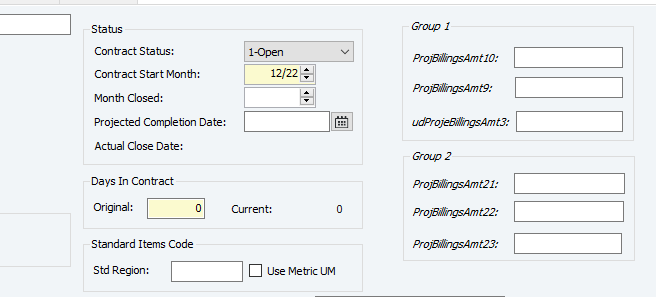
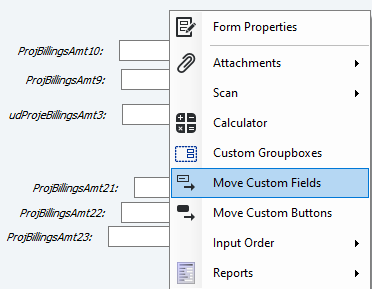 Moving fields around is fairly intuitive and there are red alignment lines that are somewhat helpful if the fields are all together.
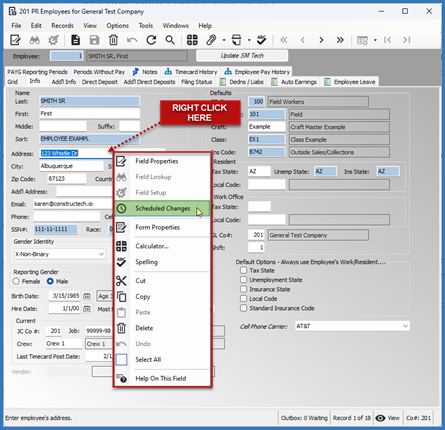
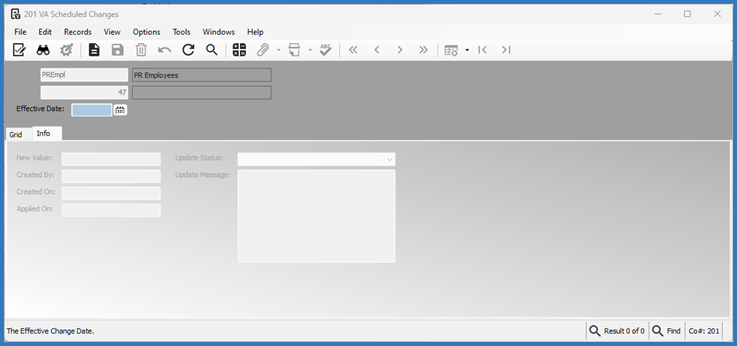 3. Enter the date for changing data in the Effective Date field, or press the Calendar button to select the date from the Calendar window.
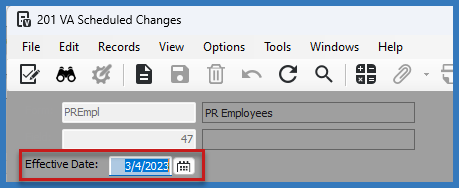
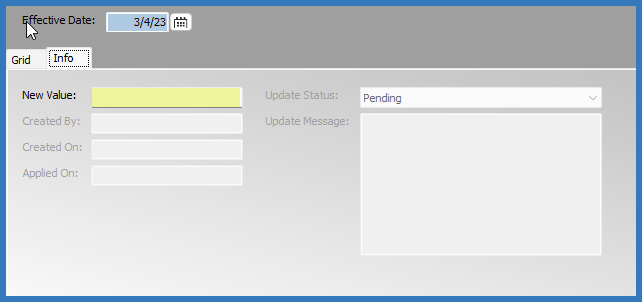 5. Enter the new data in the New Value field.
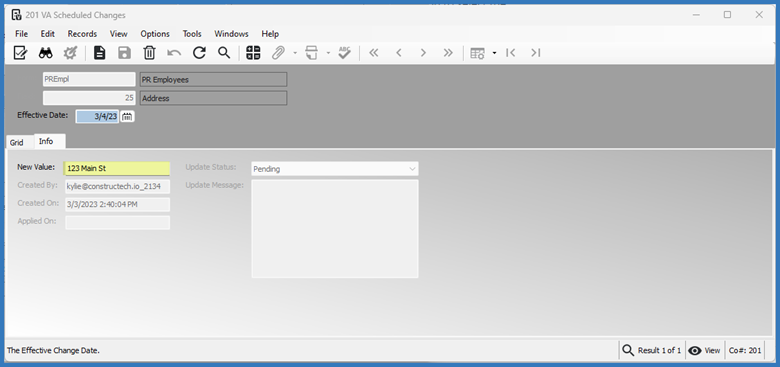 6. Save the record

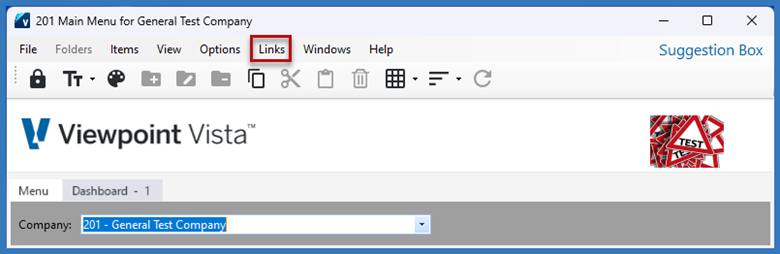
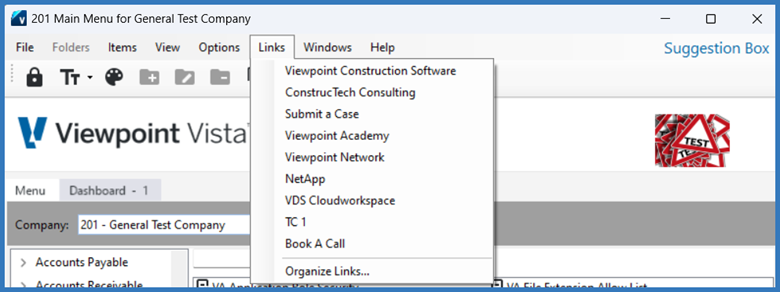
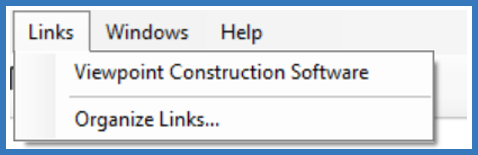 Organize Links provides access to the Organize Links form, where you can add, edit, and delete links.
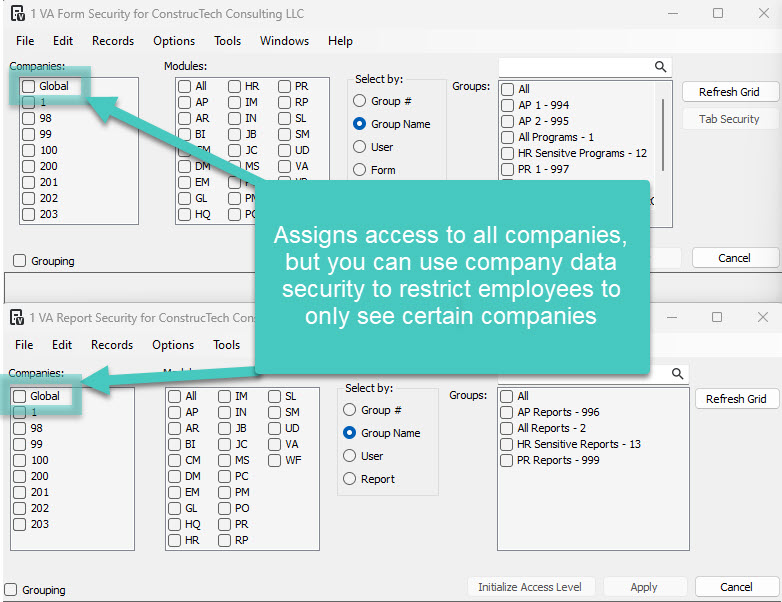
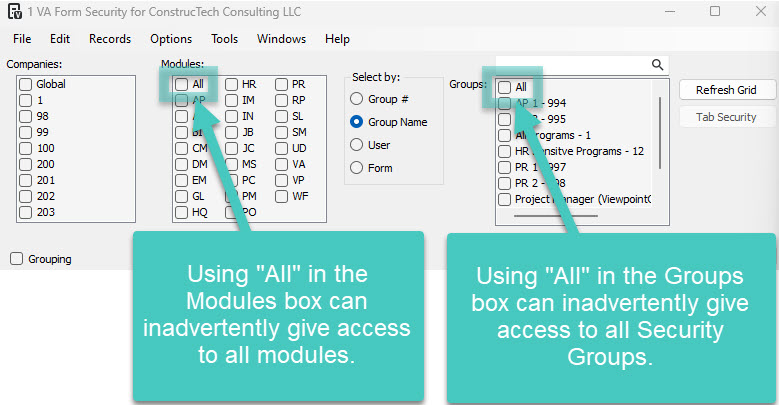
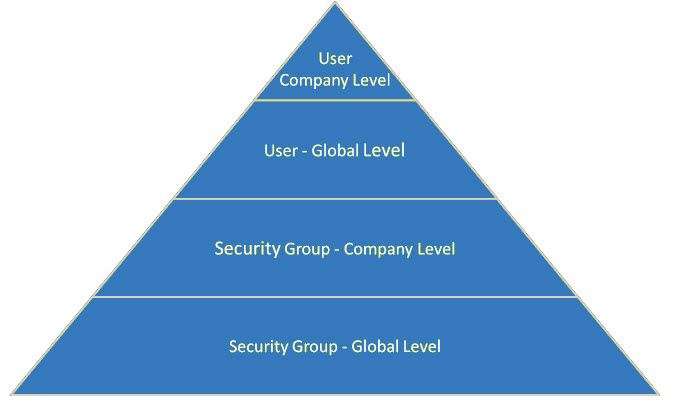 The least restricted setting is a security group with global level security, the next restrictive is a security group with company level security, then a user with global level security, and finally the most restrictive is a user with company level security. If you assign multiple groups, the most restrictive will override the least restrictive. However, when there are two conflicting groups at the same level, it will defer to the lease restricted group.
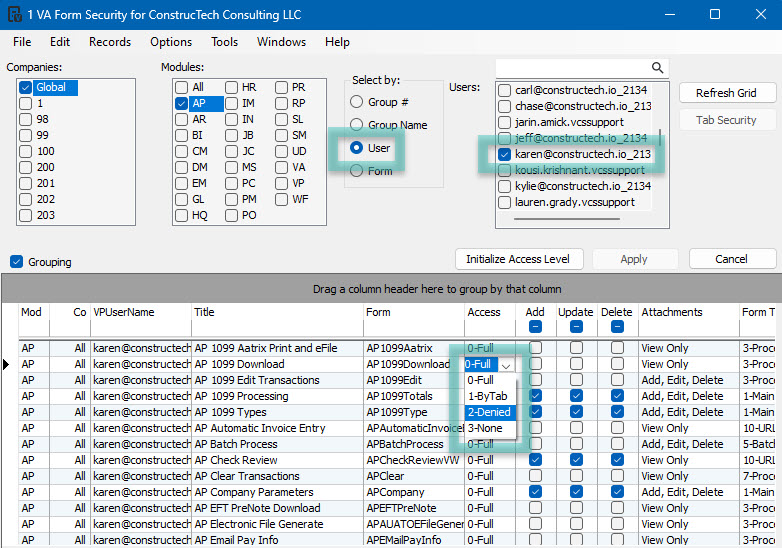 There are several reports in Viewpoint Administration > Reports that will help you to review user and group access. This is be most effective way to audit your users' access.
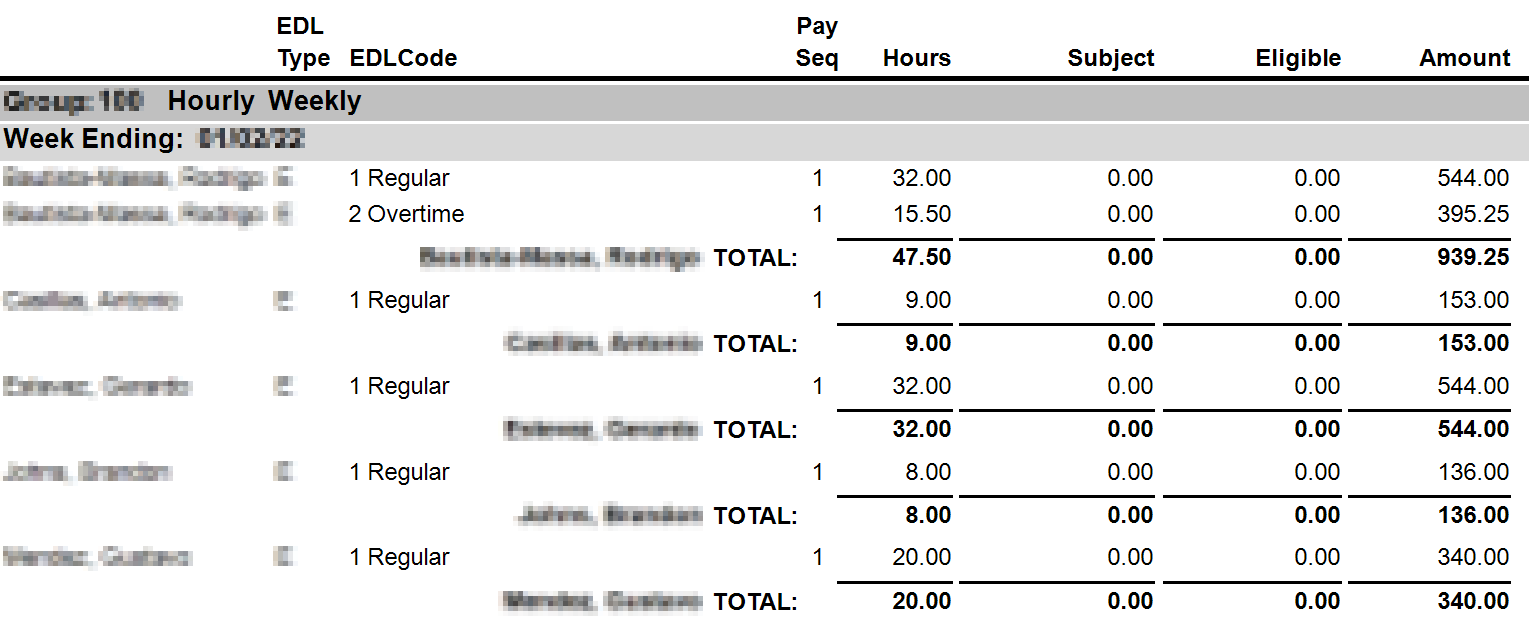

 on the jobsite.

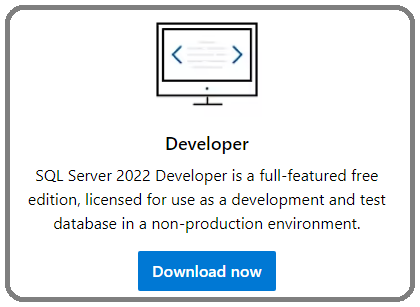 Scroll down a little bit further and also download the latest version of SQL Server Management Studio (SSMS). SSMS is the primary tool used to interact with the database for developers and troubleshooters.

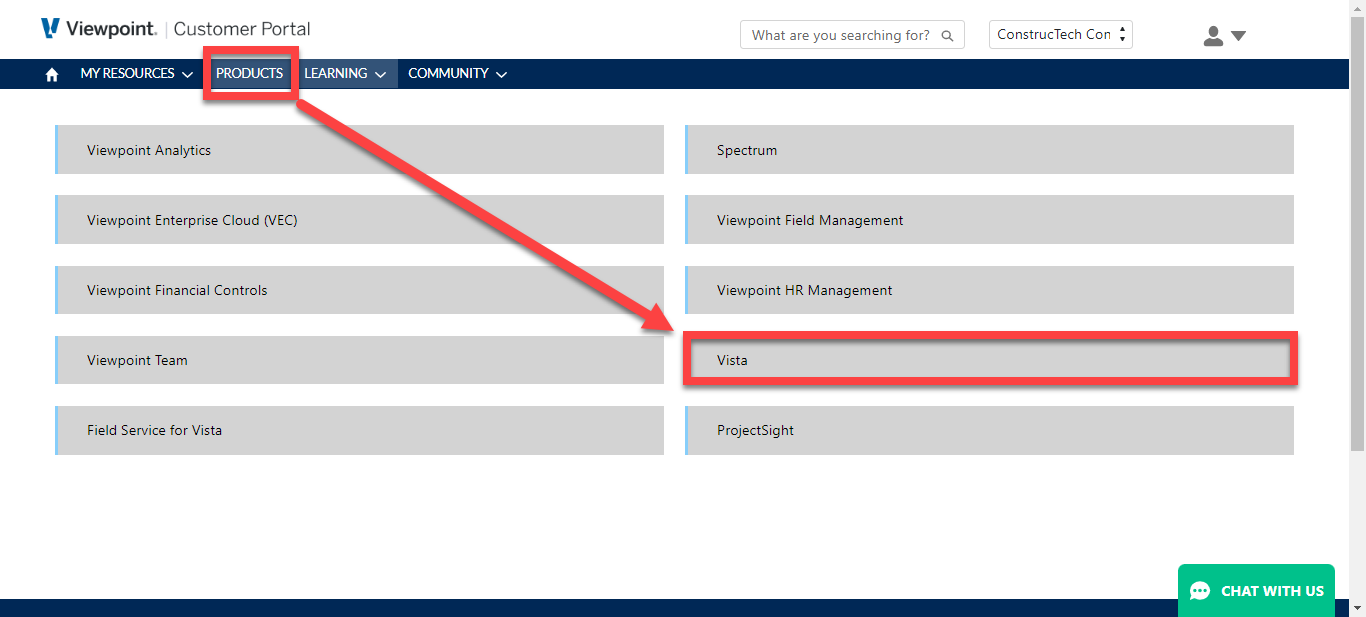 Scroll down to
  Select Conceptual Report Packs – Non-Standard (Custom)
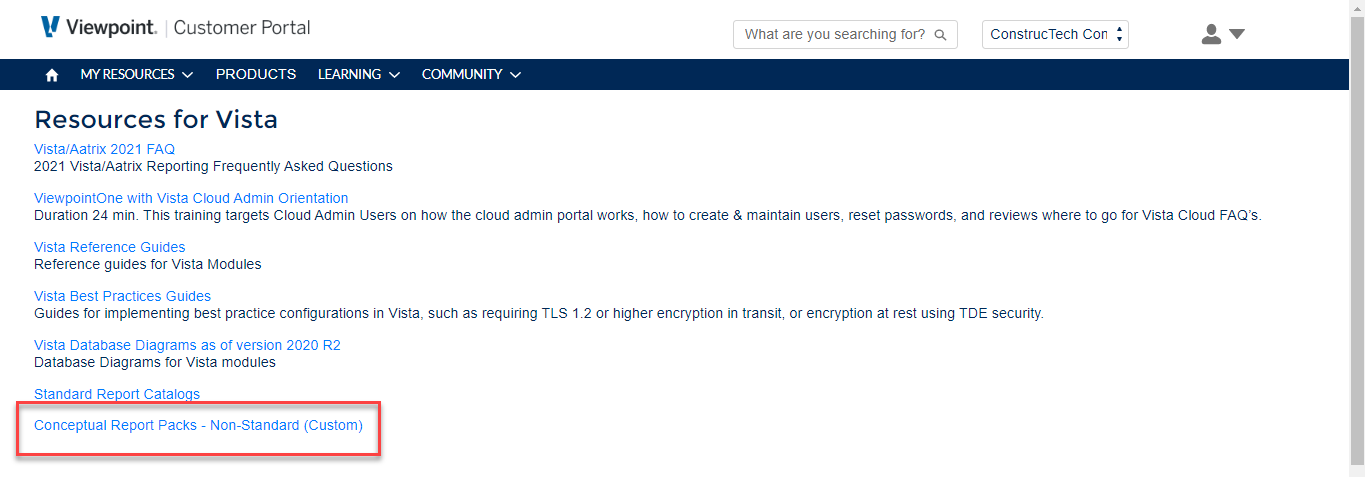
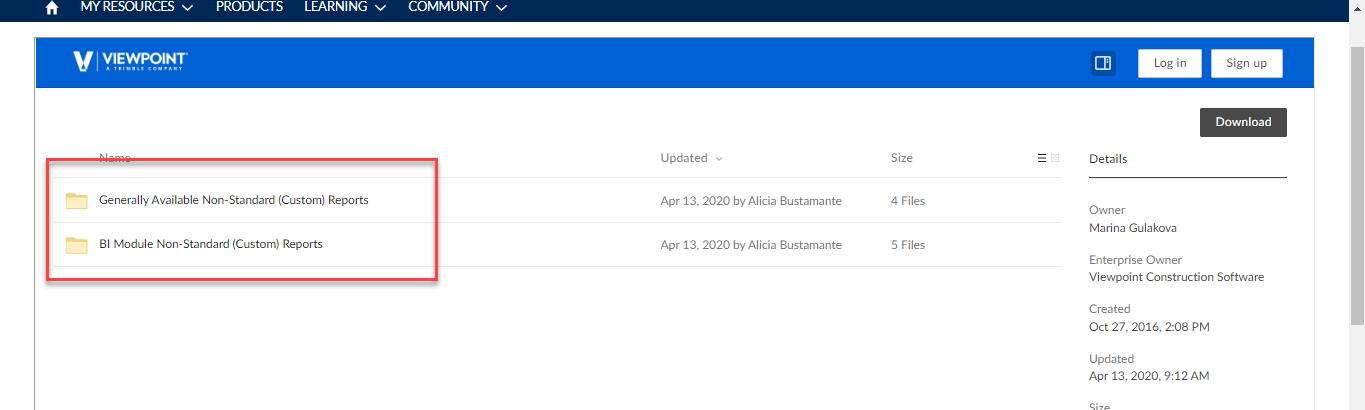
 Generally Available Non-Standard (Custom) Reports (4 Files)
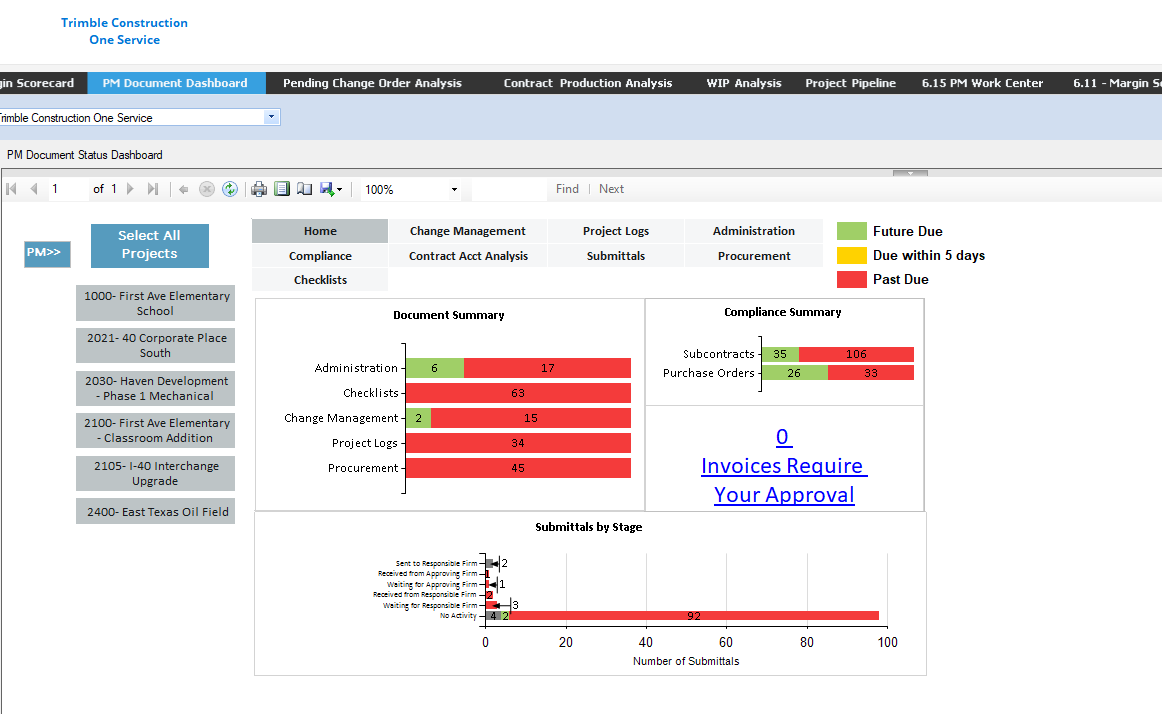 Stay tuned!